OldandWorn
Senior Member
I like that! Good ole field engineering.")


...so we have to pull the top off the brake assembly to get to the snap ring. Aarrgh!


 Problem is, you need a skinny, tripple-jointed arm to reach down the six or so inches to disconnect that pin so we can pull the assembly from the loader

.jpg")
![IMG00134-20110618-0856[1]-1.jpg](https://www.heavyequipmentforums.com/data/attachments/72/72234-20ecae66653f709b751797a65f2c6458.jpg "IMG00134-20110618-0856[1]-1.jpg")
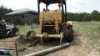
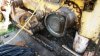
![IMG00135-20110618-0857[1]-1.jpg](https://www.heavyequipmentforums.com/data/attachments/72/72235-83280e983f6953f629fe64e63d29ff6b.jpg "IMG00135-20110618-0857[1]-1.jpg") :notworthy Success at last. Thanks to all your advice and help, we got the final drive out Saturday. Friday, we got the tank assembly off, not without some problems. Whomever put the suncover/ROPS on the Beast welded the ROPS to the deck and in doing so, partially captured two each of the horizontal bolts that hold the tank plate in place. So, it was back to town on Friday to haul the torch and bottles out to the ranch to cut the welds and part of the ROPS plate out of the way so we could get the bolts out. We wound up cutting one of the bolts on the left side out, it was just too much trouble to cut around the ROPS to free it up. We used friend Walt's winch on the front of his Kubota gator to lift the tanks off, worked like a charm.
:notworthy Success at last. Thanks to all your advice and help, we got the final drive out Saturday. Friday, we got the tank assembly off, not without some problems. Whomever put the suncover/ROPS on the Beast welded the ROPS to the deck and in doing so, partially captured two each of the horizontal bolts that hold the tank plate in place. So, it was back to town on Friday to haul the torch and bottles out to the ranch to cut the welds and part of the ROPS plate out of the way so we could get the bolts out. We wound up cutting one of the bolts on the left side out, it was just too much trouble to cut around the ROPS to free it up. We used friend Walt's winch on the front of his Kubota gator to lift the tanks off, worked like a charm.