• Thank you for visiting HeavyEquipmentForums.com! Our objective is to provide industry professionals a place to gather to exchange questions, answers and ideas. We welcome you to register using the "Register" icon at the top of the page. We'd appreciate any help you can offer in spreading the word of our new site. The more members that join, the bigger resource for all to enjoy. Thank you!

Case 580 CK rear differential way overfull why?

Billrog

Senior Member
Joined
Mar 26, 2016
Messages
727
Location
Armstrong, British Columbia
Occupation
band mill , backhoe and dump truck
I have actually had the experience after dropping a valve and managed to get the head on without any disassembling. Can't remember the details but it was heavy and awkward.
 

thepumpguysc

Senior Member
Joined
Mar 18, 2010
Messages
7,539
Location
Sunny South Carolina
Occupation
Master Inj.Pump rebuilder
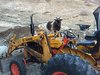
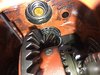
Instead of digging the oring grommets out of the injector cap, snug the cap in a vise and pull and twist on the injector body.. the rubber will slip over the injector.. THEN dig it out. put the cap back in the vise and take a small screw driver or scribe and dig straight down along the side and split it on half..
The orings look like cut up pieces of hose, they're not actual orings, they're short & fat.. LUBE them well, makes for an easy install.
Put on the cap, then work the grommet into the cap, make sure its past the starting threads.. the closer you can get them to the bottom of the cap, the easier the install will be.
There should be a bunch of them in your kit, on account the return line cap takes 2 of them too, the brass cap..
Send me that pump.!!! lol
 

thepumpguysc

Senior Member
Joined
Mar 18, 2010
Messages
7,539
Location
Sunny South Carolina
Occupation
Master Inj.Pump rebuilder
Your supposed to put a LITE coat of anti-seize/never-seize on the injector body before installation also..
They have a habit of freezing to the head after years of heating & cooling, not to mention water & dirt.. as you may have already found out from disassembly.
Send me that pump!! LOL
 

dad2six

Well-Known Member
Joined
Mar 1, 2016
Messages
147
Location
Utah
Well I could not get the dang head studs out that where on the exhaust side. I tried the two nuts approach and ended up trying vice grips. They seem to be stuck in there tight tight. I ended up just ditching the gasket and only used hi temp gasket sealer. Between the timing cover and the head.
I know many automobiles only use gasket sealer nowadays instead of a gasket. So I hope it works.
 

Juskatla

Senior Member
Joined
Dec 12, 2009
Messages
579
Location
Black Creek B.C.
Occupation
Retired
I had my block decked, so the studs all had to come out. I damaged a couple and left a couple for the machine shop to deal with. Some of the holes go right into the water jacket and could be rusted in. I ran a tap through to clean up the threads before using sealer and putting them back in. You will likely be fine with the silicone gasket maker on the end of the head where the water jacket connects to/from the pump. Its only about 4 lbs on the rad cap anyway. I also used a liberal coating of copper gasket spray on my head gasket and torqued to spec. I guess you'll know how yours works out pretty quick.

The Pumpguy's comments about the injector o rings, grommets or whatever they are called are a much better description than my poor attempt. Once you have done one of them, the other three are easy. These are not high pressure and along with those on the return manifold fittings, use these rubber type sealing o rings.
 

dad2six

Well-Known Member
Joined
Mar 1, 2016
Messages
147
Location
Utah
IMG_6450.JPG IMG_6981.JPG IMG_6983.JPG Someone (me) misplaced one of the injector hold down and bolt. I was going to go search the internet for one. But then thought hey! just make a new one with your new toy. My 1960 Cincinnati milling machine I picked up last month.
 

Juskatla

Senior Member
Joined
Dec 12, 2009
Messages
579
Location
Black Creek B.C.
Occupation
Retired
Nice I'd love to have a mill to go with my lathe. Is that a Clausing lathe? With those two machines, you can make tools and other machines. From there, with some experience and time to master the skills, the sky is the limit. I'm stuck with a milling attachment for my lathe but it suits the small bits I make. Anything bigger goes up the road to a local shop. Tools are a lifetime investment and some like my lathe, have lasted at least one lifetime already.
 

dad2six

Well-Known Member
Joined
Mar 1, 2016
Messages
147
Location
Utah
Nice Juskatla you have a lathe too!
Mine is a 1940 Southbend 13" with a 5' bed. I love having the ability to make what I need when I need it. And having a mill is a game changer indeed IMG_6448.JPG
 

Juskatla

Senior Member
Joined
Dec 12, 2009
Messages
579
Location
Black Creek B.C.
Occupation
Retired
I love old machinery. My shop has a lot of tools from my dad, who was a machinist and mechanic. I grew up in the workshop and was taught how to do it right. I don't live anywhere near where there are many good deals on older machinery or I'd have an overfull shop. Its all good...
 

Juskatla

Senior Member
Joined
Dec 12, 2009
Messages
579
Location
Black Creek B.C.
Occupation
Retired
Excellent! Its a great feeling when you have accomplished what you set out to achieve. These old tractors are relatively easy to work on and with the continued support from the experienced 'old' guys here they can be fixed and run for many more years.
 

dad2six

Well-Known Member
Joined
Mar 1, 2016
Messages
147
Location
Utah
Did you guys take off the rocker shafts and retorque the head bolts after running your rebuilt engine after an hour like the manual says to do?

The manual also showes the old style head gasket with separate fire rings.
I was not sure if this retorque is required with the new style head gasket.
 

Juskatla

Senior Member
Joined
Dec 12, 2009
Messages
579
Location
Black Creek B.C.
Occupation
Retired
Sorry for the delay in responding. I still haven't fired mine up but will do the re-torque once its running. I'm not sure its necessary but I have followed the manual for everything so far.
 

dad2six

Well-Known Member
Joined
Mar 1, 2016
Messages
147
Location
Utah
Well I re torqued the head bolts. I'm glad I did. I marked them before I loosened them and They turned around another 1/4 turn.

Drive it out of the garage today and put her to work.
She runs strong now!! Very noticeable difference in the power.
My goats like her too.
 

Attachments

  • IMG_7174.JPG
    IMG_7174.JPG
    2.2 MB · Views: 21

Juskatla

Senior Member
Joined
Dec 12, 2009
Messages
579
Location
Black Creek B.C.
Occupation
Retired
Nice, I don't think it hurt anything to follow the manual and the re-torque is one of those things I don't question, especially after all the work. I just looked at the generic information I got from my machine shop when they sent the engine back, and it specifically mentions re-torqueing the head after run in. I'd hate to end up with a gasket leak, back where I started,
Have to love the goats. They love to stand in top of whatever is around. Neighbours had a pygmy pair and they were a hoot to watch. How many do you have at your place?

Thanks for the update.
 

dad2six

Well-Known Member
Joined
Mar 1, 2016
Messages
147
Location
Utah
Have to love the goats. They love to stand in top of whatever is around. Neighbours had a pygmy pair and they were a hoot to watch. How many do you have at your place?

Thanks for the update.

Just the two. They are fun to watch
 

dad2six

Well-Known Member
Joined
Mar 1, 2016
Messages
147
Location
Utah
Well I think I finally figured out my original issue of the rear end that keeps filling up with hydraulic fluid from the shuttle. Looking through the repair manual the transmission mainshaft needs to have a plug in the end of it. Unless you have a pto shaft sticking into it.
I measured it and found a plug that was the right size. (A camshaft plug off a car) no more leaking all over and full rear end.
The picture is with the plug installed.
 

Attachments

  • IMG_7138.JPG
    IMG_7138.JPG
    1.2 MB · Views: 26
Top