• Thank you for visiting HeavyEquipmentForums.com! Our objective is to provide industry professionals a place to gather to exchange questions, answers and ideas. We welcome you to register using the "Register" icon at the top of the page. We'd appreciate any help you can offer in spreading the word of our new site. The more members that join, the bigger resource for all to enjoy. Thank you!

75/25 or 90/10 for welding loader arm?

Steve Bowman

Well-Known Member
Joined
Jul 12, 2018
Messages
194
Location
Southern Ohio
Occupation
Maintenance
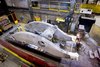
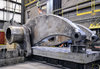
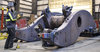
Then I braced the bushings and tweaked them a little to get the shaft to slide freely between them, and started welding.
20190115_195942.jpg
20190115_200008.jpg

I was not having a lot of luck keeping my torch angle right while welding around the bushings, so they lack some cosmetically, but I think they are sound.
20190116_180221.jpg
20190116_180252.jpg


I kept moving the shaft while welding and sort of moving from place to place on the bushings. I did preheat here also like I did on the boom. In the end, I could still slide the shaft between the bushings.

Certainly unconventional, but I think it worked ok. Best of all - on budget!. lol

The fab shop hasn't gotten to my plates yet, so nothing new on the quick attach plate.
 
Last edited:

Welder Dave

Senior Member
Joined
Oct 11, 2014
Messages
12,548
Location
Canada
Reread your post. A $5 or $6 Tempilstick is a way better way to tell what temp the steel is than seeing if water sizzles on it. Although peening wouldn't make much difference in this case, it has to be done when the weld bead is finished but not red hot. Doing it after that weld has cooled a bunch defeats the purpose. I guess the test will be when you start using the loader.
 

StanRUS

Senior Member
Joined
Mar 7, 2016
Messages
767
Location
Cal
I could still slide the shaft between the bushings.

Should work okay if the shaft still slides after all welding. Cat's guys do not peen or pre-heat when welding in pre-finished bushings using a mandrel-alignment shaft.

Only pre-heat required would be to drive out any surface moisture prior to welding; recommended when temps are below 70degs. I see moisture draw out @ 100degs.

Track Roller Frame stress crack repair with post weld annealing immediately after finishing welding.
TRF Recoil Housing Crack Rep.jpg
 

StanRUS

Senior Member
Joined
Mar 7, 2016
Messages
767
Location
Cal
Steve,
How is you Loader Arm project progressing?

Photos of L&H Industrial 'Made in USA' replacement loader arms for the world's largest wheel loaders.
 

Attachments

  • LHI.jpg
    LHI.jpg
    182.8 KB · Views: 49
  • LHI_1.jpg
    LHI_1.jpg
    175.6 KB · Views: 48
  • LHI_2.jpg
    LHI_2.jpg
    131.8 KB · Views: 48

Steve Bowman

Well-Known Member
Joined
Jul 12, 2018
Messages
194
Location
Southern Ohio
Occupation
Maintenance
Nice. Letourneau, I assume. Only saw one of them at the mining show in Vages.

The biggest we had was 992G and D11N. We did frame up rebuilds occasionally. Way back when we purchased the very 1st production D10, but that was before my time. Lol

Anyway, almost finished with the quick attach adapter.


20190209_192204.jpg 20190209_192142.jpg
 

StanRUS

Senior Member
Joined
Mar 7, 2016
Messages
767
Location
Cal
IMO, welding inspector using AWS code guidelines for commercial quality welds (allows XX defects) would have you doing lots of re-work. Weld joining the 2 square tubes together probably resulted will have heavy slag @ the root, that is 1 reason to avoid using square tubing; i.e. the extra cost to correctly perform the welds. Requires using smaller diffuser size (diameter) to keep tip-to-work distance correct. Better to us 1 rectangular tube instead of 2 square tubes IMO.

Steve, keep posting with updates.
 

Steve Bowman

Well-Known Member
Joined
Jul 12, 2018
Messages
194
Location
Southern Ohio
Occupation
Maintenance
Yea, Your right about that for sure. I thought the additional steel in the pair of square tubes would result in a more rigid assembly than a single rectanglular tube. I had not considered the slag in the root. These are 1/4 wall, so the radius is larger than something like a 1/8 wall.

You probably noticed there are several places that the edges of my welds where either slightly undercut, or bulged in the middle. I could have ground them out and re welded, but access is tight for grinding. Or, i could do another pass or two to even things out, but that could cause my brackets to draw. I did get my die grinder out in a few places. I think this is plenty strong for it's intended use, so i just left well enough alone.

If this was for a paying customer, things would likely be different.

Thanks for the interest.
 

Welder Dave

Senior Member
Joined
Oct 11, 2014
Messages
12,548
Location
Canada
I'd be concerned about the welds on the loader arm based on some of the welds I see in your pictures. At the top of the vertical bracket in the 1st pic. of your quick-attach it looks like the weld missed 80% on the one side. Generally Dual-Shield has no problem getting fusion at the edges and leaves a fairly flat bead on fillet welds. Now that I see the size of the loader, the quick attach looks a little overkill. Putting it to work will let you if your welding is sound enough but if your welds wouldn't be good enough for a paying customer, why are they acceptable to you? I'm usually more critical on my own stuff so it looks like I have some idea what I'm doing. Seeing some ropey beads and porosity am wondering if maybe you didn't use enough of a pull angle to keep the slag behind the puddle or maybe the wire stick out wasn't correct?
 

Steve Bowman

Well-Known Member
Joined
Jul 12, 2018
Messages
194
Location
Southern Ohio
Occupation
Maintenance
Seeing some ropey beads and porosity am wondering if maybe you didn't use enough of a pull angle to keep the slag behind the puddle or maybe the wire stick out wasn't correct?

You're right. And in all honestness, that particular weld does stick out to me also as the worst one. Maybe I will fix it.

Probably a combination of things. When I welded the boom, pass after pass where mostly the same, so I was able to keep some consistency. Plus, I did grind out anything that looked iffy.

With this attachment, the weld positions where much more varied. Even though I spent most of the day on it, I guess I got lazy at times with the thought that it is likely overbuilt and just an "attachment". I will agree my stickout and drag angle where not ideal at times. That comes with more practice.


20190209_135639.jpg
 
Last edited:
Top