rangerfreak
Well-Known Member
sry darin made a typo on dozer model number my dozer is actually a d20A-5 is the correct engine 4d95s,cant find the tag plate

I have found when having to remove a lot of topsoil that for me it works best to break it into stages. First is the rough in stage where you get the majority of material off. It is best not to try to push the whole ground but to start on the end you are moving soil towards and than as the soil is moved off, keep moving backwards . This way you are not pushing against greater resistance for a longer way.I'm using a D20 to build a driveway around my shop. There's a lot of dirt to be removed on one side and the problem I'm having is I'll be pushing along, going great, and all of a sudden the blade will nose-dive making a huge gouge. What have I got to do to make it quit this?:Banghead
I think this MIGHT do it. Ran it about six hours today. No problems at all. Other than the dog.
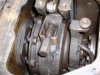
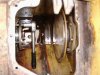
Just wondering if I need to remove the Bevel gear to renew the 2 seals near the steering cases.Both seals are leaking oil from bevel case to steering cases.I was hoping to just remove the steer drum couplings.
Has anybody done this job before?
Thanks,
Jim
") I can't seem to remember to grab the camera when I'm all greasy. A lot of people here do and I think that is GREAT. Take care and good luck.
I can't seem to remember to grab the camera when I'm all greasy. A lot of people here do and I think that is GREAT. Take care and good luck.Hello Jim,
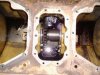
Did you get to the bevel gear seals yet? I think it's all done inside from the steering clutch compartment. You have to take the flange off and then replace seal. Keep us posted and hopefully your better than me and actually take pictures while you work.
Darin
Good luck and keep us posted. What is the weld on your right side clutch area wall?