• Thank you for visiting HeavyEquipmentForums.com! Our objective is to provide industry professionals a place to gather to exchange questions, answers and ideas. We welcome you to register using the "Register" icon at the top of the page. We'd appreciate any help you can offer in spreading the word of our new site. The more members that join, the bigger resource for all to enjoy. Thank you!

Prepping a house site and building a house

Columbo

Senior Member
Joined
Dec 31, 2021
Messages
287
Location
New Hampshire
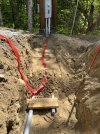
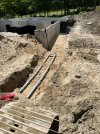
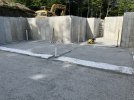
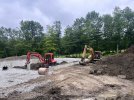
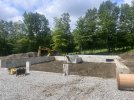
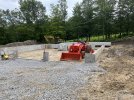
No big updates, I had several interruptions this weekend with sudden downpours and then having to pick my wife up at the airport. Still, I have 3/4 of the footing drains done. Today, I installed the electrical service conduit from the meter pedestal towards the utility room in the basement. When I installed the service conduit from the pole to the pedestal I also buried a conduit for fiber optic internet. This conduit didn’t terminate at the pedestal, I was able to locate it without issue and continue into the new utilities trench towards the house. Looks like a wet week out here but hopefully next weekend I will get the footing drains done and start on the sub-slab plumbing in the basement.

1687737077127.jpeg

1687737145499.jpeg

1687737173680.jpeg

1687737197623.jpeg
 

Columbo

Senior Member
Joined
Dec 31, 2021
Messages
287
Location
New Hampshire
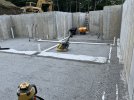
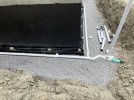
Over the past two days I got the crushed stone spread in the basement-by hand. Certainly not a fun job but there wasn’t any other way. Along with the stone I put in the inside perimeter drain and the wastewater plumbing below the slab. I’ll wait until right before the slab pour to put down the subslab insulation and poly so I don’t create a lake inadvertently.

I was one fitting short to finish the plumbing today, so I asked the wife to get one on her way home. Makes up for times she’s sent me to the store for feminine products… ;)

1688771175794.jpeg

1688771213196.jpeg
 

CM1995

Administrator
Joined
Jan 21, 2007
Messages
13,392
Location
Alabama
Occupation
Running what I brung and taking what I win
Question on the meter base/pedestal - Is that temporary or the permanent service?
 

Columbo

Senior Member
Joined
Dec 31, 2021
Messages
287
Location
New Hampshire
The meter pedestal is permanent, I chose to do it that way initially so that I would have power at the site immediately on starting construction. The plan is to put a barn a couple hundred feet up the lot eventually and this meter has two sockets so one will someday power the barn. As it turns out this was a good plan because, since the house has a wrap around porch, there is no utility approved location to mount the meter to the house.
 

materthegreater

Senior Member
Joined
Jul 25, 2012
Messages
676
Location
VT
Nice work, that's definitely not easy to do, especially by hand.

Did you get affected by the heavy rain the last few days?
 

Columbo

Senior Member
Joined
Dec 31, 2021
Messages
287
Location
New Hampshire
Although we got 5-6” of rain over the past few days the site held up remarkably well. I put in some temporary swales and a bunch of crushed stone on Saturday, I think that helped a lot. No standing water in the basement and all the exterior drainage seems to be working. It’s really muddy though, not sure when I’ll be able to get trucks in there again.

How did you make out with the rain? I think your area was hit worse than us.
 

materthegreater

Senior Member
Joined
Jul 25, 2012
Messages
676
Location
VT
That's good. Hopefully things dry out soon!

We didn't get hit too badly. Roads washed out here and there but not nearly as bad as surrounding towns.
 

Columbo

Senior Member
Joined
Dec 31, 2021
Messages
287
Location
New Hampshire
Good to hear! And yes, I’d like a month of dry weather at this point. The news was saying that my area has had 12”+ of rain over the last month or so.
 

DGODGR

Senior Member
Joined
Dec 18, 2009
Messages
1,064
Location
S/W CO
4” perforated pipe for the footings and then a separate drain for the gutter down spouts. I’ll tie both drains into a single 6” solid pipe leading to daylight. I was planning to use SDR35 pipe but the foundation contractor said he has recently started using SDR20 due to cost and ease of installation. I’ll have to look into that.
Your site and progress looks good. I do this all day, every day, and it is good to see a site with dirt (I am working mostly in solid rock these days). I hope it wasn't too hot when you spread that screened rock in the basement. Here in the southwest high temps and sunny days are a lot worse when down in a basement with no shade.
You may never have a problem with it, but I would have used (2) 4" outlet pipes, instead of a single 6", on your drains. I have not compared 6" SDR to 4" lately, but I guess that (2) 4" may be cheaper than (1) 6". Even if not, my primary thinking on this is not cost motivated anyway. The reason that I prefer to use separate pipes (for foundation drain and roof drain) is becasue of the possibility of clogging. I am aware that it may take a lot to clog a 6" pipe but there will likely be a lot of leaves on that roof someday (it is in NH after all), and it is still possible for a critter to crawl up that pipe, create a nest, and or die, and swell up, etc., even if you put some sort of critter guard on the end. After all, critter guards are not impenetrable, and even if they were, they will probably be much less prone to allow other debris to pass. Regardless, one can imagine how much water will be available from (insert however many square feet) of impermeable roof surface area, that any rainwater may now have nowhere to go, accept around your foundation, or up into your basement, in a significant rainfall event with the ppe being plugged, or even restricted. I'm sure that there may be those that would offer several arguments as to why this may not, or likely would not, happen Yet the fact remains, that running separate 4" pipes would eliminate the possibility of anything other than the water simply rolling off the roof instead of backing up into someplace that would be much more expensive, and inconvenient to repair. I am aware that you are working on this one, singular, house (albeit your house), but I am currently working 18 houses (with 9 or 10 new start ups each year) that would potentialy cause the new residents some serious inconvenience, and cost me a fair amount of money, embarrassment, and a healthy helping of crow, should anything go wrong. For me, the small amount of extra effort is worth every minute of extra sleep I get to enjoy.

I built my own house about 23 years ago. It was my first, and so far only, home build. I recently subdivided my property, and sold that house with some of the land. My memory is still clear about one thing. That is that, even though I had been in the building trades for about 20 years when I started the build, I was ignorant as to everything that goes into a home build. I didn't even know what I didn't know. I found it hard to stay motivated as, even though I did have some subs (concrete, drywall, roofing, HVAC, and I had some help with framing), I did most of the work myself. It's a LOT of work!
Please keep posting. I will enjoy following your progress.
 

Columbo

Senior Member
Joined
Dec 31, 2021
Messages
287
Location
New Hampshire
@DGODGR Thank you very much for the detailed reply and encouragement! With the weather delays and such it’s hard to not look at the amount of work remaining and not feel a little discouraged at times.

You brought up good points about the combined gutter and perimeter drain pipe. I already had some concerns about the pipe and the possibility of a clog backing up the water into the perimeter drains; I was more concerned about ice or snow plugging the pipe. It isn’t too late for me to run a separate drain line for the gutters alone, since those drain pipes are at a higher elevation I have more options for the discharge pipe location. I’d like to hear feedback or opinions from anyone else on this please.

Thanks again, DGODGR!
 

Columbo

Senior Member
Joined
Dec 31, 2021
Messages
287
Location
New Hampshire
So the wet weather has continued, today was sunny but the ground is completely saturated. Tomorrow is forecast for another 1-2” of rain…

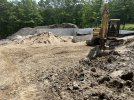
My brother owns a landscape company and currently is working on a stonework job down the street from where I’m building. He was able to bring his mini excavator up today and together we got the garage filled in. It was much easier to have him move the material around inside the garage as I loaded it in from the outside. House walls are half backfilled and so I’ll stop there until the floor framing is in.

The basement floor is scheduled for 7/28, in the meantime I am going to set the 10 precast porch piers. Im also thinking about starting the granite retaining wall behind the house and garage.
1689470126718.jpeg

1689470155709.jpeg

1689470177369.jpeg
 

CM1995

Administrator
Joined
Jan 21, 2007
Messages
13,392
Location
Alabama
Occupation
Running what I brung and taking what I win
Always enjoy seeing how things are done differently across the country.

This is a great example. Until I joined HEF I had never seen roof drains tied into the foundation drains. Here the foundation drains are their own system installed the same way and drained to daylight. Roof drains are ran at the surface 6-18" below finished grade to daylight. I guess the difference is we don't have a real frost depth to deal with?
 

Columbo

Senior Member
Joined
Dec 31, 2021
Messages
287
Location
New Hampshire
@CM1995 yeah we definitely have frost to worry about here. My plan was to run the gutter drains at about 3 feet below grade (about where I stopped backfilling the walls). The frost line here is considered 42”, the post piers I am installing are 5’.
 

Columbo

Senior Member
Joined
Dec 31, 2021
Messages
287
Location
New Hampshire
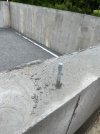
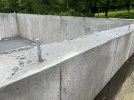
Here’s another “regional difference” I’d be curious to hear people’s experience with. The concrete contractor poured the walls to a mark inside the forms rather than to the top of the forms. I’m told this is something many concrete companies started doing recently; I’ve never seen this done on any of the houses I’ve built or worked on previously. How are the tops of the walls finished in your area?

The benefit of this practice, as far as I can see, is that you can adjust the wall heights for level. The downside is that the resulting top surface is very irregular. There’s no way I would have built on it as-is and had anything close to air sealed or flat. Today I spent an hour or two with a diamond cup wheel and an angle grinder, now the surface is uniform and all the high spots are gone.

1689543980492.jpeg

1689544008402.jpeg
 

DGODGR

Senior Member
Joined
Dec 18, 2009
Messages
1,064
Location
S/W CO
Here’s another “regional difference” I’d be curious to hear people’s experience with. The concrete contractor poured the walls to a mark inside the forms rather than to the top of the forms. I’m told this is something many concrete companies started doing recently; I’ve never seen this done on any of the houses I’ve built or worked on previously. How are the tops of the walls finished in your area?

The benefit of this practice, as far as I can see, is that you can adjust the wall heights for level. The downside is that the resulting top surface is very irregular. There’s no way I would have built on it as-is and had anything close to air sealed or flat. Today I spent an hour or two with a diamond cup wheel and an angle grinder, now the surface is uniform and all the high spots are gone.

View attachment 290210

View attachment 290211
This is a common practice where I'm at. Each form system has different size pannels and they don't oftem match the required height called out in the plans. The caviete to this is that what I usually see is the concrete contractor will install a furring strip in the form at the desired top of wall. This creates a bevel (much better for concrete as opposed to a sharp 90 like what you have pictured -they are prone to breakage), and also clearly defines the target grade for TOW that can easily be followed during the chaos that is the pour. The CC will also do a much better job of finishing the top though many often suck at this (which is one of the things that make one CC better than another CC). Here the CC usually comes back to grind it level if they didn't finish it that way. Based on wht I see in your photo, your CC didn't have any thing inside the form to use as an indicator of top of wall. That makes me think that the least of your worries was the little bits of slag that I see. I'm imagining a lot of work to make it level enough for framing, and this has me also wondering if your walls are square and plumb as well. I know that you said you helped the CC lay out the footings, but that doesn't mean that the CC laid out again when setting up walls vs. just measuring off of footing edges to locate the stemwalls. Have you checked to see if they put the walls where they need to be yet? Did they have any blow outs? I'm crossing my fingers for you.
 

Columbo

Senior Member
Joined
Dec 31, 2021
Messages
287
Location
New Hampshire
This is a common practice where I'm at. Each form system has different size pannels and they don't oftem match the required height called out in the plans. The caviete to this is that what I usually see is the concrete contractor will install a furring strip in the form at the desired top of wall. This creates a bevel (much better for concrete as opposed to a sharp 90 like what you have pictured -they are prone to breakage), and also clearly defines the target grade for TOW that can easily be followed during the chaos that is the pour. The CC will also do a much better job of finishing the top though many often suck at this (which is one of the things that make one CC better than another CC). Here the CC usually comes back to grind it level if they didn't finish it that way. Based on wht I see in your photo, your CC didn't have any thing inside the form to use as an indicator of top of wall. That makes me think that the least of your worries was the little bits of slag that I see. I'm imagining a lot of work to make it level enough for framing, and this has me also wondering if your walls are square and plumb as well. I know that you said you helped the CC lay out the footings, but that doesn't mean that the CC laid out again when setting up walls vs. just measuring off of footing edges to locate the stemwalls. Have you checked to see if they put the walls where they need to be yet? Did they have any blow outs? I'm crossing my fingers for you.
No blowouts, fortunately. Dimensionally it also looks correct, tomorrow I’ll know for sure because I’ll be doing the plate layout. I do know it’s not perfectly square, I had about a 1” difference in diagonal measurements when I checked it immediately after they stripped the forms. So…. We will see….
 

CM1995

Administrator
Joined
Jan 21, 2007
Messages
13,392
Location
Alabama
Occupation
Running what I brung and taking what I win
Here’s another “regional difference” I’d be curious to hear people’s experience with. The concrete contractor poured the walls to a mark inside the forms rather than to the top of the forms. I’m told this is something many concrete companies started doing recently; I’ve never seen this done on any of the houses I’ve built or worked on previously. How are the tops of the walls finished in your area?

The benefit of this practice, as far as I can see, is that you can adjust the wall heights for level. The downside is that the resulting top surface is very irregular. There’s no way I would have built on it as-is and had anything close to air sealed or flat. Today I spent an hour or two with a diamond cup wheel and an angle grinder, now the surface is uniform and all the high spots are gone.

View attachment 290210

View attachment 290211

That's standard practice here on the walls I've had poured. Usually the basements are all walkouts with staggered walls following the grade down to the rear basement level. The poured wall crews will use whatever forms they have to run wild on the top then shoot the TOW elevation with a laser. They'll shoot every foot or 2 and finish with a hand float.

Not picking but the top of that wall is a little rough, nothing you haven't already taken care of.

Have you checked level?
 

Columbo

Senior Member
Joined
Dec 31, 2021
Messages
287
Location
New Hampshire
I checked level today with the laser as I went over the walls with the grinder. Most was fine, +\- an 1/8” after I hit it with the grinder. I have one low spot of a 1/4 to 3/8” which I’ll have to shim. I’m planning to mix up a batch of non shrink grout to pack under the mud sill in that area before tightening the anchor bolts to level it.
 

CM1995

Administrator
Joined
Jan 21, 2007
Messages
13,392
Location
Alabama
Occupation
Running what I brung and taking what I win
That's pretty level. One trick I've seen used for low spots is place some large washers around the anchor bolt in the low area to bring the sill up level then non-shrink grout to fill the gaps and support the plate.
 

Columbo

Senior Member
Joined
Dec 31, 2021
Messages
287
Location
New Hampshire
That's pretty level. One trick I've seen used for low spots is place some large washers around the anchor bolt in the low area to bring the sill up level then non-shrink grout to fill the gaps and support the plate.
I like that idea too, thanks!
 
Top