• Thank you for visiting HeavyEquipmentForums.com! Our objective is to provide industry professionals a place to gather to exchange questions, answers and ideas. We welcome you to register using the "Register" icon at the top of the page. We'd appreciate any help you can offer in spreading the word of our new site. The more members that join, the bigger resource for all to enjoy. Thank you!

Fiat 70CI. Repairs, modifications and stories.

nutwood

Well-Known Member
Joined
Apr 28, 2012
Messages
134
Location
Tasmania
Phil_C, Iam not sure that the 70ci had a wet master clutch, nutwood will be able to verify.
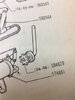
Our AT7C had an oil clutch which we were able to remove through the opening above the clutch.
We also removed the flywheel through the same opening to replace the starter ring gear.
I think you're correct. A look at the South Burnett web site brought up this:
"In the late 1960’s the 70CI models in Australia had a name change to AT7 (Angle Tilt). Apart from the upgraded track rollers and grease pump up and track adjusters as against spanner adjustment on the 70CI, and better sealing of final drives and as well as oil type master clutch on the later AT7’s there were not many other changes."
 

Phil_C

Active Member
Joined
Nov 27, 2018
Messages
44
Location
Australia
Fiat 1.jpg Fiat 2.jpg Fiat Clutch.jpg

Hello All
Above are the pictures of the dozer. There are guards over the track adjusters but they do appear to have an access hole for a grease gun so I assume they are hydraulic. It also has an angle and tilt blade so I am guessing it is a AT7 model although the model plate has 70CI 56497 604 but who knows if the firewall is original.
In the third picture of the clutch area that is in partial disassembly, we need to get part 2 out which slides back and forth on a splined shaft but is too long to fit out through the gap. Do we need to remove the housing that is noted as part 1 or is there another way to get the clutch out?

Regards

Phil
 
Last edited:

nutwood

Well-Known Member
Joined
Apr 28, 2012
Messages
134
Location
Tasmania
I can't help with this one. Hopefully some one else will be able to, but however it resolves, please post the solution to help the next person in the same dilemma.
 

Queenslander

Senior Member
Joined
Apr 5, 2009
Messages
1,250
Location
Australia
You definitely have an AT7C Phil.
It’s been over 30 years since we had our clutch out, but the spacer and clutch both come that opening, no need to remove the housing.
The toothed ring is for adjustment, may have to back it right off.
I do remember it as being a straightforward job and not encountering any major hassles.
Give Rick at GW tractors a call, he will be only too happy to copy some pages or offer advice.
 

Phil_C

Active Member
Joined
Nov 27, 2018
Messages
44
Location
Australia
I had another look at the machine today and on the fan side of the bell housing on both the left and right side of the engine are two access holes. I am thinking that we need to get to some bolts on the flywheel through one of these holes. My brother is going to ring GW tractors tomorrow and see if he can get some advice.

Thanks for the help.
 

Trackerman

Member
Joined
Feb 13, 2021
Messages
5
Location
Canberra
Hi all,
Cousin has a Fiat 70CI on plate but AT7 on the paintwork. Dozer pushes ok cold but once warm loses drive from the master clutch. Have a photo of the clutch with the covers off. We put a adjustment tool in the hole at the back to adjust the clutch. The tool would only turn the ring gear about 1/4 inch and then jams. The movement is quite free through that range. We suspect it is jamming. You can see two bolts in the first image. One on the side I think locks the tool in, is that correct? Second one on the back, we don’t know what it is for. Does it lock the adjusting ring gear?
Second picture is looking into the hole that the special tool engages. There doesn’t appear to be a receptacle for the dowel pin on the tool, nor is there a spring that pushes in that the manual describes.

Folks are we doing something wrong here? Appreciate any help advice please.

cheers
Paul Mack
 

Attachments

  • 371B2B59-0838-4E6F-A7F5-C4678E9DA2EA.jpeg
    371B2B59-0838-4E6F-A7F5-C4678E9DA2EA.jpeg
    217.4 KB · Views: 32
  • 5F240CF2-862B-4857-970C-0244DEAAB634.jpeg
    5F240CF2-862B-4857-970C-0244DEAAB634.jpeg
    121.6 KB · Views: 27
  • AB7BF5CA-E211-408C-B923-D11FC4CDDC62.jpeg
    AB7BF5CA-E211-408C-B923-D11FC4CDDC62.jpeg
    93.4 KB · Views: 23
  • 9007FE0D-2D70-469F-8878-DDF62BE66F45.jpeg
    9007FE0D-2D70-469F-8878-DDF62BE66F45.jpeg
    65.1 KB · Views: 23

Trackerman

Member
Joined
Feb 13, 2021
Messages
5
Location
Canberra
To follow up on my post here is a photo of the makers plate.

Paul Mack[/QUOTE]
 

Attachments

  • CB67345D-DC94-4604-AEB0-86B0DD44BA5C.jpeg
    CB67345D-DC94-4604-AEB0-86B0DD44BA5C.jpeg
    192.1 KB · Views: 14

Queenslander

Senior Member
Joined
Apr 5, 2009
Messages
1,250
Location
Australia
It’s been many years since we owned an AT7C, but from memory on our tractor at least, after inserting the tool you had to press it inwards against a spring loaded detent to release the locking mechanism.
Note the hole on the handle of the tool to attach a cord so as not to lose it down in the bowels of the machine.
 

Trackerman

Member
Joined
Feb 13, 2021
Messages
5
Location
Canberra
It’s been many years since we owned an AT7C, but from memory on our tractor at least, after inserting the tool you had to press it inwards against a spring loaded detent to release the locking mechanism.
Note the hole on the handle of the tool to attach a cord so as not to lose it down in the bowels of the machine.

Queenslander,
Thank you for the reply. Yes what you describe is our understanding as well and accords with the maintenance manual. My cousin had another look today and found the spring but in a different position to that in the photo above. Our understanding is there are three holes on the back of the clutch cover and the spring lock has been aligned with the incorrect hole. Hence why we couldn’t adjust the clutch with the tool.
 

Queenslander

Senior Member
Joined
Apr 5, 2009
Messages
1,250
Location
Australia
So you were able to adjust it in the end?
My recollection is that it was a fairly easy job.. the worst part was gaining access because the batteries had been relocated over the cover and had to be removed first.
 

Trackerman

Member
Joined
Feb 13, 2021
Messages
5
Location
Canberra
So you were able to adjust it in the end?
My recollection is that it was a fairly easy job.. the worst part was gaining access because the batteries had been relocated over the cover and had to be removed first.
No mate because the spring lock isn’t aligned with the hole the tool goes into. It appears the clutch was replaced at sometime and incorrectly assembled
 

Trackerman

Member
Joined
Feb 13, 2021
Messages
5
Location
Canberra
Success! We adjusted the clutch with two screw drivers. One bloke on the right keeping pressure on the spring and disc while the other moved the ring clockwise 17 teeth. A quick check and the clutch lever throws over now and locks in and needs 20 kg of force to disengage. Dozer went really well after the adjustment and pushed and ripped all day. Cousin is a very happy camper.
 

TMitchell

Member
Joined
Nov 5, 2021
Messages
17
Location
Southern Downs, Queensland, Australia
Occupation
Dog trapper and sheep breeder
Hey fellas,

New to this forum, and thought it would be a great place to search for tips and info. I have been reading through these pages trying to find some advice on how to adjust the brakes on a 70ci. Steering clutches working fine, as in they are good for slight turn adjustments, and the dozer stops when they are used together. Right brake is ok in forward motion, left is horrible. Seems like it bottoms out before engaging. In reverse, they both work great. Does this sound strange? I haven't checked yet but suspect that the brakes are inside the two plates on the back of the vehicle. Does anybody here know how to adjust them?
Cheers,
Ted.
 

Queenslander

Senior Member
Joined
Apr 5, 2009
Messages
1,250
Location
Australia
As I’ve mentioned above, it’s been many years since I’ve been near one of these.
But the brakes are easy to adjust.
You need to remove the odd shaped plates on top of the steering clutch housing….just behind where your heels would rest on the floor.
Screw up the nut under there until the pedal comes up to around 2 inches free play.
These old girls have a dry back end, at least it should be dry, and brake linings and clutch plates only have a limited lifetime.
 

TMitchell

Member
Joined
Nov 5, 2021
Messages
17
Location
Southern Downs, Queensland, Australia
Occupation
Dog trapper and sheep breeder
Hi Queenslander,
I finally got up the back to the old girl (very wet with over 300mm of rain since I posted here) and took the plate off. This is the plate directly under where the brake lever pivots on the spline. It has a 1 1/4" nut, which I managed to get a socket on using a breaker bar, and it won't shift.
I didn't try an extension on the bar, as I didn't want to bugger something. Fair bit of grease in there. Do you think that it may need some extra grunt, as in a piece of pipe over the end of the bar? Would that hurt? It is a long nut, as in twice the length of what would seem normal.
Thanks,
Ted.
 

Queenslander

Senior Member
Joined
Apr 5, 2009
Messages
1,250
Location
Australia
Sounds like you have the right nut.
Try backing it off to see if it moves freely that way.
Unfortunately, it may be that the band is so worn that it has run out of adjustment.
Either South Burnett Tractor Parts near Kingaroy or GW Tractors at Slacks CK. would likely have a sevice service manual for sale.
 
Top