• Thank you for visiting HeavyEquipmentForums.com! Our objective is to provide industry professionals a place to gather to exchange questions, answers and ideas. We welcome you to register using the "Register" icon at the top of the page. We'd appreciate any help you can offer in spreading the word of our new site. The more members that join, the bigger resource for all to enjoy. Thank you!

Bucket Cylinder removal

rumblecloud

Well-Known Member
Joined
May 6, 2012
Messages
188
Location
Michigan
Occupation
Living the dream...:]
Very soon I am going to have to remove and re-seal the bucket cylinder on my '97 555E. I've read a lot of the posts on cylinder repair and have sourced this seal kit through Reliable Aftermarket Parts. My questions/concerns are:

1. How much does this darn thing weigh? (I assume I am going to have to remove it to make the repair)
2. Is there a preferred position to have the hoe and bucket in so as not to kill myself

Plus in some of the posts I've read that the nut on the end of the rod is torqued to an ungodly high value, making it near impossible to remove --but I am not sure if what i read about was the same nut.

Any tips or things to watch out for would be greatly appreciated.

Thank you in advance.
R
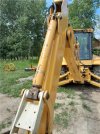
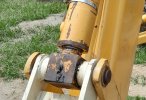
bucket cylinder.jpg
 

joe--h

Senior Member
Joined
Jul 22, 2009
Messages
1,259
Location
Utah
Leave it on the machine, lay the boom out and block it up to a comfortable height. I prefer a little below waist height so you can reef on the gland to get it apart.

Curl the bucket so ram is mostly out of the cylinder. Once you get the gland out, unpin the ram and it will slide out. Big mess, fluid comes out too, lots of it.

Block the cylinder up out of your way, secure with chain or straps so it doesn't come loose and down on you, it's heavy.

Now put the pin back through the ram to keep it from turning while you undo whatever holds the piston on. Put wood blocks under the ram to support it. At this point the ram is laying on top of the boom just where it was in your picture, but without the cylinder. Does that make sense?

Lots of wood blocking is handy, strap the blocks to the boom so they don't squirt out.

Worst case take ram to a shop and get the bolt/nut/whatever out. Heat and long bars are you friend.

Joe H
 

Swetz

Senior Member
Joined
Oct 31, 2019
Messages
1,375
Location
NJ/PA
Occupation
Electric & Gas Company
Joe--h hit the nail on the head. A couple of points to drive home...

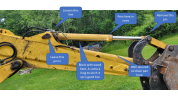
The gland nut is going to be TIGHT. Don't be afraid to whack the end of the barrel where the threads are on the inside of the tube, with a BFH. This usually will allow it to turn. FYI, I usually pein in rows. I did not do the one in the pic, but it too worked.

1687518251898.png

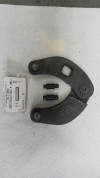
Plan on using a gland nut wrench with a 3/4" breaker bar, and a pipe. This is best achieved with 2 people. Some use a 4' pipe wrench and a pipe. This does make a bit of a mess of the gland nut tho.
1687518146442.png

Loosen the hydraulic hose that feeds the back or blind side of the ram. Without doing this, the rod will not come out.


1687518889430.png
 

Swetz

Senior Member
Joined
Oct 31, 2019
Messages
1,375
Location
NJ/PA
Occupation
Electric & Gas Company
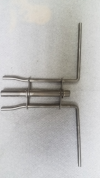
A u-cup seal installer is a nice tool to have. Ebay sells them in a set of 3 for like $30.

1687519250019.png


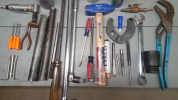
A pick set is nice to have as well. Harbor freight has them for like $2. My go to cylinder tools below.

1687519352560.png
 

rumblecloud

Well-Known Member
Joined
May 6, 2012
Messages
188
Location
Michigan
Occupation
Living the dream...:]
You guys are great!! This is exactly what I needed.

@joe--h Thanks. yes I understood everything you mentioned -- thank you. There is a local shop that rebuilds cylinders. They do good work and are not too expensive. I would really like to attempt to do this myself. I've seen others here on the forum do it in the middle of the woods with less tools than I have, so I should be able to tackle it. Most of my tools are automotive based, so I'll need to upgrade a few.

@Swetz Looks like you have answered this question a few times already :)
Thanks for taking the time for all the pics and tools. The step-by-step is very helpful. I definitely need the gland wrench and the seal installer. The tools image is great reference. I have a 3-foot pipe wrench, but I'll need the 3/4 breaker.
What's the paint marker used for?

Anyway, thanks again to you both for the responses. Not sure when I will get to this, but it is leaking pretty bad when in use. In the position shown in the above image, It doesn't leak but a drop every few minutes. I will repost with images when I decide to jump into it.
 

Swetz

Senior Member
Joined
Oct 31, 2019
Messages
1,375
Location
NJ/PA
Occupation
Electric & Gas Company
What's the paint marker used for?
I have used the paint marker to mark the bolt head in relation to the piston, and piston to the rod. I do not have a torque wrench that goes that high, so I make it as tight as it was.

Recently, I purchased a 1" drive impact gun that blasts them off and on. I feel comfortable that they are tight with this gun. It is an IR. I have herd others sat the Harbor freight works, but others say no go. I think it is more about the size of the hose and volume of the compressor, honestly. You need a 2 stage compressor and a 1" hose for the correct air volume. A socket with a breaker bar and a pipe will work as well tho.
 

aighead

Senior Member
Joined
Apr 25, 2019
Messages
2,567
Location
Dayton, OH
I didn't see the process for removal of glands on mine that just came back from the shop but the guy said they were seized on pretty good, basically rusted together. Now, I didn't pay attention prior to sending them off but I did noticed on their way back that the holes, on mine, that the gland wrench go into, got stretched a bit... When all else fails my instinct is a longer pipe, but I've never attempted this before.

Also, I helped pull the boom cylinder and the secondary boom cylinder (both can be seen in my avatar over there <---) and they were both, definitely 2 man lifts. We ran an iron pipe through each pin hole and it made it much easier to carry. Easily a couple hundred pounds each.

Also again! I don't know how much it helped or if it helped but it was suggested to hose down the pins with wd40 or an equivalent a few times to loosen them up a bit. Other than some work swinging the BFH and holding an iron pipe in place they came out nicely. There may be a spot, when you set the bucket down that loosens the force put on that pin, so it's not bound by the weight of the boom. I can't think of how the physics works on that so it may not be possible. It would suck to pop that pin out and things come crashing down on you. We blocked from the ground to the main boom pivot as well, so that may allow for a little bucket pin play...

Excellent description Joe and Swetz, thanks guys!
 
Last edited:

rumblecloud

Well-Known Member
Joined
May 6, 2012
Messages
188
Location
Michigan
Occupation
Living the dream...:]
Looks like the weight of this particular cylinder is in the 140 lb. range -- according to messicks shipping weight. I've already been hitting the pins and associated attaching points with penetrating oils. There are a few pipe wrench teeth marks on the base plate so this will not be the first rodeo for this cylinder. Pin holes don't look too bad...
base plate.jpg

Removing the bucket pin is not something I'm looking forward to. I'll be extra careful when I get to that point. Thanks for the heads up.

R
 

rumblecloud

Well-Known Member
Joined
May 6, 2012
Messages
188
Location
Michigan
Occupation
Living the dream...:]
Well, I'm gearing up for this. Ordered the seal kit, gland wrench and seal installer this AM. Been looking at the cylinder and re-reading what you guys have posted -- going thru the steps in my head. I really do get it now.
I might take a few practice swings at the base plate with the pipe wrench just to get the feel of it. It isn't like I'm gonna scar it up it any further than what it is already. I have an eight foot metal fence post for added leverage that I've used before.

Looking forward to it...film at 11 :p
 

edgephoto

Senior Member
Joined
Aug 13, 2019
Messages
734
Location
Stafford, CT
@rumblecloud I will give you this warning. Buy good tools especially stuff you are going to rely on. For instance I broke a 3/4" Snap-On breaker bar trying to remove a piston nut. Horror Freight stuff is sub standard at best. I know many here love that store but don't risk injury saving money. Buy good tools and have them forever. Picks and stuff if they break are not going to get you hurt.

Years ago I nearly knocked myself out and I thought I lost some teeth when a cheap ratchet I was was using a pipe on let go. After that day all the cheap junk went in the garbage and I replaced it with good quality.

Ebay is a great place to find tools. Being an automotive guy I did not have any 3/4" tools. I bought a new setup of Snap-On for a fraction of new. Who cares if it is 60 years old? Just hunt stuff down.
 

rumblecloud

Well-Known Member
Joined
May 6, 2012
Messages
188
Location
Michigan
Occupation
Living the dream...:]
Harbor Freight is okay for some stuff, but not somewhere I go to on a regular basis. Most of my stuff is older hand-me-downs -- Craftsman mostly from my dad and brother. Some odds and ends. But yeah, I hear you on the tool side. I'm still using the Craftsman tool box and some of the tools that came with it that I bought when I was little.

Thank you for your concern and advice. Well received
images
 

Swetz

Senior Member
Joined
Oct 31, 2019
Messages
1,375
Location
NJ/PA
Occupation
Electric & Gas Company
They are starting to make stuff in the USA again.

From what I am hearing Stanley Black & Decker just decided to close the brand new Texas plant where Craftsman tools were to be made:mad::mad::mad::mad:

I don't know if it it is SBDs fault...we make it hard to do what they were trying to do.


rumblecloud

Well-Known Member
Joined
May 6, 2012
Messages
188
Location
Michigan
Occupation
Living the dream...:]
Well all the parts are here. Picked up a 3/4-inch 36-inch breaker bar to go along with my 8 foot equalizer.
Now I just need to find the time to tackle it.
I've watched numerous vids of people removing the gland nut with varying levels of success/failure, but in the end, most of them finally came off.
Looking forward to the challenge.
 

ps66x4

Well-Known Member
Joined
Nov 10, 2013
Messages
175
Location
CT
Occupation
cement mason
I like doing them on the back of the dump truck to keep the cylinder up not to loose alot of fluid. I clean everything good first.
 

NH575E

Senior Member
Joined
Dec 30, 2015
Messages
1,189
Location
North, FL
Occupation
Retired Machinist
I have used the paint marker to mark the bolt head in relation to the piston, and piston to the rod. I do not have a torque wrench that goes that high, so I make it as tight as it was.

Recently, I purchased a 1" drive impact gun that blasts them off and on. I feel comfortable that they are tight with this gun. It is an IR. I have herd others sat the Harbor freight works, but others say no go. I think it is more about the size of the hose and volume of the compressor, honestly. You need a 2 stage compressor and a 1" hose for the correct air volume. A socket with a breaker bar and a pipe will work as well tho.
When I did my crowd cylinder I bought the 1" HF gun. It wouldn't touch the piston bolt with my little compressor. I took the rod to the local yellow JD dealer and the guy there pulled out the exact same HF gun I bought and zipped the bolt right out. He had at least a 1/2" hose with who knows how much air pressure and volume. Air pressure and volume is indeed the answer.

My 3/4" pull handle and pipe extension also did not touch it.

Next time I have to use it I am going to pull the large pipe plug on my tank and adapt a 1/2" hose to run the gun unrestricted to see if I have enough pressure. If not I see a compressor upgrade in my future. :)
 

Swetz

Senior Member
Joined
Oct 31, 2019
Messages
1,375
Location
NJ/PA
Occupation
Electric & Gas Company
If not I see a compressor upgrade in my future.
Always nice to get new tools!!

I have a 2-stage IR T30 compressor (5hp 230V, 60gallon tank) that I purchased over 20 years ago. I love the compressor, and never had a lick of problem with it.

When I was looking for another compressor for my PA house, I went right back to the IR compressors. I found though, that they had been moved offshore, and did not look at all like the old one I have. I continued my search, and found a Quincy that is similar in stats to the old T30, and is still USA made, and looked like quality. I found that Lowes was the best price, and they would ship it to the store, so no freight. I used the Lowes card, so 5% off too.

I have had the compressor now for about 5 years, and no problems with it either. I think they had a deal, whereby if you purchase a maintenance kit on the same invoice, they doubled the warrantee...think that has come and gone, but could be handy, and worth looking into before you purchase.

...Update...Lowes no longer sells it:confused:, and, It is now ~$2,000.00...I paid $1,200.00 +tax 5 years ago :confused::confused: Prices are crazy!!


Top