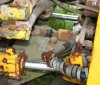
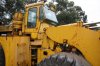
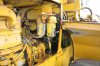
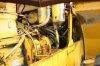
Thanks oldseabee, can water really badly effect the turbo. Forgot to add that the exhaust was left uncovered, was horizontal but i am still worried about whether the rain has damaged the turbo. So in fact what i have to do is also take all the brakes off it as well, get them all resealed.
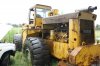
The brake caliper removal would mean jacking and removing each wheel, yes??? I think with all the work i have to do, it will take me at least a solid weeks worth of work.
I'm thinking now that maybe 8k might be a good offer, what do others think this is worth??
cheers
Alex

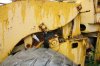
Ok so we have had problems with the brakes on our two 175B's pretty frequently recently (though they are rarely a problem usually though). That being said, i can describe the process to work on both the front and rear brakes very specifically.
There are two brake calipers on each disk (so two per wheel).
To answer your question though, yes you do need to remove the wheel to get at the calipers.
Here's a pretty in-depth description on how to take off each caliper, and then how to replace the seals in each caliper:
1. Remove the wheel:
Jack up the wheel that you are going to work on. We use one of those small pneumatic jacks to raise the tire about three inches off the ground.
Remove all of the nuts from the wheel (you can leave a nut on the top and one on the bottom started on their threads to be safe). We use a 3/4" drive impact wrench with a 1 1/8" impact socket on the end.
The next step (and this is just the way we do it) is to remove the wheel. We put "Forky" (our shop's 1961 gas Clark forklift) in front of the tire with the forks just pressing up against the bottom. Then we fasten a chain around the mast of the forklift and around the tire to pull the tire off the hub and onto the forks of the forklift.
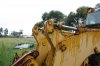
2. Remove the guard
On the rear tires, there is an angular piece of steel that guards the brake lines from being damaged. Nothing special to take it off, just remove the bolts and pull 'er off.
On the front tires, there is a big piece of curved steel that gets removed.
3. Disconnect Brake Lines
The brake lines then come off and just make sure you have a pan below the lines as they will drip brake fluid all over the place when you remove them.
After that, I usually depress the brake cylinders to get rid of all the oil that's still in there and so that the calipers come off easier.
4. Take off the Calipers
With everything else out of the way, the calipers will just slide right off very easily after removing the 5 remaining bolts that hold them to the axle.
These bolts should have lock-tite on them to keep them from loosening up. When you reinstall the bolts, make sure to apply lock-tite liberally over them to keep these bolts in place.
5. Disassemble the Calipers
Take the brake pad out first, it should slide off fairly easily and you can set it aside for now.
Then you can remove the four bolts that hold each cover on and then you can remove the two covers.
After the bolts are off you can pull each of the pistons out of their cylinders and make sure you know which way they came out so they go in the same way! The way i have always taken them out is through the middle of the caliper and NOT through the cover that was just removed.
Thoroughly clean each part after removing all of the old seals and o-rings with brake cleaner.
Cleaning now finished, you can pat yourself on the back! Don't have a beer yet though, it still needs to go back together =D
You should have a collection of new seals and stuff and all of those need to go into the calipers.
There are two o-rings that go on the four-bolt covers and you can put those on, but I can't remember if the o-rings are specific to each slot. Anyways, once you find out which ones go where, get the bottle of white lithium grease ready. Grease up each o-ring and slide each one into a slot.
Then there are four more o-rings that go into each cylinder to seal each piston. Grease all of those up and put them into their cylinders.
Each cylinder also has a rubber skirt to go over it to prevent from material damaging the seal. Those can get greased and inserted into the cylinders with the skirt part facing outward of course.
Apply grease to the cylinders and, well... there isn't really an easy way to do this. You just need to finaggle the pistons into each of their cylinders. But do it gently! Make sure that when you get each of them in, that the o-rings still seal around the piston properly. Also make sure to get the skirt over the piston before you put it in and make sure that the skirt is properly sealing the piston.
With all of the pistons in- and don't get frustrated if this takes a while to do, they just don't go in easily-you can then pick up the brake pads and use some emory cloth to sand/smooth out the pad. Then after the pad is cleaned up, spray it liberally with brake cleaner to get it nice and clean. Then put the pad in the way it came out.
6. Reassemble
Everything past the brake pad is just basic reassembly and doesn't need to me described again.
I hope this helps describe the process, its not the most difficult process and its actually one of my favorite things to fix! I guess that's just because i love this machine though. Nonetheless, still refer to the maintenance manual above me since it is the most accurate.
Whew, hope that just about covers it.
Logan