• Thank you for visiting HeavyEquipmentForums.com! Our objective is to provide industry professionals a place to gather to exchange questions, answers and ideas. We welcome you to register using the "Register" icon at the top of the page. We'd appreciate any help you can offer in spreading the word of our new site. The more members that join, the bigger resource for all to enjoy. Thank you!

Komatsu PC220 boom spool issue

Connstellation

Well-Known Member
Joined
Aug 29, 2019
Messages
54
Location
Clymer, PA
Hello
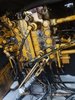
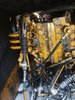
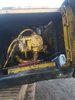
I have a komatsu pc220-3 excavator sn 22737. This machine has a lot of backstory and work into it but to make it quick and simple, I rebuilt the motor the machine ran great for 30 hours or so. During a run my operator said he felt the main boom lift was suddenly weak and 10 minutes later there was no boom lift. Machine got parked. Said operator got in it and forced the boom free which released a loud bang sound supposedly.

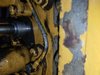
Upon main boom cylinder disassembly I found the bore nut to be severely loose and the bore to have exploded beyond repair due to movement. So I rebuilt the other cylinder and bought a factory original for actually really darn cheap. So two new cylinder rebuilds are on the machine now. Contamination seems to be pretty small and I have probably 99% of the pieces.

On first run the boom up is stuck open. I can open the joystick for boom up more, but I get no hydraulic whine for down. I checked lines for the pilot system from the joystick to the spool and it's all clear. So I took apart the spool on both sides and tried to pull the spool, I had to hammer it out. It was tight, took a lot to hammer it out. So at this point I'm assuming my operators loud boom was something in the valve body related to that spool. So I figured out where the tight spots were and made dowel rod sand sticks with 800 grit sandpaper. You may not agree with this way to attack it, but I had very good luck with it, or so I think so far. After a lot of trial and error I got the spool very smooth. Im still within .002 inch tolerance though, from what I can measure I did not take away much material.

So when back together I have no bypass that I can measure and normal use of the spool up and down, until I go to lift the boom maybe 90% of the way up, same problem as before. So I open the valve body again thinking I'd be tight again but I am as smooth as I can be after i relief pressure.

But, I did notice the spool is stuck up, about 1/4 inch out of neutral position. With fluid force acting against me [I push roughly 60 pounds of force with my thumb guesstimate] I can't push the spool to neutral but I can pull the spool out towards up more, relieve pressure, then push the spool to neutral.

I tested the beehive springs that act on spool to neutral, they're both close, 240 pounds at 1.5 inches suppression, 450 at max compression. I assume at 1/4 compression theres not 60 pounds of force. But I would consider these springs like new at these pressures.

So I'm wondering if the spool isn't somehow catching something from a raised edge, fluid pressure is preventing the spring to return spool to neutral, or?

My next plan of attack is to start machine after it sat and see if the spool is free after pressure relief. I plan to pull spool again and check for straightness with a more accurate method. I plan to check the valve body lips with a pick and check for an edge that may raise while pressurized. I plan to polish the spool [the only noticeable "marking" is normal wear on the very ends but no scoring]. I can't justify taking anything more away from valve body because it is so clean now.

Again, when pressurized I can't return spool to neutral by hand, but I can pull spool out towards up which relieves pressure, THEN I can push to neutral freely. Upon reassembly I have normal operation until I raise boom to 90% then my spool sticks to boom up, and then my pilot system still engages and disengages properly, but the boom lift is stuck open a 1/4". I was able to return it to neutral with pilot system only once.

Rest of machine operates correctly and normally. Machine worked properly prior to cylinder blowing up. I was able to lift boom all the way up and down a couple times between disassembly, so it doesn't always get "stuck". I recovered 99% of debris.

What am I missing?
 

Attachments

  • 20200115_161633.jpg
    20200115_161633.jpg
    1.7 MB · Views: 37
  • 20200115_161624.jpg
    20200115_161624.jpg
    1.5 MB · Views: 34
Last edited:

uffex

Senior Member
Joined
Jan 23, 2012
Messages
4,464
Location
Lincoln UK
Occupation
Admin
Good day Con
I wish you well but the repair methods you describe are sure fire disaster, damaging debris are not visible to the human eye to have that machine run correctly will I guess cost a lot of bucks.
Kind regards
Uffex
 

funwithfuel

Senior Member
Joined
Mar 7, 2017
Messages
5,615
Location
Will county Illinois
Occupation
Mechanic
Are you focusing solely on boom1 or 2? You have a second spool that comes on line for additional flow in boom up. Perhaps it's the second spool that is causing issues since you described that when you place the greater demand, the problem occurs. I'm sure John C will be along soon with his sage wisdom of Komatsu.
 

Connstellation

Well-Known Member
Joined
Aug 29, 2019
Messages
54
Location
Clymer, PA
Good day Con
I wish you well but the repair methods you describe are sure fire disaster, damaging debris are not visible to the human eye to have that machine run correctly will I guess cost a lot of bucks.
Kind regards
Uffex

I understand that. This machine was bought as scrap and poor repairs were put into motion before I had anything to do with the place. The hydraulic system has seen water at some point, and has been hammered without care. At this point it's make it or break it at 16,000 hours. And if I break it I'm parking it and using it to convert to an electric system down the road.

Are you focusing solely on boom1 or 2? You have a second spool that comes on line for additional flow in boom up. Perhaps it's the second spool that is causing issues since you described that when you place the greater demand, the problem occurs. I'm sure John C will be along soon with his sage wisdom of Komatsu.

You bring up a good point, I considered that at first but I haven't had a chance to look at a manual. I traced lines hoping to find cylinders being fed seperate visually at the valve body, but saw they were directly fed on same spool. And disregard that idea. I didn't account for a different pathway and that could be holding up the main feed spool/ binding. That's next on my list today hopefully.

Again I know I would've gotten fire for Attacking the valve body, but it was tight. I took off microns. Yes there's more contamination now but I can't control that anymore than I can control the weather because of previous conditions. These machines have seen worse with leaks, fluid top offs from buckets with grit and gravel in them, hoses not being cleaned, etc. I can't do, or don't care to do anything more than pull the band aid and make it worse, or hopefully better even if I only get a year or two.
 
Last edited:

John C.

Senior Member
Joined
Jun 11, 2007
Messages
12,870
Location
Northwest
Occupation
Machinery & Equipment Appraiser
There are lots of things that many people consider the right way of doing it but when you are running old worn out stuff, you do what you have to do to keep the machine working. I've had to do the exact same thing on logging machines when they wear out the stops on the grapples and beat out the cylinder pistons. The steel chunks and shavings end up in the auxiliary spool and the grapple is stuck open or closed with the pumps stuck feeding the function and flushing more busted material back into the system. Pounding out the spool and honing the bad spot at worst with give you drift in the function and you learn to work with it if it shows up. A whole new valve is not economically feasible or likely even available. Sending the valve into a machine shop for repair is also not feasible. All they will do is bore out the valve body and make a new spool and there is no guarantee that won't have the same drift problem as doing what was done and it will cost about the same as a brand new valve body.

A few points I see up front.

funwithfuel is correct in that there are two spools and two pumps feeding the boom up function. You will have to follow the tubes back from the base of the booms which will tell you which spool is the other boom spool. It is on the opposite valve section from the boom one spool. As I recall the boom 2 spool only works on the boom up function. It is likely stuck or sticking on one place.

I'm a little curious concerning the "factory original cylinder." Could this component have been sitting someplace for years waiting for you to purchase it? When you got the new boom cylinder, did you open it up for some inspection and check the tightness of the nut? They take about 5,000 foot pounds of torque and trust me, that it entirely necessary for the nut to stay tight. I suppose the cylinder should be the same if ordered by part number but I might check the extended length of the cylinder against the rebuilt one and further check the outside diameter of the barrel and the rod just to be sure. It just sounds like the new cylinder may be topping out before the other cylinder. It may be that the Dash 3 cylinder is the same as the Dash 5 and Dash 6. There is a wrinkle for that scenario. Gray market Dash 6 machines used a different cylinder than machines manufactured for North America. It's not likely but it is something to check.
 

Connstellation

Well-Known Member
Joined
Aug 29, 2019
Messages
54
Location
Clymer, PA
I didn't have markings on my cylinders that matched komatsu numbers so I matched the cylinder to the seal kit and bought that way. Aesthetics differ some but the length and seal kit bore are exact. Yes it was surplus, brand new, sitting in warehouse. I didn't open the cylinder to check torque but with that big 130mm or so nut with nylon keeper I didn't think to bother as cylinder was capped and still packaged from komatsu. The other cylinder I built with nylon nut broke free at 1800 ft pounds and damaged the nut. I torqued to calculated roughly 3300ftlb dry with liberal amount of lock tight after torqued. I was aware of the high torque values but didn't have much of a way to get it higher and really would be afraid to torque any higher and don't know that I see a point to given the known stresses but I could be wrong, not trying to be difficult.

I took apart the spool directly across , and below direct across. I can feel the ribbing on the one that is directly across but it's a smooth glide. The one below was very smooth. Neither were tensioner by fluid and both were in neutral position.

I took apart the main dual action spool and it is still not returning to neutral by a 1/4 inch or so and it's pressurized/ suctioned. To the spool position until I release both end caps. As soon as I release pressure I can move spool freely and return to neutral. So i can only return to neutral after pressure release. BUT I can pull spool out to very end of groove/ valve body slot [1/2 inch or so] and it gets suctioned back in. After I open both ends of spool caps I can relieve this suction and freely move both ways.

To add, the spool was definitely stuck AFTER my guy forced hydraulics and BEFORE I put new cylinders on.

Added pictures. Will add more in a bit. Don't mind sludge it's on outside shafts and from my gloves on this 15 degree day.

Im wondering if I fixed the main problem with Main spool being tight and now I have air in system from valve body and originally from cylinder rebuild preventing full spool travel at the up side? [Bore side] I haven't ran machine enough to promote a healthy air bleed yet.

In the pictures, left side open spool you can see the "stuck spool" it can't go in further but I can pull it about another half inch, which is roughly a spool division. On the right side, I opened both spools, they both move freely and had no pressure/ tension. Which makes me think I have an air issue from when I boom up further. Im in the middle of opening the main spool again to free it tension wise then im going to see about freeing air unless someone comes in with another idea.

Edit: it's a cooler day, went from 45 to 15 degrees. That main spool is tight again. Not hammer in tight. But definitely needs more than 60 pounds of force to push in. Not sure the cold is the cause though. Thoughts?


I appreciate everyone's time and hope im not coming off as unappreciative or angry. Just trying to give the best explanation I can.
There are lots of things that many people consider the right way of doing it but when you are running old worn out stuff, you do what you have to do to keep the machine working. I've had to do the exact same thing on logging machines when they wear out the stops on the grapples and beat out the cylinder pistons. The steel chunks and shavings end up in the auxiliary spool and the grapple is stuck open or closed with the pumps stuck feeding the function and flushing more busted material back into the system. Pounding out the spool and honing the bad spot at worst with give you drift in the function and you learn to work with it if it shows up. A whole new valve is not economically feasible or likely even available. Sending the valve into a machine shop for repair is also not feasible. All they will do is bore out the valve body and make a new spool and there is no guarantee that won't have the same drift problem as doing what was done and it will cost about the same as a brand new valve body.

A few points I see up front.

funwithfuel is correct in that there are two spools and two pumps feeding the boom up function. You will have to follow the tubes back from the base of the booms which will tell you which spool is the other boom spool. It is on the opposite valve section from the boom one spool. As I recall the boom 2 spool only works on the boom up function. It is likely stuck or sticking on one place.

I'm a little curious concerning the "factory original cylinder." Could this component have been sitting someplace for years waiting for you to purchase it? When you got the new boom cylinder, did you open it up for some inspection and check the tightness of the nut? They take about 5,000 foot pounds of torque and trust me, that it entirely necessary for the nut to stay tight. I suppose the cylinder should be the same if ordered by part number but I might check the extended length of the cylinder against the rebuilt one and further check the outside diameter of the barrel and the rod just to be sure. It just sounds like the new cylinder may be topping out before the other cylinder. It may be that the Dash 3 cylinder is the same as the Dash 5 and Dash 6. There is a wrinkle for that scenario. Gray market Dash 6 machines used a different cylinder than machines manufactured for North America. It's not likely but it is something to check.
 

Attachments

  • 20200117_144722.jpg
    20200117_144722.jpg
    1.7 MB · Views: 34
  • 20200117_144718.jpg
    20200117_144718.jpg
    1.7 MB · Views: 34
  • 20200117_144714.jpg
    20200117_144714.jpg
    1.3 MB · Views: 34
Last edited:

Connstellation

Well-Known Member
Joined
Aug 29, 2019
Messages
54
Location
Clymer, PA
I can't edit my post again. The spool is tighter again, with fluid pressure on it pushing in on spool it was sounded like I was hitting metal. Once released i and fluid still in spool I still felt like hitting metal. When I pulled out, drained cavity and pushed spool in again it was tight. Gonna have to probe the edges for raised loose flakes etc.

I have a video to show range of motion. Will upload later
 

funwithfuel

Senior Member
Joined
Mar 7, 2017
Messages
5,615
Location
Will county Illinois
Occupation
Mechanic
You may very well have a good size chunk of debris in the passage that gets moved around with the flow of oil. Perhaps, if possible remove neighboring spools to see if it can be retrieved. It may be in the center passage, pump passage, tank drain or even hanging in the A/B ports. With your obvious willingness to "get after it" I think you'll find some interesting trophies.
 

Connstellation

Well-Known Member
Joined
Aug 29, 2019
Messages
54
Location
Clymer, PA
I haven't been inside again yet. Judging by the solidness of where I bottom out and how it only happens near top end of cylinder stroke when I start building lift pressure, and how my operator described the "break free" boom sound, I'm wondering if the valve body didn't crack in the passage where the secondary spool activates via the main spool and just floats slightly in fluid direction.

I'll get into it on Monday, I'm just hoping I don't have to crack the valve body in half but I'm thinking it may be they bad. But I'll try fishing first , I understand that's a very possible scenario, I just wasn't hoping for that. I haven't had the bottom neighbor spool out yet and quite honestly the pc220-3 service manual I have doesn't resemble my valve body, along with other parts of machine. So I'm fishing in the dark but shouldn't be too bad.

You may very well have a good size chunk of debris in the passage that gets moved around with the flow of oil. Perhaps, if possible remove neighboring spools to see if it can be retrieved. It may be in the center passage, pump passage, tank drain or even hanging in the A/B ports. With your obvious willingness to "get after it" I think you'll find some interesting trophies.
 

Connstellation

Well-Known Member
Joined
Aug 29, 2019
Messages
54
Location
Clymer, PA
I haven't had a chance to do much until the last few days. No positive progress yet but if anyone has a similar issue or needs a good laugh.

To recap I had a boom cylinder's bore assembly fracture due to an improperly secured nut. As a result I'm assuming a spool was stuck closed due to debri for the main boom, and one of my operators had found himself in the machine thinking he was doing me a favor and forcefully broke it free hydraulically, which resulted in a loud crack sound or boom, as described by another worker. Since then I've bought a new factory replacement cylinder and rebuilt the one that did not fail. My current problem is I have a spool that controls that boom that does not return to neutral after booming up. So on the rod side of the valve body the spool is being pinched/restricted. The first time I opened the spool cap the spool was very tight and I had to hammer out in 32nd inch hits or less for roughly the last 1.5 to 2 inches of spool, once past that point it's free. The second to 5th times were easier. Each time I opened the caps, I lightly sanded the trouble spot, closed up, and ran machine to test. Each time I had an easier time to free the spool, however, I could never forcefully return the spool to neutral from boom up towards boom down. Most times I got a deadheading solid sound. After I would pull the spool out towards the boom up side and relieve fluid I could return spool, usually tightly, but still by hand, to neutral and beyond. Each test run was different, the first time I got roughly 30 minutes of run time then, stuck again, okay the fluid is hot something expanded. Pulled spool cool, semi tight. Maybe it's a fluke, sanded again, next test, first boom up running cold, so it isn't quite heat related. Not as tight, etc. The tightness is less as I go.

So im done removing material for now. Im assuming the other valve bodies spool is pushing a chunk of the other valve body free just a hair as it feeds. But nothing freely moves without fluid pressure.

The spool itself was in good condition, looking at it it had looked bent at the spring ends, but on machined a straight edge it's fine, at least very close, and if that were off it wouldn't translate to the hole. There is light wear on spool, but in comparison its in better condition than the other spools, which look fine. I did polish it the third time in just to be sure.

I have the problem body off, unfortunately it isn't as open as the reading materials I have made me believe. I can't visually inspect well enough but I believe I can see a chunk of material missing via the tubing attachment hole, which is about where the spool would get tight/ stuck. Unfortunately the orifice from the other valve body is roughly a 1/4 inch hole and doesn't feed directly into the problem spool which which is where im expecting to find an issue. I am waiting on an inspection camera.

If there is a crack I'm going to try the best applicable method for the spot, but almost doesn't seem to be looking good.

If it isn't fixable im considering disabling the auxiliary spool for testing. Or adding a 3rd spool body to replace the faulty body.

After writing this up I thought about it, I suppose it's possible there's a rough or raised edge from where the small chunk is missing and i haven't removed the propert amount of material yet due to bad angle. Anyways, until the camera comes Saturday I'm sitting on it.

I appreciate the help.
 
Last edited:

John C.

Senior Member
Joined
Jun 11, 2007
Messages
12,870
Location
Northwest
Occupation
Machinery & Equipment Appraiser
I've had similar scenarios on logging machines. All you can do is the best you can do with the thought that the function will likely have some drift when you get the spool totally free. You might look around for a used valve while you are waiting for the bore scope.
 

Connstellation

Well-Known Member
Joined
Aug 29, 2019
Messages
54
Location
Clymer, PA
Alright another follow up from Saturday. Updating in case anyone has something similar and is looking for a solution to beat their head against.

The spools ribbing and/or edge is catching on the fractured edge of the spool race and pressure is raising the edge and pinching the spool or preventing travel. I am 95% sure there are no fractures but visibility is not the best.

If I had a fracture that was metal gap metal, i was planning on using a flex tube dremel to cut out an indent of cracked area and 95/5 solder to fill.

For an edge like this I am not sure I can add material reliably as welding/brazing will kill the edge. Soft solder won't hold at an open edge. So my only thought is to aggressively sand down to a rounded edge and try without adding material which may be viable or fill the fracture voids with jb weld then polish down to smooth. Jb weld will be structurally correct but I'm worried about fluid exposure breaking down jb weld. I know people have gotten away with transmission bodies and cylinder barrels/rods that were pitted.

Any options or suggestions I'm missing? Attached is a picture of the spool race. Sorry for the quality, I forgot to bring an sd card to capture via the inspection camera, but its pretty visible. The spool race in question is towards the right of the screen by the camera sensor.

Appreciate any feedback.
 

Attachments

  • 20200321_162909.jpg
    20200321_162909.jpg
    1.6 MB · Views: 29

funwithfuel

Senior Member
Joined
Mar 7, 2017
Messages
5,615
Location
Will county Illinois
Occupation
Mechanic
I can't see from the image, but your description seems clear. As long as there is undamaged bore between lands, I would think you would be ok. If it's possible to feather the edge without compromising the bore, you may not even introduce a drift problem.
I would discourage anyone from using plastic metal inside a hydraulic system. It is not truly bonded to the base material, it is a filler. It has the tendency to flake off as shavings or the entire chunk. Now you have debris on top of everything else.
Good luck in however you proceed
 

HydraulicGuy

Active Member
Joined
Jun 4, 2018
Messages
27
Location
Maine
I’ve had luck taking a 1/4” die grinder with a 1/4” rod however long you need to get in there.. cut a slit in the end of rod with cut off wheel. Fold up a piece of sand paper tight in the cut slit so it doesn’t fly off. And get in there and take some material off. Your going to have contaminants of course but I think you’re ok with that at this point.
 

funwithfuel

Senior Member
Joined
Mar 7, 2017
Messages
5,615
Location
Will county Illinois
Occupation
Mechanic
I’ve had luck taking a 1/4” die grinder with a 1/4” rod however long you need to get in there.. cut a slit in the end of rod with cut off wheel. Fold up a piece of sand paper tight in the cut slit so it doesn’t fly off. And get in there and take some material off. Your going to have contaminants of course but I think you’re ok with that at this point.
This procedure, while proven will most assuredly result in a drift. Once the material is removed, you're not going to put it back.
 

Connstellation

Well-Known Member
Joined
Aug 29, 2019
Messages
54
Location
Clymer, PA
I am only taking away from the edges of the ribs. I'm staying away from the main sealing surfaces, aside for chamfering a few spool edges and polishing.

My problem seems to be 2 part which is shat I've been guessing. I've got the body pretty smooth but I've come across the biggest problem now which is a hair line crack which explains why my problem is so variable.

Again, too lazy to put an ad card in cam. It's hard to tell with glossy body. But after degreasing cleaning body I've found it. It is at least an inch long. I cant find where it stops. It's just before the bore side feed. Temperature outside conceals it. Warmer days you cant see it and the spool travel is smoother. Cooler days is so variable and visibility differs.

Anyways. I'm going to see how clean I can get it take away some material close to spool bore and see if I can pre-heat and tack weld without distorting the bore, which should be pretty simple. That will give me some strength. And then im going to low temp solder the seam I can't weld for blind fill.

Being recessed the solder will hold. Meanwhile ill see about retrofitting with a different valve body, modular or whatever suits what I care to do. But this should be a long term fix.

I don't have any drift yet with how I've attacked it. I've been using a 1/4 or so dowel rod secured with hot glue for what I can directly access. And various picks with sandpaper hot glued for the hard to reach edges. For aggressive chips I used 120 grit, for smooth chamfering 200 to 300.
 

Attachments

  • 20200402_184519.jpg
    20200402_184519.jpg
    2.5 MB · Views: 18

mikebramel

Senior Member
Joined
Jul 15, 2012
Messages
1,612
Location
milwaukee
if the spool is straight you can lap the OD. if that checks out a flex ball hone and a lot of patience and fitting
 

Connstellation

Well-Known Member
Joined
Aug 29, 2019
Messages
54
Location
Clymer, PA
Checking in.

I welded the plate. The crack travelled across all processes. Tram, boom, and bucket. . So looked like o--o--o the -- is the crack. Although not straight through to the tram and bucket bores, so they're recoverable. I welded body back with 316l stainless rod. I couldn't get the silver solder to take, as I tried after I heated and welded trying to make uniform. Im amost sure if I started with solder it would've been golden.

Anyways I had sanding to do from slight wattage. I used a dremel this time started with grinding disc then various sandpaper discs. I ended up with no bypass that's noticeable.

Because I couldn't secure the boom bore on both sides I still have movement there pinching spool.

Plan b, and something I thought of in beginning but was trying to be gentle. The spool is .875 inches. I had trouble sourcing .875, but I found steel tubing that is .87. So I can hone it out to final dimension. So my plan is to ream out body to snugly fit tubing, and cut adequate slots in tubing to allow fluid flow to pass as normally as i can get it. Im going to keep it a solid piece probably 3 or 4 passages deep so I can use spool to keep alignment then try to solder in to the spool passage.

I would like to flange the end of tubing to use valve body as support and shim the spring for more support for tubing support but I don't want to introduce another possible problem. The solder is rated for a hair over 10,000 lbs.


Anyways, as far as fluid. I noticed the machine states for a cd 10w oil. The company used to use aw68. I migrated machines to aw46. This machine has never seen the 46 but im sure before I was around it's seen aw68 and mixed with whatever it had before it came here.

So right now im looking to switch to sinopec aw 32. I've attached it's specs. I haven't looked into the cd 10w specs much yet so I'm blind on the subject until tonight. Or what would an acceptable fluid be?
 

Attachments

  • 20200416_155623.jpg
    20200416_155623.jpg
    357.2 KB · Views: 3

Nige

Senior Member
Joined
Jun 22, 2011
Messages
29,565
Location
G..G..G..Granville.........!! Fetch your cloth.
I would have said AW68 (SAE30 give or take) would be on the heavy side for your climatic conditions. SAE30 would be more used in troical climates, and even then only in certain specific circumstances.
The equivalent Cat machine would be calling for SAE10W (ISO32).
"CD10W" is actually a (very old) engine oil spec, but IMHO any suitable 10W anti-wear hydraulic oil should do the job.
 

John C.

Senior Member
Joined
Jun 11, 2007
Messages
12,870
Location
Northwest
Occupation
Machinery & Equipment Appraiser
AW46 was what was always used in the Komatsus when they were new. With all the work you have done you probably paid for a good used valve by now.
 
Top