mhobson
Well-Known Member
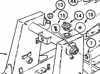
I recently noticed that the left hand top loader pivot plate has completely ripped out, there are a few marks around the left, is this a known problem?
How do I attach photo's?
How do I attach photo's?

I recently noticed that the left hand top loader pivot plate has completely ripped out, there are a few marks around the left, is this a known problem?
How do I attach photo's?
I recently noticed that the left hand top loader pivot plate has completely ripped out, there are a few marks around the left, is this a known problem?
How do I attach photo's?


Not a simple fix either, as that is the fuel tank. I'd bet shock load from bulldozing caused it. Maybe a bad weld. Neither of mine did that.
Willie
Case puts the loader arms on the fuel tank? Somehow I don't think that's a good idea or true. But what do I know. I'm a Ford guy and Ford doesn't do stuff like that....
Case puts the loader arms on the fuel tank? Somehow I don't think that's a good idea or true. But what do I know. I'm a Ford guy and Ford doesn't do stuff like that....
Not a simple fix either, as that is the fuel tank. I'd bet shock load from bulldozing caused it. Maybe a bad weld. Neither of mine did that.
Willie
 ).
).Billrog, don't you see the wet spot? I'll bet that's what it is.
That looks like fatigue to me, that loader flexed a few thousand times too many. Any idea of hours on this and it's previous use?
Am I the only one that sees the wet spot at 8 o clock on the first picture?
If there's not a wet spot, use some kind of solvent to check for a crack, spray it on, let it dry and dust it to see if it sucks any out of the crack.