• Thank you for visiting HeavyEquipmentForums.com! Our objective is to provide industry professionals a place to gather to exchange questions, answers and ideas. We welcome you to register using the "Register" icon at the top of the page. We'd appreciate any help you can offer in spreading the word of our new site. The more members that join, the bigger resource for all to enjoy. Thank you!

EX120 - Swing motor gear oil leak (Pictures)

funwithfuel

Senior Member
Joined
Mar 7, 2017
Messages
5,618
Location
Will county Illinois
Occupation
Mechanic
1 is swing motor, 2&3 are reduction and pinion housing. The top is not the brake. The motor and brake are integral to the same section. If you have the bottom 2/3 you're good to go, bolt her down tight. Make sure your sealing surfaces are clean with fresh silicone. Then just swap your motor onto the new stuff. Fill with the proper oil.
 

Egetebee

Well-Known Member
Joined
Jul 2, 2019
Messages
110
Location
New England
Thank you again funwithfuel.
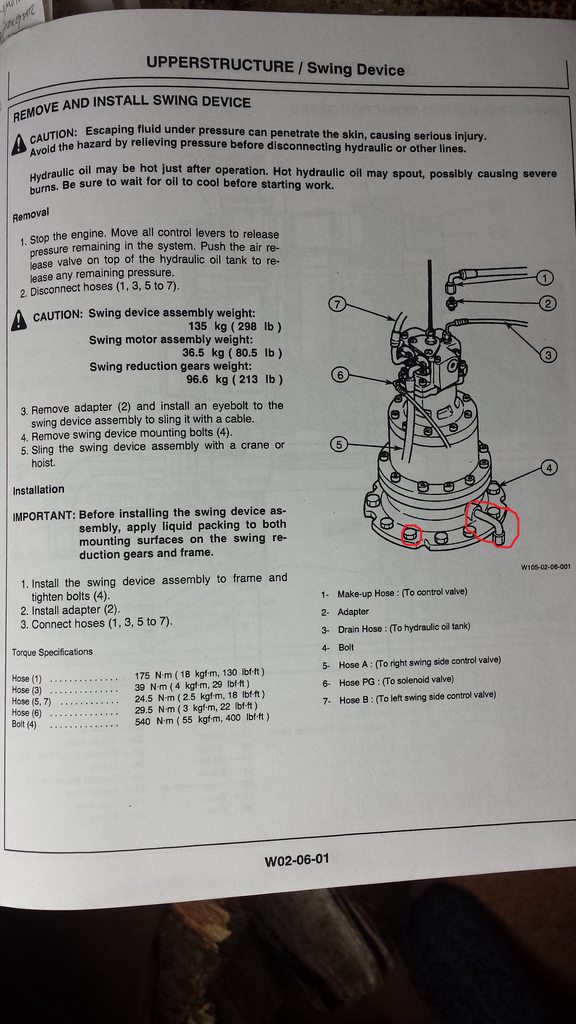
Ahh, I was wondering what 'apply liquid packing material to both mounting surfaces... ' meant in the installation instructions (shown below); Silicone, got it and will do.

So the question about housing bolt-hole alignment in relation to the pinion gear meshing into the slew bearing; how would I deal with misalignment as the lower section also has an oil drain line that needs to be in the correct position too (circled in the image below)
Will I be able to actually turn the new lower section if it's off by a tooth? As others have warned, I'd hate to discover after the old part is out that the new gear assembly pinion and slew bearing teeth won't mesh according to the correct bolt holes in the grear housing and frame.
Can you please speak to this particular concern?

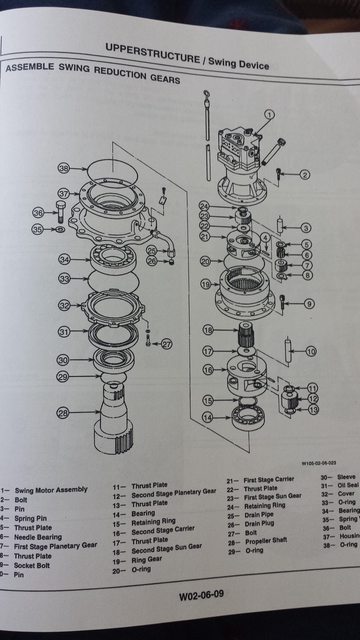
Also, should I replace the mounting bolts as the old ones have been tightened and retightened many times?
The original bolts have both split-ring lock (practically worthless) and flat washers; should I consider using wedge locking washers like Nord-Lock instead?

Thank you again,
E

iug0hCvh.jpg
 
Last edited:

Egetebee

Well-Known Member
Joined
Jul 2, 2019
Messages
110
Location
New England
Hello Everyone,
With regards to the install of the new reduction gear unit, I have a few more questions.

Question(s):
1. I'm ordering new 10.9 (M20x250x60mm) bolts. Should they be zinc-coated or uncoated; does it matter with regard to frictional holding power?
2. The required bolt torque is 400 ft/lbs but I don't have a torque wrench to this 400 ft/lb capacity. Any advice for tightening the bolts?
3. Funwithfuel clarified that silicone is applied to each mounting surface. Is this a gasket type of silicone, like Permatex?
4. Must I disconnect all of the hydraulic lines and remove the entire swing motor assembly to rebuild the unit or can I simply unbolt the Swing Motor section while it's still in the machine, position that section out of the way, and then remove & replace the lower reduction gear section and reassemble?
5. Finally, I don't have another machine or lift to help remove the 300lb motor assembly so it'll be a 'muscle out & in' job with my sons. Any advice here?

Thanks again to all who help,
E
 

funwithfuel

Senior Member
Joined
Mar 7, 2017
Messages
5,618
Location
Will county Illinois
Occupation
Mechanic
1 order the screws from your manufacturer. They may have specifications over a common hardware screw.
2 get you a cheapo torque multiplier and the right size socket. You could get , say a 4:1 which you could set up and have a 100 ft/lb input with a 400 ft/lb output.
3 Yes, RTV sealant. Best you can get, rubberized is better.
4 yes, unbolt and swing aside , if the hoses permit.
5 That is gonna be a big bucket of suck. IIRC your existing housing is broken, so no risk there. Dropping the new one in should be done smoothly. I would try to rent or borrow something to perform this task. Too many hands in a confined area trying to achieve a common goal could result in strains and sprains and may cost someone a finger or two. Please be careful in however you choose to proceed.
 

Egetebee

Well-Known Member
Joined
Jul 2, 2019
Messages
110
Location
New England
1 order the screws from your manufacturer. They may have specifications over a common hardware screw.
2 get you a cheapo torque multiplier and the right size socket. You could get , say a 4:1 which you could set up and have a 100 ft/lb input with a 400 ft/lb output.
3 Yes, RTV sealant. Best you can get, rubberized is better.
4 yes, unbolt and swing aside , if the hoses permit.
5 That is gonna be a big bucket of suck. IIRC your existing housing is broken, so no risk there. Dropping the new one in should be done smoothly. I would try to rent or borrow something to perform this task. Too many hands in a confined area trying to achieve a common goal could result in strains and sprains and may cost someone a finger or two. Please be careful in however you choose to proceed.


@funwithfuel:
Thank you very much
#1 & 2. Understood.
#3 Would you happen to have a brand type of RTV; ie; Permatex - Black, Grey, Red, Blue....??? that you've used with success?
#4 This is really good news I've heard toward this repair.
#5 Will be very careful and Thank You for the reminder.

E
 

mg2361

Senior Member
Joined
Jul 5, 2016
Messages
5,193
Location
Pennsylvania
Occupation
Equipment Mechanic
Is this a gasket type of silicone, like Permatex?
From the factory new they use a silicone sealant. I use this product for Deere/Hitachi. No time constraints with assembly as it does not set until there is a lack of air. Silicone sealants might start setting up before you get the assembly installed. The part number below is a Deere number. Loctite's number is without the "PM".

Sealant.png
 

63 caveman

Senior Member
Joined
Nov 11, 2017
Messages
343
Location
western Pa.
Hope I'm not to late, I've replaced a few of these seals and the design has changed over the years (common failure) you may want to put some oil in the unit and check for leaks or just go and replace the seal (something like $90 from the dealer) for cheap insurance.
If you have to put it in without a lift have two strong backs lower it in with straps and one person line it up from the top keeping their fingers and hand out of the way!
Good luck!
 

Egetebee

Well-Known Member
Joined
Jul 2, 2019
Messages
110
Location
New England
From the factory new they use a silicone sealant. I use this product for Deere/Hitachi. No time constraints with assembly as it does not set until there is a lack of air. Silicone sealants might start setting up before you get the assembly installed. The part number below is a Deere number. Loctite's number is without the "PM".

View attachment 206338

Thank you all for clarification about the sealant. I'll be sure to use one of your suggestions.

As well, I'll pick up straps and eye-hooks to lift out / in the motor assembly and have another set of hands to do the alighment.

E
 

Egetebee

Well-Known Member
Joined
Jul 2, 2019
Messages
110
Location
New England
With regards to alignment of the housing bolt holes and the frame; Will the reduction pinion gear that mates with the slew ring actually rotate a little if the reduction housing bolts are not perfectly aligned when installing?

You've warned me previously about this and so I'm a bit concerned and am unsure how to solve the problem if it arises during installation

I'm hoping that if the housing bolts don't align exactly that the housing itself will rotate slightly but I don't know that to be fact and during the install is Not the time to find out.

Advice?

Thanks you all again,
E
 
Last edited:

Egetebee

Well-Known Member
Joined
Jul 2, 2019
Messages
110
Location
New England
With the motor/brake assembly off you can turn input by hand to get the pinion to drop into ring.

Perfect!
Just what I needed to hear!

Question regarding part #35 (Spring Washer) in the picture below:
p0Txp1Pl.jpg

The previous owner of this machine had worked on the Swing Motor and replaced several original bolts with 'newer' ones and I believe (not 100% sure) added split-ring lock washers to all the bolts which I don't see anywhere in the manual and may be a big contributor to the existing loosening & breakage problem. There's a 'Spring Washer' listed as shown in the picture but Not a Split-Ring and research shows they're different functional design.

What is on the machine now are bolts through split-ring lock washers through flat washers.

Can someone please verify that the swing motor mounting bolts actually should include split-ring lock washers or just simply the bolt and spring washer as shown in the manual or Advise on best practice as to ensure bolts will not come loose?
How should I lock the bolts down besides proper torque? New Belleville sping washers, lock-tite, Nord-Lock washers?
What do you advise?


Ordering bolts (uncoated steel 10.9 grade M20x2.50x60mm) & sealant Permatex Ultra Grey (compatible with Titebond 1215, apparently the recommended product.) this weekend and should be ready to do the job once I'm on school break (Mid December) or maybe just wait till Spring at this point as it's getting cold quick...

Thank you all again,
E
 
Last edited:

John C.

Senior Member
Joined
Jun 11, 2007
Messages
12,870
Location
Northwest
Occupation
Machinery & Equipment Appraiser
Usually those type of washers are just hard washers. Had a bolt salesman tell me that split ring washers are to be sold and never used. He put on a demonstration with some kind of special torque setup. He torqued up a bolt with a hard washer and one with a lock washer. He used the torque wrench to pull them loose and the torque was the same. Basically he showed that the lock ring did absolutely nothing to hold the bolt tight. Then he pulled out have a dozen broken lock washers that he said came out from under bolt heads. I've never used one again and thrown all the existing ones I find out in the brush. Ones on starters and alternators are usually the worst for ruining things as well.
 

Egetebee

Well-Known Member
Joined
Jul 2, 2019
Messages
110
Location
New England
Usually those type of washers are just hard washers. Had a bolt salesman tell me that split ring washers are to be sold and never used. He put on a demonstration with some kind of special torque setup. He torqued up a bolt with a hard washer and one with a lock washer. He used the torque wrench to pull them loose and the torque was the same. Basically he showed that the lock ring did absolutely nothing to hold the bolt tight. Then he pulled out have a dozen broken lock washers that he said came out from under bolt heads. I've never used one again and thrown all the existing ones I find out in the brush. Ones on starters and alternators are usually the worst for ruining things as well.

Yes, have seen the same and agree, which is why I'm going to simply install bolts through spring or even flat washers, torque well and see what happens.

Doing bucket repair today as described in another post: EX120 Torn Bucket
But will keep you posted on this progress.

Again, many Thanks to all of you for help & support,
E
 

Egetebee

Well-Known Member
Joined
Jul 2, 2019
Messages
110
Location
New England
Do not use a lock washer.

View attachment 206482

Thank you mg2361,
That being the case, I already have these flat washers on the bolts and will simply reuse them as their in good shape. The bolts have come loose and been re-tightened many times so replacing them seems wise.

Actually, just found a bag of 8 washers for $10 on EBay based on the part number you've provided.
Purchased.

Thanks again,
E
 

jonno634

Well-Known Member
Joined
Dec 19, 2018
Messages
141
Location
Garfield, WA
Occupation
Farmer
If you are still working on this project, I found that to clean out the oil/grease/water out of the bottom, that this worked well for me. I covered the carbody with a canvas tarp, then used a portable heater and blew the hot air in. This melted the grease and ice (as it was cold outside when I did this last year). With the drain hole open, most of the goo ran out, then when I had the swing gearbox out, I used a paint scraper and pushed the rest out the drain hole. This worked really slick in my opinion. Then, I installed grease back to the swing gear via a bucket before I installed the gearbox.
 

Egetebee

Well-Known Member
Joined
Jul 2, 2019
Messages
110
Location
New England
If you are still working on this project, I found that to clean out the oil/grease/water out of the bottom, that this worked well for me. I covered the carbody with a canvas tarp, then used a portable heater and blew the hot air in. This melted the grease and ice (as it was cold outside when I did this last year). With the drain hole open, most of the goo ran out, then when I had the swing gearbox out, I used a paint scraper and pushed the rest out the drain hole. This worked really slick in my opinion. Then, I installed grease back to the swing gear via a bucket before I installed the gearbox.

Wow, this is great info Jonno and I'll be sure to do the same!

My thoughts are that I may actually Wait for the spring to do the job as I've read about and have some apprehension of water entering into the swing cavity area, freezing and then both tearing the pinion seal when rotated as well as heaving the swing motor assembly, which I believe is much of the reason for the existing cracked housing and gear oil leak (previous owner).
Any input to this thinking?

Thank you very much!
E
 
Top