• Thank you for visiting HeavyEquipmentForums.com! Our objective is to provide industry professionals a place to gather to exchange questions, answers and ideas. We welcome you to register using the "Register" icon at the top of the page. We'd appreciate any help you can offer in spreading the word of our new site. The more members that join, the bigger resource for all to enjoy. Thank you!

1971 540b diesel - blows all the coolant out of the cap on cold start

Status
Not open for further replies.

tracing

Well-Known Member
Joined
Jul 16, 2018
Messages
172
Location
fort valley
yeah i have a leak down tester so i can do that, are these injectors in the 188 diesel DEFINITELY surrounded by a cooling jacket that could be the culprit (in addition to all the other suspected areas) ?

as for checking all tolerances, ill be posting all that here to get feedback as i inspect it all

also, anyone know a good place to ship this head to for rebuild ?

thanks
 

tracing

Well-Known Member
Joined
Jul 16, 2018
Messages
172
Location
fort valley
I need to see if the tools i have will work for diesel, what kind of max psi are we looking at for a compression test on this engine

forget it, i see in the manual about 400 psi or so
 

Bluox

Senior Member
Joined
Jun 19, 2010
Messages
1,960
Location
WA state
yeah i have a leak down tester so i can do that, are these injectors in the 188 diesel DEFINITELY surrounded by a cooling jacket that could be the culprit (in addition to all the other suspected areas) ?

as for checking all tolerances, ill be posting all that here to get feedback as i inspect it all

also, anyone know a good place to ship this head to for rebuild ?

thanks
There are no coppers in that head the nozzles just fit in a straight hole drilled thru the head.
Bob
 
  • Like
Reactions: DB2

tracing

Well-Known Member
Joined
Jul 16, 2018
Messages
172
Location
fort valley
I'm at the point of removing rockers and push rods, then head bolts. Looking into the exhaust ports cylinders 1 2 and 4 are black sooted and dry, cylinder 3 is moist to wet and the exhaust valve stem is much cleaner and shiny is places. Looks like cylinder 3 is the issue, probably (hopefully) blown head gasket. I skipped leak down test cause my tester doesn't have a fitting that will work and it looks like cyl 3 is the area to concentrate on. I'm not trying to rebuild just put back in service until I decide to do more thorough rebuilding at a later date to include engine and trans. Appeared to have life left in it so I want to use that if possible. We will see.
 

tracing

Well-Known Member
Joined
Jul 16, 2018
Messages
172
Location
fort valley
ok so I am having trouble getting the head off, i see at least one post here about dowel pins and pb nut blaster.

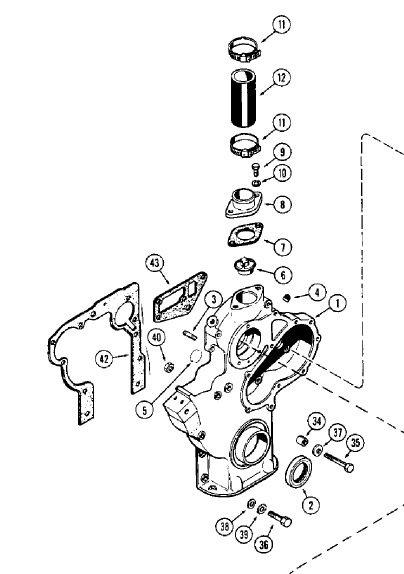
i have removed everything from the head, intake exhaust rockers push rods etc 19 bolts/nuts including the 2 fancy ones that hold the valve cover on (i still have the 2 long studs sticking up but the lower large nuts are removed ) i have removed 4 bolts from the water pump housing that appear to thread into the head. I have not removed any other fasteners from the front housing as they all seem to be lower than the head and go into the block. the book seems to indicate that you do not need to remove this front cover to remove the head, although there is a gasket between the front cover and the front of the head.

when i look at pictures of this front gasket it appears to have 6 holes but i have only pulled 4 fasteners (im not counting the 2 nuts on studs that held the water pump in place as they are lower and at the block level not the head level.)

i am using an engine hoist to lift the head and its not giving at all so far, have not tried to put an excessive load on it yet as i want to make sure i am not missing something, i have seen others post the head can be quite stuck on there.

part 43 is the front head / water pump body gasket and i think i have removed 4 bolts that were going into that. Online images show 6 holes in that gasket but i don't see 2 more fasteners.

i don't want to remove the entire front part number 1 unless its required.

thoughts ?

i am going to spray some pb on the dowels and do a little hammer smacking around the bottom of the head using a sledge and wood, im not going to pull hard using the lift until i see some replies here :)

xO4HaS1.jpg
 

tracing

Well-Known Member
Joined
Jul 16, 2018
Messages
172
Location
fort valley
i did find one more bolt, i need to check and see if it really needed to come out, was inside the pump housing, head still would not release, sprayed pb in the two bolt holes where the bushings are (bolts 14 and 17 in the tightening sequence diagram), applied lift force, tapped all 4 corners with a hammer, and in a few minutes it jumped up 2 inches. cyl 1 2 and 4 piston tops are black and dry, cyl 3 has an ounce of coolant on to of the piston, and the sidewalls of the cylinder are bright and shiny, on cyls 1 2 and 4 they are black.
 

tracing

Well-Known Member
Joined
Jul 16, 2018
Messages
172
Location
fort valley
The hidden bolt i referred to earlier does need to come out, reach in the water pump hole and you will feel an 11/16 head bolt, it goes into the bottom of the front of the head. if you don't pull it and lift the rear of the head you will probably destroy the water pump housing.
 

funwithfuel

Senior Member
Joined
Mar 7, 2017
Messages
5,600
Location
Will county Illinois
Occupation
Mechanic
Can you see damage to the head gasket? Have you found the point of coolant intrusion? If not, please roll #3 to bottom dead center. Look at liner walls very carefully, especially the top inch or so. Looking for grey/white clouds in the liner. Actually, hoping not to see, it would indicate cavitation.
 

tracing

Well-Known Member
Joined
Jul 16, 2018
Messages
172
Location
fort valley
I'm not really seeing anything obvious on the head gasket or surface of block or head. I had changed the oil previously and it has run maybe 15 minutes since then, there is about a half quart of water in the oil. I will move 3 down tomorrow and look, right now 3 is down about 2 inches maybe, all the other cylinders are black on the top inch, 3 is black but has an area on the tractor left and right sides where it is clean. if i find my lost phone i will post pics, my phone tracer says it is within 100 feet of the tractor lol.

What does cavitation indicate ?
 

tracing

Well-Known Member
Joined
Jul 16, 2018
Messages
172
Location
fort valley
ok so i read this...

https://www.heavyequipmentforums.com/threads/case-580c-coolant-in-the-oil.60670/

and im thinking, maybe i should get an in frame rebuild kit and just fix this thing ?

it was run with no thermostat, probably low on coolant too, has coolant in the crankcase, i'm pretty handy, but i dont have a machine shop, is the in frame rebuild doable ? replacing liners etc.

im thinking that if i just replace the head gasket, and that works, there is the risk that the crank or rod bearings have been damaged and ill be splitting a tractor later to replace or grind a crank unless i just replace the crank rod bearings now.
 
Last edited:

tracing

Well-Known Member
Joined
Jul 16, 2018
Messages
172
Location
fort valley
fyi, getting injectors out, i placed the head on the bench, after i first inserted bolts in the BOTTOM of the head, so the bolt heads would keep the bottom of the head in the air to protect the injector tips.
i sprayed a little pb around the injectors, and placed a large round jawed vice grip on the base of the injector, you have to start on cylinder 4, the rear most
i then try to rotate the injector ever so slightly without forcing it, let the pb work, spray it again, wait... i am going for any slight movement left and right, once established that it will move a tad, i spray it and try to add a little more force and eventually, may be 20 30 50 attempts, it gains movement, eventually i get almost 45 to 90 degrees (well maybe not 90)
once i have good movement even if its tight movement, i place a large screwdriver under the VICE GRIPS NOT THE INJECTOR and pry ever so slightly while rotating, this got all of my injectors out.
 

Grady

Senior Member
Joined
Oct 4, 2012
Messages
573
Location
NH
I'm not trying to answer for funwithfuel but cavitation doesn't indicate - he was trying to get you to look for evidence of cavitation erosion. Google it or check this out.

http://www.enginebuildermag.com/2015/03/cavitation-erosion-in-diesel-cylinders/

An in frame rebuild is do-able but it would be nice to determine the source of coolant intrusion. You can have the head checked for cracks and new liners and gaskets will rule them out so as long as the block is good you should be ok. Now you know why it had no thermostat.
 

funwithfuel

Senior Member
Joined
Mar 7, 2017
Messages
5,600
Location
Will county Illinois
Occupation
Mechanic
Cavitation, in extreme cases, such as what he may be experiencing will show on the interior walls of liners as cloudy discoloration of the iron. Those same grey/white clouds usually harbor pin holes that will weep coolant when heated.
I agree w/ Grady, cavitation itself is usually undetectable on iterior walls, however, in extreme cases where coolant was not maintained and pressure was not sustained, excessive turbulence and boiling will occur in between liners. Metal explodes off exterior walls, blah blah blah.... Coolant intrusion.
 

tracing

Well-Known Member
Joined
Jul 16, 2018
Messages
172
Location
fort valley
working on getting all the head studs in the block out, got more than half, a few are stubborn they are soaking, going after the oil pan next. Looks like I have to remove the A frame for the steering cylinders to get the pan off, the tie rod is already off as i was replacing it cause they welded the tie rod ends on lol, lucked out and found probably the last new tie rod bar in the world that is actually in stock

thanks for the link reading it now

i don't plan to order anything until i get stuff out measured and look for part numbers or sizes, normal 010 etc... as well as any catastrophic damage to block and to measure the liners to see which ones i have.

head will either be sent out or i will buy a rebuilt one

what about the oil pump, should i plan on addressing it ?
 

funwithfuel

Senior Member
Joined
Mar 7, 2017
Messages
5,600
Location
Will county Illinois
Occupation
Mechanic
Absolutely. If nothing else, disassemble and inspect. With all that sludge, you may have experienced a little oil starvation here and there.
 

Grady

Senior Member
Joined
Oct 4, 2012
Messages
573
Location
NH
If you want to make your life easier, get a fire breathing wrench. You would have had that thing apart in no time. Old machines need more persuasion.
I think drilling the hole under the screen lets you monitor it over time as well as providing another drain for sediment - even if you do take it apart this time, it may save you from having to do it again.
 

tracing

Well-Known Member
Joined
Jul 16, 2018
Messages
172
Location
fort valley
Yes, it may make sense for me to pull the top off the trans and remove the suction screen THEN drill the case adding the new screen maintenance port while the screen is not in the way of the drill bit.
 

tracing

Well-Known Member
Joined
Jul 16, 2018
Messages
172
Location
fort valley
Got all the pistons out, none of the rod bearings appeared to have worn to the point of messing the crank up. Tried to jack liner 3 out no luck, ordered a home grown liner puller off ebay so need to wait for that to arrive now. I used a hand pump and got all the coolant out of the block, then filled it with pb nut blaster :) Hopefully that will eat at some of the corrosion holding the liners in and prevent any damage to the block when i pull them out. Studying the main crank bearings to see how i will replace all of them. Looks like a challenge.

I know I should plastigauge the crank, I plan to order standard bearings, one wouldn't order oversize due to wear only due to machining is that correct ?
 
Status
Not open for further replies.
Top