• Thank you for visiting HeavyEquipmentForums.com! Our objective is to provide industry professionals a place to gather to exchange questions, answers and ideas. We welcome you to register using the "Register" icon at the top of the page. We'd appreciate any help you can offer in spreading the word of our new site. The more members that join, the bigger resource for all to enjoy. Thank you!

Bought a used 303.5 - Scammed or just Stupid? Or both?

Georgia Iron

Senior Member
Joined
May 6, 2012
Messages
877
Location
USA - Georgia
Occupation
Concrete building slab and grading contractor
My 303.5was a similar mess at the stick end. I built the bores up with 7018, set up a boring bar with my magdrill. Used a high speed steel cutter,they are easy to grind to suit those small holes.built up the end faces and touched them up with a flat face cutter. Used Cat bushings and a long pin to fit the thumb from Elliot Fabrications in Edmonton. Made new bosses for the quick change. Made spacer washers out of aluminum bronze to take all side slop out. That was 2 years ago and its still like new .
View attachment 304770View attachment 304771
Tugger do you have any more photos of this job?
 

skyking1

Senior Member
Joined
Nov 3, 2020
Messages
7,685
Location
washington
It is pretty slick. Tack the stick to the bench, line it all up and go.
I am sure he had the stick free so he could curl it under for laying beads in there, then roll it out so the welding was as easy as it could be. Nobody likes welding overhead in a bore.
 

Georgia Iron

Senior Member
Joined
May 6, 2012
Messages
877
Location
USA - Georgia
Occupation
Concrete building slab and grading contractor
Me not being a Line boring expert. I had to repair the end of a stick on an excavator.

It had a bronze bushing on each side of the bore. The center was open. On one side the bushing cracked and broke apart. It egg holed one side of the bore. I took a small 7018 rod and added metal the bad side.

Then took a die grinder and cleaned it up using the new bushing as a guide. I never got it super snug. But the bushing was supported all the way round again.

Still using it 10 years later.

I like the nice methods you guys have.
I don't mean that in a condescending way. When I read my post it seemed like that.
Ffff... what I am trying to say is let's see the way you pros do it. Over and out.
 
Last edited:

skyking1

Senior Member
Joined
Nov 3, 2020
Messages
7,685
Location
washington
I got it. I love mag drills and one will probably follow me home some day. That was the first time I saw one used like that.
 

emmett518

Senior Member
Joined
Mar 24, 2021
Messages
812
Location
USA
Always ask. If they say no, you’re out nothing. If they say yes, you have some cash to fix the problems.
 

Tugger2

Senior Member
Joined
Mar 22, 2018
Messages
1,379
Location
British Columbia
Tugger do you have any more photos of this job?
P2023001.JPGP2023002.JPGP2023009.JPG
Thats my bearing setup.Take a pillow block bearing ,roll the bearing out of the housing . Then i make a mandrel that will hold the housing in the lathe chuck so the flanges can be machined off leaving a groove for the 1/2" set screws. A short chunk of 6" shed 80 pipe with 4 1/2" holes tapped in makes the mount . On the 305.5 i had a piece of 3" plate that made a nice bench on some shop stands .Tacked the stick to it along with the bearing mounts and a plate for the mag to grip. Line up of existing pins and a bit of practiced eyeballing and your away. The heavy plate absorbs the vibration and any potential chatter well. I use high speed steel ,3/8" square on these holes. It takes some thought to grind the tool to get a good shape with clearances and relief as needed . I use inside calipers to feel the bore for size,bend them to shape to the bore and go around the bar.Then check your sizing with a micrometer ,its an aquired skill but not hard .set the bit with a light tap of a hammer. A dial indicator helps sometimes ,sometimes a feel with your finger gets it. Diegrinder ,flapwheels and lock tite are a practicing line borers best friend.
 

Georgia Iron

Senior Member
Joined
May 6, 2012
Messages
877
Location
USA - Georgia
Occupation
Concrete building slab and grading contractor
Thats my bearing setup.Take a pillow block bearing ,roll the bearing out of the housing . Then i make a mandrel that will hold the housing in the lathe chuck so the flanges can be machined off leaving a groove for the 1/2" set screws. A short chunk of 6" shed 80 pipe with 4 1/2" holes tapped in makes the mount . On the 305.5 i had a piece of 3" plate that made a nice bench on some shop stands .Tacked the stick to it along with the bearing mounts and a plate for the mag to grip. Line up of existing pins and a bit of practiced eyeballing and your away. The heavy plate absorbs the vibration and any potential chatter well. I use high speed steel ,3/8" square on these holes. It takes some thought to grind the tool to get a good shape with clearances and relief as needed . I use inside calipers to feel the bore for size,bend them to shape to the bore and go around the bar.Then check your sizing with a micrometer ,its an aquired skill but not hard .set the bit with a light tap of a hammer. A dial indicator helps sometimes ,sometimes a feel with your finger gets it. Diegrinder ,flapwheels and lock tite are a practicing line borers best friend.

Couple of questions.

1. Is the purpose of the groove to allow the set screws to get a better bite?

2. On the calipers what are you bending to match the bore?

3. How does the cutter mount to the bar?

4. What do you use to weld up the bores? 7018 / nickel?

5. Why do you use that type of bearing. Say compared to a fixed type bearing.


Thanks
 

skyking1

Senior Member
Joined
Nov 3, 2020
Messages
7,685
Location
washington
The groove and the four screw method of fixing those bearings allows him to adjust that shaft in space and get it centered up in the bore.
He can tighten and loosen the various opposing bolts to move it around, while measuring the clearance to each side.
You could achieve a similar adjustability with a flat plate with oversized holes, bolts and washers and the original plate mount bearing.
It would be a whole lot more fiddly.
Think loosening the bolts up just a little bit and tapping with a hammer and going too far. ARGH!
Once you got it where you wanted it. You'd want to tack weld the bearing housing to the plate.
 

Tugger2

Senior Member
Joined
Mar 22, 2018
Messages
1,379
Location
British Columbia
Tugger do you have any more photos of this
-The groove is to help keep the bearing in place .
-The calipers are the spring loaded leg type with an adjustment screw that opens and closes the legs against the spring. I warm the legs up and bend them to suit.its a matter of holding one leg solid against the bore and scratching the other leg against the oposite side of the bore at its centre axis.
-The cutter is mounted in a hole drilled thru the bar witha set screw tapped into the side of the hole. A square broached hole is nice if your ambitious when making your bar.
-I run 7018 in the bores, stringers long ways instead of a circular pass like the bore welders.Its not hard to curl the stick around a bit for better positions.
-We always seemed to have pillow blocks around , they are cheap to buy .The cast housing is easy to machine off .They stand up pretty well to.
Ill try and get pics of the calipers when i get near the shop again ,busy on site this week.
 

os4ivmb

Member
Joined
Jan 29, 2024
Messages
15
Location
WA
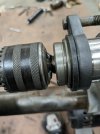
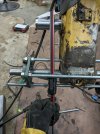
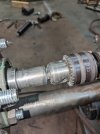
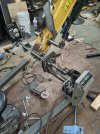
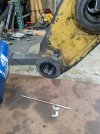
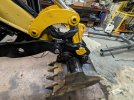
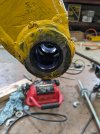
Just an update on a similar note - I have likely the world's most mentally unstable line bore setup. As someone guessed above, yeah it's a little bit too quick, but it's doing the job thus far. I figure if my plan here doesn't work, that I'll just do it again and learn more. For some dumb reason I'm just doing this with items I have on hand. Centered the bar in the bore with a 3d printed insert, then checked parallel with the upper bushing a few inches out.

The feeds and cuts need to be very light, or it's worlds of chatter. As expected, on the "pull" cuts, the taper on the chuck would pull out. It's okay, welded it in place. Then I got tired of the boring bar slipping in the chuck, so that got welded too. I'm doing partial bores from both sides to whatever gives a stable circle. After that, I'll machine sleeves to lightly press in to get a shade under a 50mm bore. After that, I'll heat the end of the stick up and give the bushings a liquid nitro bath and hopefully get those set without wrecking the sleeve. I'll leave 4mm of free bore in the sleeve outside of the bushing for a shaft seal. Might tack weld the sleeve to the outside just to help it stay put.. but probably won't.

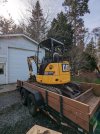
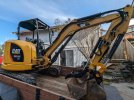
Either way, it'll be good enough for use around the property for a while. The rest of the machine is near good to go. New pins and bushings just about everywhere else, new tracks, all things checked and getting the primer all sanded for the body panels. New paint new decals and she should be right squared away. Ive had a lot of fun with this thing. Heavy equipment seems like a whole different kind of working on stuff. Big Lego pieces that you can wail on with sledges.
 

Attachments

  • PXL_20240214_042446605.jpg
    PXL_20240214_042446605.jpg
    2.7 MB · Views: 34
  • PXL_20240214_033430510.jpg
    PXL_20240214_033430510.jpg
    3 MB · Views: 33
  • PXL_20240214_051543492.jpg
    PXL_20240214_051543492.jpg
    3 MB · Views: 35
  • PXL_20240214_051655286.jpg
    PXL_20240214_051655286.jpg
    3.6 MB · Views: 35

Welder Dave

Senior Member
Joined
Oct 11, 2014
Messages
12,549
Location
Canada
If you're using liquid nitrogen, you shouldn't need to heat the bore for the bushings. I think it might cause the bushing to crack because of the extreme temperature difference. Also don't tack the bushing as that could cause it to crack too.
 

os4ivmb

Member
Joined
Jan 29, 2024
Messages
15
Location
WA
Well it ain't all perfect, but it'll get the job done. Everything is put together and is as tight as it probably was from the factory. Whether the whole sleeve strategy will last the long haul is anyone's guess. Though the sleeves and bearings are in there... Enough to snap 3/4" allthread when I was pulling them into the bore after being cooled.

But yeah happy that it works. New paint on some parts too just to make me feel better about everything.

Thanks folks in the thread for all the tips and tricks
 

Attachments

  • PXL_20240217_202648277.jpg
    PXL_20240217_202648277.jpg
    2.6 MB · Views: 45
  • PXL_20240218_022217061.jpg
    PXL_20240218_022217061.jpg
    3 MB · Views: 44
  • PXL_20240218_022223024.jpg
    PXL_20240218_022223024.jpg
    3 MB · Views: 45
  • PXL_20240217_215456508.jpg
    PXL_20240217_215456508.jpg
    2.5 MB · Views: 45

92U 3406

Senior Member
Joined
Jan 3, 2017
Messages
3,169
Location
Western Canuckistan
Occupation
Wrench Bender
One thing with Cat is they don't really use model years. The machine very well could have been built in 2013 but wasn't actually purchased and put into service until 2016.

Maybe it was mentioned somewhere in the thread already, I only skimmed through the responses.
 

os4ivmb

Member
Joined
Jan 29, 2024
Messages
15
Location
WA
Finally found the time to finish the machine. I don't have before pictures of everything but it was fairly beat up. Now looks like new-ish and feels great. As tight as it was from the factory - the only thing I didn't end up working on was the slew ring. The pinion gear had maybe 1/32 of wear on it, so not the end of the world.

New pins/bushings pretty much everywhere. Anything that was off was repaired or replaced. Added another aux circuit with a radio and a light bar.

Going now to live an easy life on my cabin property. Probably not getting anywhere near 100hr/yr.

Total cost at this point is the initial 26k + about 3.5k in parts and tracks. So all said and done, what do y'all think? Is 30k a good price for this machine?
 

Attachments

  • PXL_20240313_222702135.jpg
    PXL_20240313_222702135.jpg
    4.2 MB · Views: 36
  • PXL_20240313_222717704.jpg
    PXL_20240313_222717704.jpg
    3.3 MB · Views: 36

BC Placer gold

Senior Member
Joined
Mar 6, 2014
Messages
355
Location
Enderby, Bc Canada
Good job, should be a really good acreage machine!

Price sounds okay….we are in Canada so prices tend to be very high. Not sure about your local market.

Even a brand new machine usually has some backlash on the pinion gear.
 

TomA

Well-Known Member
Joined
Aug 17, 2012
Messages
145
Location
Mariposa, CA
Local auction had a couple of Bobcats sold over $20k. They had many brand new micro excavators with 13 hp air-cooled engine. These sell for about $3400, some pay more.

I thought this might impact the price of the mini's but I guess not.
 

Georgia Iron

Senior Member
Joined
May 6, 2012
Messages
877
Location
USA - Georgia
Occupation
Concrete building slab and grading contractor
Finally found the time to finish the machine. I don't have before pictures of everything but it was fairly beat up. Now looks like new-ish and feels great. As tight as it was from the factory - the only thing I didn't end up working on was the slew ring. The pinion gear had maybe 1/32 of wear on it, so not the end of the world.

New pins/bushings pretty much everywhere. Anything that was off was repaired or replaced. Added another aux circuit with a radio and a light bar.

Going now to live an easy life on my cabin property. Probably not getting anywhere near 100hr/yr.

Total cost at this point is the initial 26k + about 3.5k in parts and tracks. So all said and done, what do y'all think? Is 30k a good price for this machine?
I wouldn't even think about it. You will have your answer in 500 or a 1000 hrs from now if it puts out some good work with out any major failures. All machines in those price ranges typically need some work.

A 1' bucket would be on my list if you don't have one. Nice repairs and good luck.

I had a 302.5 not as nice as yours used it for several years and sold it for more than it cost used. When people see you using it they will want it.
 
Last edited:
Top