
-
Thank you for visiting HeavyEquipmentForums.com! Our objective is to provide industry professionals a place to gather to exchange questions, answers and ideas. We welcome you to register using the "Register" icon at the top of the page. We'd appreciate any help you can offer in spreading the word of our new site. The more members that join, the bigger resource for all to enjoy. Thank you!
You are using an out of date browser. It may not display this or other websites correctly.
You should upgrade or use an alternative browser.
You should upgrade or use an alternative browser.
Service code on a d6t
- Thread starter artree0
- Start date
Nige
Senior Member
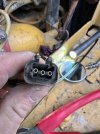
#3 is for coolant temperature. Shown as 2-wire both in Parts Manual and electrical schematic. According to Parts Manual the sensor has no pigtail (2nd illustration). The engine wiring harness plugs straight into it.
What are the wire colours & numbers if you can see any on the engine harness side of the connector for any sensor you're interested in. It makes it easier to identify stuff.
Unless your photo above is deceiving that 3-pin connector doesn't look like anything Deutsch I've seen before. For a kickoff Deutsch 3-pin connectors are AFAIK all triangular.


EDIT: The other sensors in that illustration are:-
#2 - Inlet Manifold Temp
#4 - Atmospheric Pressure
#5 - Engine Oil Pressure
#6 - Inlet Manifold Pressure
#7 - Injection Actuation Pressure
#8 - Speed/Timing
What are the wire colours & numbers if you can see any on the engine harness side of the connector for any sensor you're interested in. It makes it easier to identify stuff.
Unless your photo above is deceiving that 3-pin connector doesn't look like anything Deutsch I've seen before. For a kickoff Deutsch 3-pin connectors are AFAIK all triangular.
EDIT: The other sensors in that illustration are:-
#2 - Inlet Manifold Temp
#4 - Atmospheric Pressure
#5 - Engine Oil Pressure
#6 - Inlet Manifold Pressure
#7 - Injection Actuation Pressure
#8 - Speed/Timing
Last edited:
Unless your photo above is deceiving that 3-pin connector doesn't look like anything Deutsch I've seen before. For a kickoff Deutsch 3-pin connectors are AFAIK all triangular.
I think that's an Ampseal connector which has lost its cover and had the locking tab broken off. They're typically used on the newer Perkapillar engines.

Nige
Senior Member
I don't think I've ever seen one on a C9 though......I think that's an Ampseal connector which has lost its cover and had the locking tab broken off. They're typically used on the newer Perkapillar engines.
The OP's machine has the 3306034 sensor group due to there being a serial break at THX22180. It looks like this sensor group does use at least some Ampseal style sensors. However, in both sensor groups, the ECT sensor is 2 pin so the plug in the photo is for something else. Engine oil pressure maybe?

Nige
Senior Member
There are four options for a 3-wire sensor on that engine, and they are all pressure sensors, engine oil pressure being one of them.However, in both sensor groups, the ECT sensor is 2 pin so the plug in the photo is for something else. Engine oil pressure maybe?
Again it comes back to the (as yet) unanswered question of what the colours/numbers are on the wires. With that information it would be easy to identify which sensor it is.
Have a 465-6504 filter ordered but not sure it is applicable to my dozer. It's a canister. Have a cartridge type at my filler location. Is there another location for that # to go? Cat says its for my machine as the cartridge one also.
Nige
Senior Member
If it's the one I've circled - Atmospheric pressure.Brown, white and green on #7 of schematic.
The arrowed one is coolant temp.

Nige
Senior Member
Were you looking in the right place.? The steering charge filter is located in a compartment at cab level on the LH side of the machine. Should have a door on it. 465-6504 is the correct Part Number for that filter.Have a 465-6504 filter ordered but not sure it is applicable to my dozer. It's a canister. Have a cartridge type at my filler location. Is there another location for that # to go? Cat says its for my machine as the cartridge one also.
Nige
Senior Member
That’s the steering filter. I suggest that you make sure the filter bypass switch is working correctly while you are in there.Just the battery and fuse box on left. Have a cartridge one along with trans dip stick there in right side with door.
Nige
Senior Member
Go back to Post #24 on the previous page. In it there is a link and a reference to details how to clear Codes.You had sent me a how to on clearing codes. Can't find it. Thanks in advance!!
What happened with the E281 for the steering filter.?
Nige
Senior Member
Dead easy to check the switch. Unscrew it from the filter housing then reconnect it to the machine harness. From memory with the button on the business end of the switch pressed the alarm should be off, released it should be on. You could do the same test with a multimeter to check the switch contacts are opening & closing.