• Thank you for visiting HeavyEquipmentForums.com! Our objective is to provide industry professionals a place to gather to exchange questions, answers and ideas. We welcome you to register using the "Register" icon at the top of the page. We'd appreciate any help you can offer in spreading the word of our new site. The more members that join, the bigger resource for all to enjoy. Thank you!

Ole "Fred" to the Rescue Again!!

1693TA

Senior Member
Joined
Feb 27, 2010
Messages
2,687
Location
Farmington IL
Occupation
FAA Radar Engineer, (Retired)
Decided to start and new thread rather than continue to cabbage onto Aighead's.

Got a call from guys with the manlift and they were done with it. Said they noticed a slight leak as the machine got warmed up. Back at the shop I found a 3/8" hose rubbed through from slight movement as the boom elevates. I replaced the same and then rode the basket up and down twice to purge air from this circuit operating the basket swivel each way several times at elevation, and ground level. I then went to the top again and at the extreme end of travel for the boom lift cylinder. I heard the relief valve function and a "Pop"! along with an immediate spray of oil. Blew the main hose for the boom lift cylinder. Safeties worked as they should and boom did not shudder, or drop at all with the sudden loss of hydraulic pressure. However driving the boom back down so I could get out made a real mess of oil. I grabbed a clean, large drain pan and was able to probably capture about half of what evacuated the system so it will be strained, filtered, and reused till a complete change out later this year.

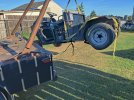
I coupled "Fred" to the boom and using the combination of his winch power, weight, and limited hydraulic pressure available though the boom lift circuit, was able to get the boom back to where I can work on replacing the blown hose which is in the center pedestal.

20230817_094531.jpg
20230817_094541.jpg20230817_095532.jpg


I've since relaxed "Freds" winch tension and the boom is held in placed with it's counterbalance valve. The photos do not show the current elevation of the boom which is about parallel to the ground.

All that steam cleaning last week to finally be rid of the greasy mess this lift has been for years.....
 

redneckracin

Senior Member
Joined
May 19, 2010
Messages
574
Location
Western PA
Occupation
Civil Engineer
I like the photos, but why didn't you get a little closer? Got to love the fix one problem to find another one.....
 

1693TA

Senior Member
Joined
Feb 27, 2010
Messages
2,687
Location
Farmington IL
Occupation
FAA Radar Engineer, (Retired)
This one was just a 3/8" pressure hose for the counterbalance valve. As much of a cloud and spray as I'd seen from above, was certain it was a larger line. Easy to replace and I had both the hose, and fittings on hand.

Takes a little while to get a good tight crimp of the fittings onto the hose with a claw hammer and piece of railroad iron but.....

Boom is manual extend and retract. Knew I only needed assistance from Fred and not a dead lift so didn't retract anything.

Now to pressure wash again.
 

1693TA

Senior Member
Joined
Feb 27, 2010
Messages
2,687
Location
Farmington IL
Occupation
FAA Radar Engineer, (Retired)
Built up and installed a new hose without much issue and operated the lift with all functions to restore an airless system. Now have two of about two dozen replaced.....

Lift is hosed with 100R2 hose which is original to the machine built in 1980. I kinda favor 100R16 citing it's 1/2 bend radius of the 100R2 hose so used that as replacement. My fittings are a bit bulkier than the original Aeroquip fittings, so snaked the hose just a bit different as couldn't route behind the solenoid valve bank mounted to a bulkhead as original.

All in all a nice little job I'd have enjoyed a lot more had there been money coming in for it rather than going out.

Split in hose:

20230817_125136.jpg

Fittings and coil:

20230817_130108.jpg

Decided to not use the claw hammer and railroad iron, so used the hose machine to make the hoses instead:

KIMG0364.jpg

Greased Lightning back to pretty as a pig with lipstick:

20230817_145451.jpg
 

1693TA

Senior Member
Joined
Feb 27, 2010
Messages
2,687
Location
Farmington IL
Occupation
FAA Radar Engineer, (Retired)
He certainly does and I really have thought about it through the years. Went as far as building a set of "stiff legs" for him but never installed.

With the boom all the way retracted about a 5K dead lift is all he's capable of till the rear "hitch" I put on in 1985 is blocked up. I have two 6X6 timbers for the task when needed and they work well for the blocking. Heaviest I've ever lifted was a lathe that weighted right at 12K, but I just picked it straight up and the trailer backed under the load. Probably could have done near the same here by opening the "emergency decent" valves which neutralize the hydraulic system and picked the boom up with the winch but opted for that shown. Pick the wheels clear of the ground, power the boom up till wheels are back down, then repeat. I was certain the counterbalance valves would work as they should.

Showed photos to my wife whom promptly reaffirmed her belief in I'm "effing" nuts.....
 

1693TA

Senior Member
Joined
Feb 27, 2010
Messages
2,687
Location
Farmington IL
Occupation
FAA Radar Engineer, (Retired)
Well, this showed up this morning so guess I'm now an aerial lift platform mechanic:

20230818_121152.jpg

Leaks terrible from both lifting cylinders and the telescoping cylinder is disconnected it sprays so bad:

20230818_121050.jpg

Removed counterbalance valve cartridges and pushed the telescoping cylinder back closed, then chained the basket so I could take up less room inside the shop when the cylinders are off for rebuild:

20230818_125132.jpg
20230818_151114.jpg

Rear telescope cylinder mounting pin is frozen in place. Going to weld a large nut to the pin, thread a grade 8 3/4X16 threaded rod into the nut, then attach a sleeve and hollow ram cylinder to apply some pull action directly to the pin. No real access from the rear side but it's plenty crusty from what I can see. The aluminum counterbalance valve block mounts right to the bottom trunion mount where the pin slides through so may need to remove that if applying heat. Want to attempt cold first.

At this rate I hope an arab with a camel named "Crazy Clyde" doesn't show up.
 

cfherrman

Senior Member
Joined
Jun 3, 2022
Messages
1,813
Location
Hays, Kansas
Fred is not a crane so it doesn't need outriggers, just need to pole up

Moving around broken equipment is much easier with one of these trucks
 

Attachments

  • IMG_20230819_182559.jpg
    IMG_20230819_182559.jpg
    5.5 MB · Views: 41

1693TA

Senior Member
Joined
Feb 27, 2010
Messages
2,687
Location
Farmington IL
Occupation
FAA Radar Engineer, (Retired)
Yes, I have a Leland "Roustabout" 12' bed for my old Mack with full width rolling tail board on the rear. 12' fold down poles with it. 20K Tulsa winch that will be hydraulic driven.

Gin pole trucks are very handy and intuitive to work with.
 

1693TA

Senior Member
Joined
Feb 27, 2010
Messages
2,687
Location
Farmington IL
Occupation
FAA Radar Engineer, (Retired)
Sounds like short poles, I think I have 10' on my won ton
They will be perfect for the single axle truck as my engine drive welder will be crosswise across the back of the cab. I set the frame length for this setup when I rerailed it. Bed was originally on a one ton Ford truck and worked very well for it's purpose which was small equipment and pumps. I have the original split drum winch, but have opted for an Tulsa 23R with double capstans instead. Have several "Mckissick" sheave blocks and the "A" frame weldment for the end of the poles. Poles are light enough to handle without equipment and store in side pockets alongside the bedsides without disconnecting, or unpinning anything. They will also rest on the headrack but rattle terrible there when traveling. Takes all of about five minutes to set up for lift, or drag up onto the deck over the tailboard.
 

1693TA

Senior Member
Joined
Feb 27, 2010
Messages
2,687
Location
Farmington IL
Occupation
FAA Radar Engineer, (Retired)
Well, this showed up this morning so guess I'm now an aerial lift platform mechanic:

View attachment 292578

Leaks terrible from both lifting cylinders and the telescoping cylinder is disconnected it sprays so bad:

View attachment 292580

Removed counterbalance valve cartridges and pushed the telescoping cylinder back closed, then chained the basket so I could take up less room inside the shop when the cylinders are off for rebuild:

View attachment 292582
View attachment 292583

Rear telescope cylinder mounting pin is frozen in place. Going to weld a large nut to the pin, thread a grade 8 3/4X16 threaded rod into the nut, then attach a sleeve and hollow ram cylinder to apply some pull action directly to the pin. No real access from the rear side but it's plenty crusty from what I can see. The aluminum counterbalance valve block mounts right to the bottom trunion mount where the pin slides through so may need to remove that if applying heat. Want to attempt cold first.

At this rate I hope an arab with a camel named "Crazy Clyde" doesn't show up.
Got this pin to move with a four pound sledge and long piece of 1.250" cold roll shaft. If the boom is elevated quite a bit and the basket near touching the roof inside, (27'-3") the pin exposes itself on the back side. From this I could stand on a four foot step ladder and get some good smacks in on it. Got the pin moved about 1/2" but that's good for the day. Very crusty and rust jacking just starting. Tomorrow in the early hours before the heat really ratchets up, I'll get it out with heat or the hydraulic assist mentioned earlier. I removed the counterbalance block and that took some time as the steel bolts retaining this to the cylinder base were corroded and swollen in the aluminum block. They will be replaced. Need to get the lift back outside, extend the telescoping cylinder, then heat the mounting trunion base good and drive the pin out. The cylinder then slides out the rear of the boom.

Hydraulic repair shop will be here on Wednesday morning to pick them up so hopefully the other four pins come out easily and I can get the other two cylinders out of my lift to ship everything together.

Pretty good day for as hot as it is and Sunday, (the day of rest).
 

cfherrman

Senior Member
Joined
Jun 3, 2022
Messages
1,813
Location
Hays, Kansas
They will be perfect for the single axle truck as my engine drive welder will be crosswise across the back of the cab. I set the frame length for this setup when I rerailed it. Bed was originally on a one ton Ford truck and worked very well for it's purpose which was small equipment and pumps. I have the original split drum winch, but have opted for an Tulsa 23R with double capstans instead. Have several "Mckissick" sheave blocks and the "A" frame weldment for the end of the poles. Poles are light enough to handle without equipment and store in side pockets alongside the bedsides without disconnecting, or unpinning anything. They will also rest on the headrack but rattle terrible there when traveling. Takes all of about five minutes to set up for lift, or drag up onto the deck over the tailboard.

Don't put the welder there, a friend has one like that and it's terrible as you can't see anything out the rear window, might be different on your truck.

When poles are on the headache tie down one line below the plane of the poles with a chain or something, tighten the winch up. No more rattle.
 

1693TA

Senior Member
Joined
Feb 27, 2010
Messages
2,687
Location
Farmington IL
Occupation
FAA Radar Engineer, (Retired)
Don't put the welder there, a friend has one like that and it's terrible as you can't see anything out the rear window, might be different on your truck.

When poles are on the headache tie down one line below the plane of the poles with a chain or something, tighten the winch up. No more rattle.
Mine had a window and bed with a solid headboard so never used it. Back in 1980 I removed the original window and installed a small "Jalousie Window" from a camper for some airflow in the cab. That headboard amplified the airflow so never ran with it fully open as it would push loose paperwork out the door windows and constantly messed up my "do". Never had air conditioning except the 2/40 variety. Truck is a 57 Mack B-61T. Driven so long using only the outside mirrors, this shouldn't be a problem.

I've not used this bed myself. Bought the wrecked and rusted truck solely for this. I kept the bed and sold the nice 390 "FE" engine to another party. Transmission was worn out so scrapped the rest. Had a much longer truck with poles and really used it a lot but this one is small and easy to get around with. As a replacement for my one ton Dodge, it should be fine.
 
Last edited:

1693TA

Senior Member
Joined
Feb 27, 2010
Messages
2,687
Location
Farmington IL
Occupation
FAA Radar Engineer, (Retired)
Got the pin out but not as wanted.

This shows pin alignment and drift to smack with 4lb sledge while standing at the top of a 4ft. step ladder:

20230821_081905.jpg

This shows as far as I could get that sumbitch to move with all the ass I had pounding on it and the block the pin slid through almost red:

20230821_090735.jpg20230821_090735.jpg

This shows the next step which is to weld grade 8 hardware to the pin:

20230821_091357.jpg

This is a little 10T hydraulic puller I fashioned to affix to the welded hardware:

20230821_095450.jpg

More to follow.
 

1693TA

Senior Member
Joined
Feb 27, 2010
Messages
2,687
Location
Farmington IL
Occupation
FAA Radar Engineer, (Retired)
This shows what 10T of force does to help out the pin. This photo show tack welding the nut to pin and base but it was welded solid before pulling:


20230821_092641.jpg

Hydraulic force pulled the end right off the pin leaving me this:

20230821_100014.jpg
20230821_100017.jpg

I don't show it but I decided this pin must be soft so got out the Cobalt sawzall blade and hacked it off at the ends inside the boom section. The cylinder then found freedom.

I now have to separate the basket and fly boom from the base boom as the telescoping cylinder removes this way rather than through the rear as originally thought. I'll do that tomorrow in the early hours as it's hot now and direct sunlight where I'm at.

Forgot I'd snapped this just prior to pulling with the hydraulics:

20230821_101356.jpg

Little b*****d worked pretty derned good for something coming from between my ears.
 

1693TA

Senior Member
Joined
Feb 27, 2010
Messages
2,687
Location
Farmington IL
Occupation
FAA Radar Engineer, (Retired)
Have the fly boom just about ready to separate from the base boom then can extract the telescoping cylinder. Old "Fred" will play into this equation once again.

More this afternoon.
 

1693TA

Senior Member
Joined
Feb 27, 2010
Messages
2,687
Location
Farmington IL
Occupation
FAA Radar Engineer, (Retired)
Here we go again:

Separating the basket from the fly boom. I'm an old man and can't swing a 12lb sledge like I used to but got the job done regardless:

20230822_082251.jpg20230822_082429.jpg

Use old "Fred" to suspend and hang the basket from:

20230822_100905.jpg

Now able to separate the fly boom from the base boom:

20230822_100900.jpg

More to follow.
 

1693TA

Senior Member
Joined
Feb 27, 2010
Messages
2,687
Location
Farmington IL
Occupation
FAA Radar Engineer, (Retired)
After unbolting the wear blocks the telescoping cylinder slides right out:

20230822_100916.jpg
20230822_102557.jpg

Rolled seal in the end of the telescoping cylinder:

20230822_102543.jpg

Base boom cylinder rear trunion pin was stuck but knocked right free with a drift. I didn't show it but strapped to the skid steer forks for balance and picked it clear:

20230822_111140.jpg

More to follow.
 

1693TA

Senior Member
Joined
Feb 27, 2010
Messages
2,687
Location
Farmington IL
Occupation
FAA Radar Engineer, (Retired)
Now have two of the three cylinders ready to go to the repair shop. The repair shop has postponed till Friday for pickup but I'm not in a real hurry. I'll use the extra time to pull a couple on my lift spoken of in the past to have repaired also.

These are the telescoping cylinder and base boom lift cylinders staged for pickup.

20230822_120047.jpg

I yet need to get this arm cylinder extracted but will wait till morning as it's damned hot now and directly in the sun:

20230822_120027.jpg

Hope these last two pins push out easy enough. I need to remove and temporarily relocate the ground control station for access to the lower rear pin to drive it through.

I know it will go back together easier than it's come apart but I've really earned my wages with this one. Owner is kept apprised nightly so he knows the cost he's incurring.

Another gent stopped by asking if I'd have a look at his scissor lift unit this morning so these are becoming very good advertisements it seems.
 
Top