• Thank you for visiting HeavyEquipmentForums.com! Our objective is to provide industry professionals a place to gather to exchange questions, answers and ideas. We welcome you to register using the "Register" icon at the top of the page. We'd appreciate any help you can offer in spreading the word of our new site. The more members that join, the bigger resource for all to enjoy. Thank you!

D9H refurb: The boring bits

Crook_Donk

Well-Known Member
Joined
Nov 29, 2016
Messages
56
Location
Australia
Local Cat dealer screwed up the parts order so couldn't start the cab pressurizer. Got tapping bolt holes instead. 52 holes later and am about a quarter to third of the way done. Will need a big tub of anti seize! Slow, but progress all the same.
 

DMiller

Senior Member
Joined
Feb 21, 2010
Messages
16,583
Location
Hermann, Missouri
Occupation
Cheap "old" Geezer
You are aware one swipe of anti-seize is enough to cover the entire globe! Stuff gets on a finger and spreads as if it self expands, have done that on a hundred different jobs, ruined I don't know how many t-shirts and jeans, all off a little dab from a bolt thread or off a wrench that touched a little dab!!
 

kshansen

Senior Member
Joined
Mar 11, 2012
Messages
11,165
Location
Central New York, USA
Occupation
Retired Mechanic in Stone Quarry
You are aware one swipe of anti-seize is enough to cover the entire globe! Stuff gets on a finger and spreads as if it self expands, have done that on a hundred different jobs, ruined I don't know how many t-shirts and jeans, all off a little dab from a bolt thread or off a wrench that touched a little dab!!
True, all anti-seize in the world comes from the one test tube that the inventor mixed up decades ago!
 

Crook_Donk

Well-Known Member
Joined
Nov 29, 2016
Messages
56
Location
Australia
After tapping out all the threaded holes (183 i think i got to!) Turned attention to cab internals now the parts arrived. Reassembled the cab pressurizer unit with new seals for the evaporation coil and bloerr cowlings. All snugged up and ready for a bench test of the electricals. Next job is to mock up the linkages and mark out location and orientation of grease nipples to install. Then a final clean and paint before re assembly of the controls. Slowly getting there.
 

Attachments

  • IMG_20170522_164727.jpg
    IMG_20170522_164727.jpg
    1.3 MB · Views: 125

Crook_Donk

Well-Known Member
Joined
Nov 29, 2016
Messages
56
Location
Australia
Mock install linkages for clutch and brake controls. Not sure on having the interior brown on the external rods leading to the bellcranks. May throw them in the highway yellow pile of painting to come. Drill and tap for grease nipples next.
 

Attachments

  • IMG_20170523_215735.jpg
    IMG_20170523_215735.jpg
    1.1 MB · Views: 138
  • IMG_20170523_215958.jpg
    IMG_20170523_215958.jpg
    1.2 MB · Views: 133

Crook_Donk

Well-Known Member
Joined
Nov 29, 2016
Messages
56
Location
Australia
Cleaned up all the awning window hardware, door handles and latches and installed the doors awnings and most of the hardware. The left hand door has a twist in it which will make finding seals interesting. Probably result of a tree branch or just the operator running the machine with the doors open.
Poor quality phone camera photos taken at night when I do cab work...
 

Attachments

  • IMG_20170529_224131.jpg
    IMG_20170529_224131.jpg
    1.1 MB · Views: 123
  • IMG_20170529_223940.jpg
    IMG_20170529_223940.jpg
    1.2 MB · Views: 119
  • IMG_20170529_224252.jpg
    IMG_20170529_224252.jpg
    863.6 KB · Views: 117

Crook_Donk

Well-Known Member
Joined
Nov 29, 2016
Messages
56
Location
Australia
When this D9 is done it might be too pretty to take it out in the dirt and work!
Haha, yeah it will get plenty dirty don't worry about that!
My business partner and I wanted to get the cab as good as we could for a few of reasons. The main one being that this machine will represent our startup business when it is onsite. We want our reputation to include having reliable, well maintained gear that operators will want to run. Also we want it to be respected by the operators. If it looks rough, it sure won't be looked after by the clients and their operators. It makes the discussion around back charging a non issue as well, as it was in near new condition when handed over.


Plus it satisfies my strange desire to have it all shiny and new!
 

kshansen

Senior Member
Joined
Mar 11, 2012
Messages
11,165
Location
Central New York, USA
Occupation
Retired Mechanic in Stone Quarry
Plus clean and shinny cleans up easier when the job is done!

Agree on the "If it looks like junk they treat it like junk" One of the biggest problems I had was the attitude of bosses who would say "It's just going to get dirty so why wash it!"

When ever I could before servicing a machine I would give it a good hosing down. Made the service work easier and gave me some time looking over the machine to spot that loose hose hold down and small crack in the frame.
 

Birken Vogt

Charter Member
Joined
Nov 30, 2003
Messages
5,324
Location
Grass Valley, Ca
For me warranty work always happened in the busy season and I would not have time to wash a truck before taking it to the dealer so it would be all muddy and dirty and invariably come back scratched up, grease on paint and/or shoddy work. If I was able to wash it first so it looked good to them, the repairs would always come back much better quality.
 

Crook_Donk

Well-Known Member
Joined
Nov 29, 2016
Messages
56
Location
Australia
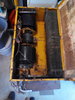
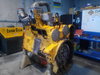
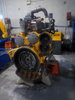
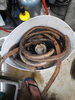
Bit of cab and engine the last week. Heads are on, rear cover and flywheel is on ready to set valves. Intake, exhaust manifolds and external bolt ons got a sandblast to clear up scale etc. Exhaust manifold is in place. Next up is valve set, intake manifold etc.

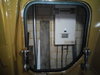
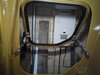
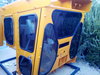
Cab has new door and awning window seals. New seals for the hell hole and other plates are also in. The doors have a satisfying "thunk" when they close, and don't budge after the latch engages.

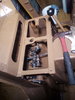
My business partner has been tackling the engine during the week and I help on weekends. He is a real technician and has the older mindset of the grey haired cat men. Great to watch and learn.

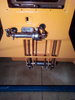
With any luck the engine will be sooting hard by the end of the week. That will be a big milestone!
 

Crook_Donk

Well-Known Member
Joined
Nov 29, 2016
Messages
56
Location
Australia
Accessories are starting to go on. Intake is massive but the intercooler looks to be a huge restriction.
Some of the water lines are pretty rotten and need replacing / repairing. Part of the fun of reviving an old unloved machine I guess.
 

Attachments

  • IMG_20170610_164545.jpg
    IMG_20170610_164545.jpg
    1.3 MB · Views: 160
  • IMG_20170610_164515.jpg
    IMG_20170610_164515.jpg
    1.1 MB · Views: 158

Crook_Donk

Well-Known Member
Joined
Nov 29, 2016
Messages
56
Location
Australia
Glass reinstalled. What a prick of a job that was. Don't want to attempt that myself in the field...definitely a two man job....
 

Attachments

  • IMG_20170611_125631.jpg
    IMG_20170611_125631.jpg
    1.4 MB · Views: 125

DMiller

Senior Member
Joined
Feb 21, 2010
Messages
16,583
Location
Hermann, Missouri
Occupation
Cheap "old" Geezer
Looks as if you have the old split seal key lock glass rubbers. They have a key in or roll in 'flange' that is a bugger to get into place.

I use a tool that I got from Sears Craftsman eons ago called a cotter pin puller to which it was actually useless for to drag along that seam line while lubricated with spray window cleaner to get it to key in. Will take a photo of it later, found nothing easier.

BTW, where is the rest of the machine, no photo not happenin'!!

Oh and the 'ghost' child in the tip out window is funny!!
 

Crook_Donk

Well-Known Member
Joined
Nov 29, 2016
Messages
56
Location
Australia
You've a keen eye DMiller! Didn't notice him there. I am not a fan of putting pictures of my young ones on the internet, so tried to get a quick snap before he jumped in the frame. He was so keen to help clean the new glass.
Found a photo I took of the rubbers when they first came out as a comparison. Stiff and covered in dirt and over spray.
They have shrunk a little over the years so need some Sikaflex to fill the gaps. Cheers for the encouragement. Need them occasionally.
Will post photos of the rest of the machine shortly. It is in bits across various sites as it gets refurbished.
Time for some shut eye. Day job tomorrow!
 

Attachments

  • IMG_20170315_212416.jpg
    IMG_20170315_212416.jpg
    1.4 MB · Views: 79

Crook_Donk

Well-Known Member
Joined
Nov 29, 2016
Messages
56
Location
Australia
While I would love to replace the head linings with new ones from CAT, we need a turbo and T/C components. $50 for felt and some glue vs $1100 for the two liners out of Melbourne. Will have to do until we are up and running. Will cut holes once glue has cured. Time for bed.
 

Attachments

  • IMG_20170613_202648.jpg
    IMG_20170613_202648.jpg
    1.5 MB · Views: 85
  • IMG_20170615_224430.jpg
    IMG_20170615_224430.jpg
    1.2 MB · Views: 85
Top