• Thank you for visiting HeavyEquipmentForums.com! Our objective is to provide industry professionals a place to gather to exchange questions, answers and ideas. We welcome you to register using the "Register" icon at the top of the page. We'd appreciate any help you can offer in spreading the word of our new site. The more members that join, the bigger resource for all to enjoy. Thank you!

D9H refurb: The boring bits

Crook_Donk

Well-Known Member
Joined
Nov 29, 2016
Messages
56
Location
Australia
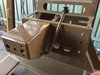
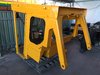
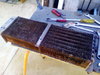
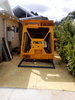
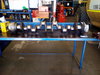
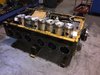
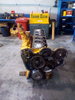
So if you are interested in boring bits of a D9H dozer refurb, you are only slightly less deranged than the person posting such rubbish (me). Here is some photos of the end result of toil this evening. I can only work on the dozer in the evening when the kids are in bed and wife has given up with running cups of tea to the shed, as I work 40 hrs a week in an office job I hate and any spare time the kids are awake is devoted to them. I am working on salvaging any thing I can from the cab, so I have been scraping 40years of dust and mud from the windows rubbers and cleaning the cab pressurizer outlets. This machine is kinda special as it was one of the early machines used by Bell brothers in WA before it became a corrupt entity. There is heaps of red dust in this cab.

If you are looking for inspiration on refurbishing a dozer, this thread may serve as a warning. I've been at these rubbers for about four nights now. Seriously think hard before committing to an old dozer.
IMG_20170323_210524.jpg IMG_20170323_210524.jpg IMG_20170323_214549.jpg
 

Attachments

  • IMG_20170323_221152.jpg
    IMG_20170323_221152.jpg
    1.1 MB · Views: 186

d9gdon

Senior Member
Joined
Feb 12, 2010
Messages
1,517
Location
central texas
Well you sure picked a good project. I see the brown bottle patience there. You'll be through before you know it.
 

Crook_Donk

Well-Known Member
Joined
Nov 29, 2016
Messages
56
Location
Australia
Finally some reward for effort. Blast and paint has been completed after many days and nights dismantling and making repairs to the old girl. Now to get it back home and begin reassembly.
 

Attachments

  • IMG_1594.JPG
    IMG_1594.JPG
    2 MB · Views: 245
  • IMG_1605.JPG
    IMG_1605.JPG
    1.9 MB · Views: 239
  • IMG_1592.JPG
    IMG_1592.JPG
    1.8 MB · Views: 233
  • IMG_1595.JPG
    IMG_1595.JPG
    2.2 MB · Views: 240

JPV

Senior Member
Joined
Aug 20, 2015
Messages
756
Location
S.W. Washington
Keep em coming, one slightly less deranged person is watching, what are you gonna use it for when finished?
 

Crook_Donk

Well-Known Member
Joined
Nov 29, 2016
Messages
56
Location
Australia
Less interesting progress. Cleaning out the cab pressuriser today and straightening the evaporator fins. Wife is now short one plastic hair comb. It was worth it. Before and after of the fins...plus a pic of the fan system
Looks to have been altered as the cowlings have threaded holes without any attachment.. Odd.
 

Attachments

  • IMG_20170401_131412.jpg
    IMG_20170401_131412.jpg
    2.1 MB · Views: 201
  • IMG_20170401_135047.jpg
    IMG_20170401_135047.jpg
    1.8 MB · Views: 197
  • IMG_20170401_144144.jpg
    IMG_20170401_144144.jpg
    1.3 MB · Views: 203

Crook_Donk

Well-Known Member
Joined
Nov 29, 2016
Messages
56
Location
Australia
As for intended use, the intent is to operate this as both wet and dry hire during the agricultural growing season, then once harvest is done, bolt on some proprietary hardware to help farmers improve their soil, and maybe run some subsurface drainage / tiling.
Cheers
 

Crook_Donk

Well-Known Member
Joined
Nov 29, 2016
Messages
56
Location
Australia
Maybe not the exact colour, but the cowlings got a lick of paint. No one will see except me when i need to service the ac unit. Still makes me happy.
 

Attachments

  • IMG_20170401_212702.jpg
    IMG_20170401_212702.jpg
    1 MB · Views: 134
  • Like
Reactions: DB2

Marsh Mutt

Well-Known Member
Joined
Aug 9, 2015
Messages
64
Location
Africa
Pulling up a chair for this one. Looks like no expense is being spared for this D9H re-animation, meaning of course that details of the exact cost had best be kept from one's better half, to preserve peace in the household while this necessary project is under way.
 

Crook_Donk

Well-Known Member
Joined
Nov 29, 2016
Messages
56
Location
Australia
Slow progress, but progress all the same. Made the base of a frame for the cab which arrived from the blast and paint shop this morning. Now to begin the fit out. Need a bunch of seals and a head lining is shot. Cab pressurizer needs a good clean, red dust everywhere. Plenty to do.
 

Attachments

  • IMG_20170407_120011.jpg
    IMG_20170407_120011.jpg
    1.3 MB · Views: 176

kenworth

Well-Known Member
Joined
Feb 27, 2010
Messages
108
Location
Central Washington State, USA
Occupation
Jack of a Few Trades, Master of None
This looks like the start of a great project. Where is the rest of the machine at and what are your plans for the rest of the machine restoration.
Keep the pictures and progress reports coming.
 

Crook_Donk

Well-Known Member
Joined
Nov 29, 2016
Messages
56
Location
Australia
Big bit engine assembly today. Bulk cleaning to get the bottom end sorted. crank, 4/6 liners in place and 4 slugs with rods ready to go. 2 new liner and cylinder packs will go in #1 & #6 location. Good days work.
 

Attachments

  • IMG_20170429_101925.jpg
    IMG_20170429_101925.jpg
    1.3 MB · Views: 242
  • IMG_20170429_102148.jpg
    IMG_20170429_102148.jpg
    1.4 MB · Views: 248
  • IMG_20170429_124541.jpg
    IMG_20170429_124541.jpg
    1.2 MB · Views: 243

Crook_Donk

Well-Known Member
Joined
Nov 29, 2016
Messages
56
Location
Australia
Torqued up some beefier big end nuts and last two liners are in ready for cylinders tonight. Bottom end is almost done.
 

Attachments

  • IMG_2168.jpg
    IMG_2168.jpg
    139 KB · Views: 169
  • IMG_2169.jpg
    IMG_2169.jpg
    141.4 KB · Views: 170

DMiller

Senior Member
Joined
Feb 21, 2010
Messages
16,583
Location
Hermann, Missouri
Occupation
Cheap "old" Geezer
Not to throw a wrench in but you did square up the thrust bearing when installed the caps? I used to bump the crank GENTLY with a dead blow soft face hammer to get bot sides of the bearing squared up so would not run against on side of one shell and the opposite to the other shell.
 

Crook_Donk

Well-Known Member
Joined
Nov 29, 2016
Messages
56
Location
Australia
Back to boring bits. Knocked out the needle bearings (what was left of them) from the clutch and brake pedals and gave them a good clean and buffed the five layers of paint off with the wire wheel. Don't think they have had any love for the last 40 years and should smooth out operating the clutch and brakes somewhat.
Engine has all the pistons in along with cam shaft and rear cover. Water pump drive shaft has been pressed straight to remove the large wiggle it had developed when the engine failed #4 pot. Onwards and upwards.
Edit: yep thrust bearing is all aligned and end play well within tolerance. Bottom end is looking solid.
 

D6c10K

Senior Member
Joined
Apr 1, 2008
Messages
681
Location
Iowa, USA
Back to boring bits. Knocked out the needle bearings (what was left of them) from the clutch and brake pedals and gave them a good clean and buffed the five layers of paint off with the wire wheel. Don't think they have had any love for the last 40 years and should smooth out operating the clutch and brakes somewhat.........

I cleaned up the needle bearings on my D6 like that....then I installed grease zerks in the pedals so I could add grease occasionally. Did the same thing on several other linkage pivot points.
 

Crook_Donk

Well-Known Member
Joined
Nov 29, 2016
Messages
56
Location
Australia
Sorted out timing for the cam shaft and fuel pump/injection system. Flywheel next to confirm and then onto the top end shortly. Parts order for the cab has arrived so will get onto that into the evenings. Managed to straighten out the A/C support plate and hinges. Lots of heat and CRC and she's working like it was designed. Seemed like it could have been fabricated with a heavier gauge steel. Needed plenty of straightening with the press and dolly. A coat of paint or two and that will mark the start of cab reassembly. First need to tap all the new paint out of the weld bosses.
 

Attachments

  • IMG_20170513_151308.jpg
    IMG_20170513_151308.jpg
    1.3 MB · Views: 160
  • IMG_20170513_151300.jpg
    IMG_20170513_151300.jpg
    1.2 MB · Views: 161
Top