
-
Thank you for visiting HeavyEquipmentForums.com! Our objective is to provide industry professionals a place to gather to exchange questions, answers and ideas. We welcome you to register using the "Register" icon at the top of the page. We'd appreciate any help you can offer in spreading the word of our new site. The more members that join, the bigger resource for all to enjoy. Thank you!
You are using an out of date browser. It may not display this or other websites correctly.
You should upgrade or use an alternative browser.
You should upgrade or use an alternative browser.
Case 580B - Water In Crankcase
- Thread starter Gary N
- Start date
willie59
Administrator
Case 188 engine has three freeze plugs in the head under valve cover, item #22.

Last edited:
Gary N
Active Member
Racing darkness after getting home from work, I got the valve cover off tonight. Just like willie59's diagram, there are 3 little 1" freeze plugs in the head. There was water in every pool that would hold water so I blew all the water out with an air nozzle and cleaned it up. Unfortunately those little dang freeze plugs look nice and shiny and no evidence of them being the problem. The old saying "Hope is not a plan" surely applies here. Dang it! I did see rust on the rocker tower bolts and up inside the valve cover suggesting that it has probably been a problem for awhile. I am going to take that as it probably isn't due to a faulty water pump installation which I just did. It couldn't imagine it rusting that soon in that oily environment. So now I'll have to wait for the weekend and pull the pan. I sure wish I would have raised the bucket and blocked it up like I read in packratc's post with the angle iron while I could still start it for short burst. Maybe I can crack a hose and raise the bucket up with my little Ford 1700. I know all you guys like pictures so I'll have to figure out how to post pics as I go through this. I saw that front axle A frame support that goes back to the bell housing area. I'm not going to have to disconnect and move the axle forward to get the pan off am I?
willie59
Administrator
If you currently have the machine in the spot you're going to do repairs, simply drain the cooling system, drain the oil pan, add some fresh oil, start it up and raise loader arms to install safety prop. The extent of time it will take to raise loader arms will only take a few moments, certainly not enough time to even warm the engine up even without coolant.
And yes, we a gluttons for pictures. Here's a thread that might give you some tips on posting pics. > https://www.heavyequipmentforums.com/showthread.php?21903-How-to-add-pics-to-forum-posts
And yes, we a gluttons for pictures. Here's a thread that might give you some tips on posting pics. > https://www.heavyequipmentforums.com/showthread.php?21903-How-to-add-pics-to-forum-posts
ScottAR
Senior Member
I would pull the valve cover and look at the cup plugs in the head as suggested above.... If they are intact, I'd wager your liner rings are shot. I had to replace em in the 207 in my 580d a couple years ago. The 207 is basicly a bigger version of the 188. I'm not sure if leaking could be observed if you pull the oil pan or not. I had similar problems to yours and that was it.
Gary N
Active Member
I would pull the valve cover and look at the cup plugs in the head as suggested above.... If they are intact, I'd wager your liner rings are shot. I had to replace em in the 207 in my 580d a couple years ago. The 207 is basicly a bigger version of the 188. I'm not sure if leaking could be observed if you pull the oil pan or not. I had similar problems to yours and that was it.
ScottAR, when you say similar problems do you mean a lot of water in the crankcase like I described earlier? Also, did yours by any chance leak water into the case just sitting without running. Im really hoping at this point it is the liner rings because the only other think would be a cracked block I would imagine. Thanks for the input. Oh.....you don't think I'll see it leaking once the pans off hey?
ScottAR
Senior Member
I had a lot of water yes. Pan holds about 8-9 quarts of oil on a 207 as I recall and the "milk mix" I had coming out was nearly 5 gallon. I'm not sure about leaking while sitting but I would think so as the block is pretty much open inside with the liner rings separating the water jacket and the crankcase. I'm not sure about the leaking being seen because I didn't look. It may show up or not I just don't know.
As far as what to take off to get the oil pan down I'm unsure. I just had to take the drag link loose on one end and that made enough room but that was a 580D.
As far as what to take off to get the oil pan down I'm unsure. I just had to take the drag link loose on one end and that made enough room but that was a 580D.
Gary N
Active Member
Well that sure sounds like my situation. Hopefully I'll get down to the cause this weekend. Have a couple honeydoos' and then I'm going in. Thanks for the info ScottAR.
Gary N
Active Member
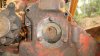
So a good buddy of mine and myself got a good day in on the tear down. Took the pan off, pressurized the radiator and we could see water coming out from the sleeve on cylinder 2 (from front). So we started to take the head off. I heard what you guys said about the bolt behind the water pump so we took that off. That water pump is no easy task. Hard to get the fan off and out without taking the radiator out and hard to take the radiator out without taking the fan off. Its like the chicken and the egg. Anyway.... guess what..... there's not a bolt in that hole behind the water pump. I see threads in there though. I think, hope, that's a water jacket hole anyway. A hollow bolt was mentioned once. Anyone know for sure? See pic.
Then things went bad. The bolt that holds the alternator bracket that also goes into the head snapped off. The last dang bolt. Can you believe it? :Banghead So we had to take the radiator and cooler out so we could drill it out. Had about another 1/8" to go and ran my batteries down on the drill. Was getting dark anyway so called it a day. We should have the head off this afternoon though.
Then things went bad. The bolt that holds the alternator bracket that also goes into the head snapped off. The last dang bolt. Can you believe it? :Banghead So we had to take the radiator and cooler out so we could drill it out. Had about another 1/8" to go and ran my batteries down on the drill. Was getting dark anyway so called it a day. We should have the head off this afternoon though.
Attachments
ScottAR
Senior Member
I'm unsure on the 188 but the water pump bolt on the 207 isn't hollow but an allen socket head. I got to buy a set of allen bits for mine. The only hollow bolt I'm aware of is the one that holds one of the rockerarm stands. Return it to the stand you find it in. Depends on the engine according to my case manual. Above a certain serial number it goes in the back. Below it goes in the middle but my memory is fuzzy as it was a couple years ago. I used zip ties to cinch all the rockers together and took off the whole stand and all the last time.. Makes it some easier than trying assemble it with all those shaft springs fighting you.
Gary N
Active Member
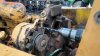
Finished drilling out that bolt and got the head off. When we did the pressure test we saw water coming out #2 so we pulled that piston and sleeve. The o-rings look flat but they were not broken. You can see some evidence of rust trails below the o-rings on the sleeves (zoom in on sleeve pic) . Also, one of the compression rings was broke. The head gasket looked fine so it wasn't that. That dang bolt behind the water pump is really bothering me. I looked on Case's site and they show it as a plug for the '72 Case 580B with hydro-static? Anyway, I'm into it now so wheres should I look to get a sleeve kit? I don't want to go here again. I should just do all 4 since I'm in this deep.

Just another pic......
Just another pic......
Attachments

willie59
Administrator
Joseph Industries. > http://www.joseph.com/
Gary N
Active Member
Since I cant work on my engine on weekdays cause its just about dark when I get home, I try to get my research in on putting her back together. Here's what I've picked up by reading your guys post. Good stuff from packratc, shopguy, alrman, and Tinkerer to mention a few.
1) Install the liners without the o-rings, clamp them down with the bolt and washer method and check the liner height. Shim as required to bring to spec. Then put the 0-rings on and butter them up good with o-ring lube.
2) I saw alrman's method of the valve adjusting procedure....
To adjust #1 on compression look for #4 to be rocking;
adjust #3 with #2 rocking;
adjust #4 with #1 rocking;
adjust #2 with #3 rocking;
3) I'm still torn about that bolt behind the water pump that was not in mine when I took it apart. Some say its a hollow bolt so I reckon the water must pass through as that's a water passage. If that's the case (pardon the pun) a missing bolt isn't a show stopper. But I saw a diagram on Cases web site and it shows what appears to be a plug. And I also read that if the head isn't lined up right due to bad sleeve height that the water pump bolt wont line up and go in....makes perfect sense. I need to figure out if I'm supposed to have a bolt or a plug.
4) I also didn't remove the front cover to take the head off. I can see that will be a real problem putting the head back on. Looks like packratc used silicone instead of a gasket or did you use both. Seems like he loosened the front cover enough to wedge it forward far enough to get it on and seal. Comments??
Lastly, where can I find all my specs like liner height, rocker arm clearances, rod and head torques, head tighting pattern etc? I don't have a manual.
I'll keep digging into the wealth of information all you guys have laid out in this awesome forum but I really struggle searching for what I'm looking for. I'm not doing something right in my searches. I knows its all in here, I just have to find it.
This next weekend I will have everything out and cleaned up to start putting it back together. I'm going to have to find a place to get my liner kit from. I cant wait to post up pics of all the pretty new shiny stuff going back together!! Maybe I can earn a Senior Member merit badge by the time this is all over...
Gary N
Active Member
Found where packratc got his kit. They also had the specs I need. http://www.agkits.com/images/G188D.gif
It says sleeve protrusion is .002 - .006? Is that a different thing? I'm thinking I'm about .050? Just rambling though.....am I a G188D? More home work for me!!
It says sleeve protrusion is .002 - .006? Is that a different thing? I'm thinking I'm about .050? Just rambling though.....am I a G188D? More home work for me!!
packratc
Senior Member
I tried to cover most of this during my engine rebuild. I don't think that the bolt behind the pump is hollow. If it is I don't remember. I did loosen the front cover and used the gasket and silicone to put the head back on. Couldn't get head in place without loosening it. For an out-of-frame rebuild you'd take the water pump housing off. My manual is out in the shop or I'd check that bolt for part number. The most valuable tool that I've purchased for my backhoe is the factory manual. I first bought a CD and it's pretty good. But it ain't nothin' like the manual. The crankshaft is pretty tough. I looked the bearings all over and plastiguaged (sp?) a couple. They were standard and I replaced them all. I took someone else's advise and bought my rebuild kit online & it was good quality stuff. These are pretty straight-foward diesel engines. Should be a piece of cake. Good luck. Packratc
Gary N
Active Member
I tried to cover most of this during my engine rebuild. I don't think that the bolt behind the pump is hollow. If it is I don't remember. I did loosen the front cover and used the gasket and silicone to put the head back on. Couldn't get head in place without loosening it. For an out-of-frame rebuild you'd take the water pump housing off. My manual is out in the shop or I'd check that bolt for part number. The most valuable tool that I've purchased for my backhoe is the factory manual. I first bought a CD and it's pretty good. But it ain't nothin' like the manual. The crankshaft is pretty tough. I looked the bearings all over and plastiguaged (sp?) a couple. They were standard and I replaced them all. I took someone else's advise and bought my rebuild kit online & it was good quality stuff. These are pretty straight-foward diesel engines. Should be a piece of cake. Good luck. Packratc
I'm guessing you got this kit....
http://www.agkits.com/Case-188-G188D-Diesel-Engine-Rebuild-Kit.aspx
Looks like a good deal.....I really wasn't thinking about doing the mains though. You did your mains "in frame" and slid them up in there with the nail trick hey? Its a tough decision. I have that "if it aint broke, don't fix it" philosophy. But then in this case you'd sure kick yourself in the butt if you don't when your in that deep hey?
packratc
Senior Member
Yep, did the mains too. When you're that deep in it it ain't no big thing. I think that the condition of the mains will just indicate whether the previous owners changed oil often enough. No matter. If they're bad their bad. Make sure your rear main seal is not leaking. It's time to do it too if need be. Good luck, Packratc
Hey dont give that dang bolt another thought just look at the head and see where the hole leads to or still not sure hit it with a blow gun see where it goes i have heard of them being left out because the head had been shaved so many times it would not line up .Was the water coming from inside or out side the sleeve ?
Gary N
Active Member
shopguy....I have only pulled one liner so far. I didn't see a real positive leak trail through the o rings. I figure I'll see a nice rust trail passing by the problem area. I will pull the other 3 this weekend and hopefully find the cause of the leak. What I'm trying to say is right now I don't really know where it was leaking.