• Thank you for visiting HeavyEquipmentForums.com! Our objective is to provide industry professionals a place to gather to exchange questions, answers and ideas. We welcome you to register using the "Register" icon at the top of the page. We'd appreciate any help you can offer in spreading the word of our new site. The more members that join, the bigger resource for all to enjoy. Thank you!

Bobcat 773: "Mystery Part"

DrJim

Well-Known Member
Joined
Feb 19, 2011
Messages
172
Location
Oak Ridge TN
Occupation
General Dentist, including Implant Restorations
I have set out to re-seal my spool valves, re-build the float detent mechanism, and refurbish the pintle arms & torsion bushings. I started out by having a helper thoroughly clean the innards of the machine, with the cab tilted up.

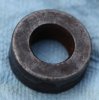
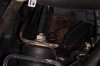
When I started to work, I spied a part--a bushing or spacer of some kind--lying on the top of the "case" immediately under the pump, in the area beneath and slightly in front of the right side pintle mechanism. Here is the part, and the area in which it was found.
 

Attachments

  • IMG_4323 (640x427).jpg
    IMG_4323 (640x427).jpg
    75.8 KB · Views: 1,277
  • IMG_4326 (640x427).jpg
    IMG_4326 (640x427).jpg
    145.7 KB · Views: 1,348

DrJim

Well-Known Member
Joined
Feb 19, 2011
Messages
172
Location
Oak Ridge TN
Occupation
General Dentist, including Implant Restorations
So the question is. . . what is it, where did it come from? I am not aware of anyone else ever working on this machine. . . and we haven't done anything but replace some hoses. . . and of course, filters and fluids.

I must confess. . . I have played a role in mystery parts before. A good friend--I'll call him "Ratchet"--worked at the local Mopar dealership. Mark is top-notch, and always had some major re-build going on.

From time to time I would walk through the shop to visit him. If he wasn't looking, I would drop an extra bolt or other part (only one--never more than one!) on his parts tray. If I had been there, he would usually catch it pretty quick. If I hadn't been by there, he would sometimes call me and ask me if I had been by looking for him--that meant he must have actually left something out (or somebody else was messing with him).

I don't think this part was planted. It doesn't fit any of the hardware we have disassembled. . . and the paint on the top of the ? case (whatever it is) has a ring in it as though the spacer/bushing has been sitting there for a long time.

Is the part familiar to any of you Bobcat experts? Thanks for looking.
 

willie59

Administrator
Joined
Dec 21, 2008
Messages
13,409
Location
Knoxville TN
Occupation
Service Manager
It's a spacer for the bottom drive pump support bolt Jim, I've seen this several times. Vibration makes the bottom pump support bolt rattle out, spacer drops. Many times I've simply put spacer back in place and install a new support bolt. Other times I've had to run a tap into threaded hole to repair a few buggered threads, use red locktite on new bolt.

The spacer fits in the gap in red circle. The 1/2"-13 bolt goes through hole in bracket (see red arrow), through spacer, then into threaded hole in bottom of drive pump housing. You may have to pry up on drive pump housing to get bolt to start in threads. ;)


Dr Jim Bobcat.jpg
 
Last edited:

mach123

Member
Joined
Nov 10, 2012
Messages
13
Location
st albert
I think willie is correct, but I was going to say the to round ones on my back door latch looks like those.....
 

DrJim

Well-Known Member
Joined
Feb 19, 2011
Messages
172
Location
Oak Ridge TN
Occupation
General Dentist, including Implant Restorations
Willie59: 1/2" x 13 by what length, I wonder? The bolt ought to be there somewhere. It's too big to get out of the drain holes
 

willie59

Administrator
Joined
Dec 21, 2008
Messages
13,409
Location
Knoxville TN
Occupation
Service Manager
Yes, logic would dictate that bolt would still be in there. But in my experience (unlike the spacer), that bolt seems to fall into the abyss. :D
 

DrJim

Well-Known Member
Joined
Feb 19, 2011
Messages
172
Location
Oak Ridge TN
Occupation
General Dentist, including Implant Restorations
Maybe like up under the plastic fuel tank, rubbin' a hole. . . .
 

willie59

Administrator
Joined
Dec 21, 2008
Messages
13,409
Location
Knoxville TN
Occupation
Service Manager
Maybe like up under the plastic fuel tank, rubbin' a hole. . . .


LoL, I'm sure that bolt will have something to do with at least one of Murphy's laws. :D

I can't recall the length of the bolt, but a quick measure with a ruler of some sort should confirm length, adding maybe 3/4" to 1" to fit in threads in pump housing.
 

Bobcatdan

Well-Known Member
Joined
May 15, 2012
Messages
241
Location
wisconsin
You will be very lucky if the pump mount bolt fell. Those like to break off. I check them on every machine that uses that style and they are often broke. Most of the time I can find the right angle to attack it and drill it out, but I have pull several engine?hydro combo out for the the really tough one. I had one one time that I drill, started exacting, it moved several turns and locked tight. A half day of meesing around before I gave up and pulled then engine combo. When the bolt broke it banged up the threads so bad the rest of it wasn't coming out. I had to spin it out the back side, cutting it down several times to clear. I hate pump mount bolts.
 

bill onthehill

Senior Member
Joined
Dec 27, 2008
Messages
661
Location
pa/ny border
I found the pump bolts loose and laying in the pan of my Gehl skid steer when I dropped the bottom pans to clean it out. At least they were easy to get to.
 

DrJim

Well-Known Member
Joined
Feb 19, 2011
Messages
172
Location
Oak Ridge TN
Occupation
General Dentist, including Implant Restorations
Great. . . thanks for the "encouraging" words, Bobcatdan. Maybe I'll be the lucky one this week. The machine is at the farm; I'll check the hole later this week. I don't know what grade Bobcat assembled it with, but the replacement part #'s are all Grade 8. Tougher to break, but darn sure tougher to drill and/or cut off, too.
 

DrJim

Well-Known Member
Joined
Feb 19, 2011
Messages
172
Location
Oak Ridge TN
Occupation
General Dentist, including Implant Restorations
Pump Mount parts breakdown

The "mystery part" question has been beneficial in bringing the loose/missing pump mount bolt issue to HEF.

Here are the engine mounts/pump mount parts for my 2001 Bobcat 773G series.

Exploded Diagram
Pump Mount 1 (456x640).jpg
Code:


Parts List, page 1
Pump Mount 2 (456x640).jpg

Parts List, page 2
Pump Mount 3 (456x640).jpg


The Mystery Part that prompted this thread (spacer) is #44. Also note the spacers (washers) #13, and the bolt, #43. Bobcat specs out (3) different bolts, each with a different length. I surmise that the different bolt lengths are used for different spacer combinations. The longest bolt reportedly has an unusual "shoulder" area vs. threaded area, stock for this application. With the exception of the 2" length, the bolt lengths are probably not something easily found at a hardware store in Grade 8. Bobcat of Knoxville stocks each of the parts in question. Though this is for a specific ser # run of 773G, the scheme likely applies in general terms to other Bobcat models.
 

DrJim

Well-Known Member
Joined
Feb 19, 2011
Messages
172
Location
Oak Ridge TN
Occupation
General Dentist, including Implant Restorations
Pump Mount Bolt, continued

:update The winner is: Bobcatdan! My boy "Mistake" went by the farm tonight and says, yes, the bolt is broken off approximately 1/8 - 1/4" deep in the hole. :crying

I'm not good at much, but I am really good at breaking off drill bits and extractors in broken bolts. Without any help at all, I can do that most every time, the first try. Nothing that a good EDM machine can't fix.

Maybe I'll wait until Willie59 is off in Virginia working on one of those Morookas. . . and then drop the machine off at his shop, and tell 'em I need it back "tomorrow morning." :D
 

willie59

Administrator
Joined
Dec 21, 2008
Messages
13,409
Location
Knoxville TN
Occupation
Service Manager
Maybe I'll wait until Willie59 is off in Virginia working on one of those Morookas. . . and then drop the machine off at his shop, and tell 'em I need it back "tomorrow morning." :D


LoL, good luck getting that done. :tong

Sorry to hear that bolt is snapped off in the hole Jim, bummer of a spot to work in getting it out. :mad:
 

DrJim

Well-Known Member
Joined
Feb 19, 2011
Messages
172
Location
Oak Ridge TN
Occupation
General Dentist, including Implant Restorations
Looks like some hoses would have to come off to allow access with a drill. . . unless one of you true experts can drill it with a right-angle drill.

Studying bolt-extractors; the Alden Drill-Outs look good but the pump-mount bracket is out from the bolt hole, would probably not allow deep enough drilling with the Alden Drill-Out. Any suggestions, Dan or anyone? I'm thinking it is something that probably should be fixed, not ignored. No telling how long it has been like that.
 

DrJim

Well-Known Member
Joined
Feb 19, 2011
Messages
172
Location
Oak Ridge TN
Occupation
General Dentist, including Implant Restorations
Hah. Thought I was gone, huh Willie? Not a chance!

The broken pump mount bolt is out! How long did that take--2 years? I used the Tom Sawyer method. A really nice, smart machinist friend named Eric volunteered some time ago to take a stab at it. . . and he needed the skid-steer to do some mods to his yard and driveway area. I finally got the machine to his house a couple of weeks ago.

Eric carefully employed 2 or 3 of the ideas that Willie and others suggested to me, along with my idea of a centering guide, and some other techniques that Eric came up with. Read the next. . .
 

DrJim

Well-Known Member
Joined
Feb 19, 2011
Messages
172
Location
Oak Ridge TN
Occupation
General Dentist, including Implant Restorations
I will skip the ideas that we discarded, and get right down to the steps that, in combination, worked.

First, I ordered some 1/2" hollow "headlamp" bolts from a speciality outfit, OTB Gear
http://www.otbgear.com/Hollow-12-Headlight-Mounting-Bolt-P78.aspx

The bolt was broken more or less flush with the pump block, so there were no threads to engage. ( You, however, might get lucky.) Eric modified a hollow bolt and double-nutted it to the pump-mount bracket flange, centering it as best possible over the broken bolt and hole. This hollow bolt would serve as a drill guide. With a punch through the drill guide, the bolt was center-punched to help start the drill.
 

DrJim

Well-Known Member
Joined
Feb 19, 2011
Messages
172
Location
Oak Ridge TN
Occupation
General Dentist, including Implant Restorations
Huh. It isn't a very handy place to drill. Eric smartly stuck a laser pointer pen backwards into the mounted hollow-bolt drill guide, and spotted a point on the inner surface of the "frame", the exoskelton of the Bobcat. Mark that point. Then measure or make some sort of template, using the existing small holes that are nearby. Remove the rear wheel. Transfer that point to the outside of the machine and drill a hole.

To make a long drill, take a piece of round rod and machine a pocket in the end. Take a reverse-twist drill bit suitable for drilling in the 1/2 bolt (the same size as the hole in the hollow bolt). You may have to turn a little off the shank end. . . and fit it to the pocket machined in the rod. Braze. Presto! You now have a long reverse-twist bit suitable for drilling the bolt.

Insert bit from the outside of the machine, through the hole you made in the frame, and through the hollow-bolt drill guide. Drill slowly, stopping frequently to blow out the hole. Drill all of the way through the broken bolt.
 

DrJim

Well-Known Member
Joined
Feb 19, 2011
Messages
172
Location
Oak Ridge TN
Occupation
General Dentist, including Implant Restorations
Access to the hole in the bracket is partly blocked by the hydraulic hose. I might have removed the alternator and hose, and blocked the hose with JIC plugs and caps as taught by Wise Willie. Eric didn't do that; he instead fought with the hose and somehow held it down or up out of the way. He used a bolt-extractor (as in Easy-Out). The bolt wouldn't budge.

At that point, I would usually "horse it" until the Easy-Out broke. Eric is smarter. He first started the engine, ran it to full operating temp, and applied pressure to the wrench on the Easy-Out. No movement. The OEM bolt reportedly had red thread-locker on it, supposedly "non-serviceable". Leery of direct flame, Eric used a heat-gun on the iron--for quite some time--until Voila!, the wrench on the extractor began to turn. Success!
 
Top