• Thank you for visiting HeavyEquipmentForums.com! Our objective is to provide industry professionals a place to gather to exchange questions, answers and ideas. We welcome you to register using the "Register" icon at the top of the page. We'd appreciate any help you can offer in spreading the word of our new site. The more members that join, the bigger resource for all to enjoy. Thank you!

weld the bucket hook correctly

Nige

Senior Member
Joined
Jun 22, 2011
Messages
30,972
Location
G..G..G..Granville.........!! Fetch your cloth.
The manufacturers should sell the hooks as accessories, the excavator must be versatile in quarries and construction sites, in case of urgent needs mount the suitable hook safely and carry out the work,
It is important to consider that most excavators do not have the necessary load check valves in the boom and stick cylinders to block oil flow when the controls are in neutral. That is the main difference between an excavator and a hydraulic crane that is technically considered to be a lifting appliance and rated as such.

When lifting with an excavator generally the only thing that is supporting the load are the spools in the main control valve. Any failure of a hose or steel line between one of the cylinders and the control valve will result in the load falling to the ground in an uncontrolled manner, potentially with fatal consequences to any person who might be near the load.

AFAIK this is the main reason why in general excavator manufacturers do not make it so easy to lift with one of their machines.
 

Entropy1

Senior Member
Joined
Feb 6, 2023
Messages
252
Location
Washington State
Welder Dave, my original recommendation was to preheat the bucket with a propane torch, and also preheat the new hook & 7018 in an oven. This will minimize the risk of hydrogen embrittlement cracking - should the hook be welded against higher-yield steel.

You are saying low-hydrogen rod doesn't need to be kept oven-dry, and that it's also ok to use the rod straight out of the box.

FWIW, if a welder did that where I work, he'd be fired.
 
Last edited:

Entropy1

Senior Member
Joined
Feb 6, 2023
Messages
252
Location
Washington State
The previous owner of the wife's little TB-035 excavator installed a hydraulic thumb (a quality thumb kit). The arm-end cylinder attachment cracked the weld, and the crack prorogated several inches into both sides of the excavator's arm. He ground it out and welded up the cracks. It cracked again. He lapped some 1/2" plate over the cracks and really put the bead down. The whole thing looks like complete dog crap, but at least it's holding.

I can speculate (with some degree of certainty) that he did something wrong with his original welds. I'd like to believe he could've accomplished proper weld-prep while standing in mud, but who knows?
 

terex herder

Senior Member
Joined
Nov 10, 2017
Messages
1,945
Location
Kansas
Lincoln Welding developed a procedure for the Navy they called the clip test. For battle damage prompt repair is important. Make a tee joint with a piece of known mild steel and run a proper fillet weld. Wait 5 minutes. Use a hammer to fold the leg of the tee over onto the parent metal. If the weld holds, you are good. If the bead pulls out of the parent metal, up your preheat 200F and try again.
 

skyking1

Senior Member
Joined
Nov 3, 2020
Messages
8,157
Location
washington
That's pretty handy. With the advent of the infrared thermometers, you could do that in the field really easily.
 

Welder Dave

Senior Member
Joined
Oct 11, 2014
Messages
13,649
Location
Canada
In ideal conditions every possible step is easy to employ. In the field it isn't always possible. Thousands of hooks and other repairs are successfully holding where the rods were never in an oven. Sticking the rod to the work for a few seconds to get it hot is a good compromise if an oven isn't practical or available.

Typically rods from an oven are to be used within an hour. What if you went 15 minutes past, are the rods all of a sudden no good to use? After 15 minutes or so the rods are cooled to room temperature. What's the difference from new rods opened from a hermetically sealed package? Those are tests I'd like to see.
 
Last edited:

Willie B

Senior Member
Joined
Jan 2, 2016
Messages
4,171
Location
Mount Tabor VT
Occupation
Electrician
Lincoln Welding developed a procedure for the Navy they called the clip test. For battle damage prompt repair is important. Make a tee joint with a piece of known mild steel and run a proper fillet weld. Wait 5 minutes. Use a hammer to fold the leg of the tee over onto the parent metal. If the weld holds, you are good. If the bead pulls out of the parent metal, up your preheat 200F and try again.
I like that.
I spend too much time not knowing what the steel is I'm welding to.
I've always heard of the spark test. Grinder sparks will be straight yellow, or forked orange........WHAT?
Always somebody on a forum wanting me to check with manufacturer to learn the specifications of the steel. Don't know if you've tried that. Not a success for me.
Case does forge into lots of stuff "DUCTILE IRON DO NOT WELD" aside from that, it's anybody's guess.
 

Welder Dave

Senior Member
Joined
Oct 11, 2014
Messages
13,649
Location
Canada
The previous owner of the wife's little TB-035 excavator installed a hydraulic thumb (a quality thumb kit). The arm-end cylinder attachment cracked the weld, and the crack prorogated several inches into both sides of the excavator's arm. He ground it out and welded up the cracks. It cracked again. He lapped some 1/2" plate over the cracks and really put the bead down. The whole thing looks like complete dog crap, but at least it's holding.

I can speculate (with some degree of certainty) that he did something wrong with his original welds. I'd like to believe he could've accomplished proper weld-prep while standing in mud, but who knows?
Too many unknowns like your other example. How experienced was the welder, what rods, what position were the welds done, was the thumb mounted in a way that put undue stress on the welds, how much was the thumb being abused, was the thumb relief valve set properly, etc. In order to say for sure what caused a failure you need to know all the variables not just some of them. An inexperienced welder putting down a beautiful looking 7018 weld but did it downhand has no where near the strength of an uphand weld. Leaving a crater at the end of weld or even too much build up can also cause cracks. There's a lot of variables and you have to know all of them if it's not obvious what caused the failure. Sometimes it's just overworking the component that it was designed for.
 
Last edited:

skyking1

Senior Member
Joined
Nov 3, 2020
Messages
8,157
Location
washington
I remember that was how the shop teacher checked your welds, but it was not about preheat or dissimilar metals. He clamped the coupon in the vise and beat on it to see if it would pull apart.
 

skyking1

Senior Member
Joined
Nov 3, 2020
Messages
8,157
Location
washington
FWIW, I've never seen a thing like a hook or tab break off. I have seen those boom failures that @Nige describes the proper fix for, the ones around the top boom cylinder pin bosses.
I welded on all the AR400 strips on the buckets with a wirefeed and general purpose wire. I never did see any cracking.
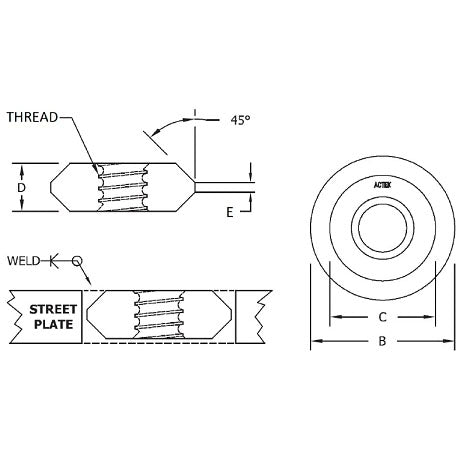
The only cracking I have made was welding a thread insert into T1 plate. It has a few and I suspect I would have a heck of a time avoiding that with the T1.

I pre and post heated it with a torch and used the recommended 7018, but it was designed to go into a mild steel road plate.
https://www.freertool.com/products/actek-ak48801

street_20plate_20nut_20rev01_20-_20helper_4e75594e-f8c8-4980-a8ed-f72f0ed3a0aa_grande@2x.jpg
 

Welder Dave

Senior Member
Joined
Oct 11, 2014
Messages
13,649
Location
Canada
Simple fillet weld break tests are a good way to check the strength of a weld and also different filler metals. You can also test types of weld flaws like too low of heat or excess build up of weld, etc. What's important to get the best results/comparisons is to have a control plate that was done at the right amps and with the right size of weld. You can compare different size welds, amperage settings, travel speed etc. This is where dual-shield flux-core wire can have an advantage over stick welding. A 3/16" flux-core weld could have the same strength as a 1/4" or even 5/16" stick weld due to the increased penetration into the root. The throat depth would be similar. In a production environment there could be a big times saving over being able to use smaller size welds.
 

Welder Dave

Senior Member
Joined
Oct 11, 2014
Messages
13,649
Location
Canada
FWIW, I've never seen a thing like a hook or tab break off. I have seen those boom failures that @Nige describes the proper fix for, the ones around the top boom cylinder pin bosses.
I welded on all the AR400 strips on the buckets with a wirefeed and general purpose wire. I never did see any cracking.
The only cracking I have made was welding a thread insert into T1 plate. It has a few and I suspect I would have a heck of a time avoiding that with the T1.

I pre and post heated it with a torch and used the recommended 7018, but it was designed to go into a mild steel road plate.
https://www.freertool.com/products/actek-ak48801

street_20plate_20nut_20rev01_20-_20helper_4e75594e-f8c8-4980-a8ed-f72f0ed3a0aa_grande@2x.jpg
I remember reading about someone having an issue welding mild steel to T1. Some welders have had better success using 8018 (8018C3) that has 1% nickel or even 9018 or 10018. T1 is where preheat and postheat is very important. Was it cracking in the heat affected zone on the T1 plate?
 
Last edited:

Acoals

Senior Member
Joined
Dec 15, 2019
Messages
1,390
Location
Wisconsin
Occupation
Jack of all trades/Master of none
All this science . . . all that is really needed is a Lincoln AC225 and a back pocket full of 6013.

Fix 'er right up . . .
 

skyking1

Senior Member
Joined
Nov 3, 2020
Messages
8,157
Location
washington
I remember reading about someone having an issue welding mild steel to T1. Some welders have had better success using 8018 (8018C3) that has 1% nickel or even 9018 or 10018. T1 is where preheat and postheat is very important. Was it cracking in the heat affected zone on the T1 plate?
I'd have to look again. Maybe right at the T1 edge of the weld.
 
Top