• Thank you for visiting HeavyEquipmentForums.com! Our objective is to provide industry professionals a place to gather to exchange questions, answers and ideas. We welcome you to register using the "Register" icon at the top of the page. We'd appreciate any help you can offer in spreading the word of our new site. The more members that join, the bigger resource for all to enjoy. Thank you!

Pictures of my Tired Iron

alskdjfhg

Senior Member
Joined
Jun 21, 2015
Messages
405
Location
Houston TX
The thread title is a little bit of a misnomer, I'm not actually fixing anything yet. But now that the shop should be functional in a few days, I'm really really close. And since I'm sure I'll have lots of questions about how to fix some of this stuff, I figure having it all on once place would be best.

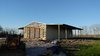
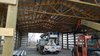
Right now all I've got is the pictures of the shop getting built. I started clearing back in October, started dirt in January, poured concrete early this month and should be wrapping up the sheet metal here soon.

Since I still feel new on this forum, I'll kinda start from the top;

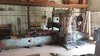
I don't want to focus too much on this, as it's still hard to talk about. But this barn building process started back in September when Dad died very suddenly. He and I were in the process of starting a machine shop and farm with obsolete machinery saved from craigslist, fence rows and scrap yards. We had grand plans of building a huge building ourselves, but that's just not gonna happen now that I'm down to one set of hands.

I realized that if I wanted to save any of this machinery, I would have to turn-key a shop built. There is only so much a full time 19 year old engineering student can do.

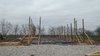
Ended up going with a 40x80x16 insulated pole barn with 25' opening in both endwalls and having a 20' lean too on each side. Making the overall building about 80x80.

Even though I HATE pole barns, they do have some advantages.

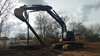
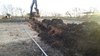
I started by clearing the area where I wanted the building built. Took two days with a 250G and a 1968 F600 hauling off tree waste. I think it was about 40 loads of tree waste, that old truck paid for it's self and then some that day.
1106161028_HDR.jpg 1106161025_HDR.jpg 1106161226_HDR.jpg 1106161409.jpg
 
Last edited:

alskdjfhg

Senior Member
Joined
Jun 21, 2015
Messages
405
Location
Houston TX
Then we started the dirt work.

Dug down 2'-3' and then fill back in with 95 loads of select fill. Ran both end dumps and dump trucks. We were flying, got that pad knocked out in 7 hours.

The ground was soft so each one of those end dumps had to be drug in with the dozer. Tried to do it with the Case 930 and it would only dig ruts. The tractor could pull them out empty, but loaded it had no chance.

0112171711.jpg 0113170826.jpg 0113171026.jpg 0121171316.jpg
 

alskdjfhg

Senior Member
Joined
Jun 21, 2015
Messages
405
Location
Houston TX
With the pad done, the next thing was my yard/driveway.

Before that I had get my underground power done as that went under the driveway.

Used the Case 930 with a post hold digger and a 24" auger to set a telephone pole 4' deep. Then used the excavator to set the pole.

Tried to rent a trencher for the conduit, but that wouldn't cut it. So again used the excavator.

Then I laid out 3 rolls of geo-fabric to minimize material losses and brought in 18 loads of 4"-6" crushed concrete. My driveway has 40' culverts and I designed it so a 3 axle truck and a 4 axle lowboy would have all weather access.

Then the building people came and set the poles for the main 40x80 section of the shop. They did the lean toos once the building was up.
 

Attachments

  • 0114171528.jpg
    0114171528.jpg
    8.2 MB · Views: 166
  • 0127170734.jpg
    0127170734.jpg
    7.7 MB · Views: 164
  • 0127171424.jpg
    0127171424.jpg
    8.4 MB · Views: 156
  • 0203171631.jpg
    0203171631.jpg
    7 MB · Views: 158

alskdjfhg

Senior Member
Joined
Jun 21, 2015
Messages
405
Location
Houston TX
A total of 76 yards were poured and finished.

A couple of trucks got stuck up to their axles, but other than that, it went pretty smooth. They started pouring at 9am, and left at 11pm.

Normally I would never do this, but I drew Dad's initials and them mine with the date in the wet concrete by the door. Seemed fitting for as much up hill slogging, herding of cats and pushing of chains that he did to get everything to this point. And it seemed like he should get his name on it as it was his life insurance that paid for it.
0204170859b.jpg 0204170925.jpg 0204171500.jpg 0204171500b.jpg
 

alskdjfhg

Senior Member
Joined
Jun 21, 2015
Messages
405
Location
Houston TX
Pictures of framing.

These guys have been doing decent work, but they are slow.

18 loads of bull rock and I'm still getting stuck. I need to cap it with a layer of fines and do a better job of compaction49f7f452d907d54c4d67e5bc2d527d06.jpg c760bc2b18d5c2fd2ee01b206512808e.jpg c54ae1cb525b249af8d98a7f52db07e4.jpg 1e3aeadb3a02918adf9d9637286a558b.jpg
 

alskdjfhg

Senior Member
Joined
Jun 21, 2015
Messages
405
Location
Houston TX
More framing and sheet metal pictures.

As of today they got my roof up and only had the front face left and the trim. Not sure what I'm going to do about doors though.

I'm glad they got my roof up today because I bought a planer last week and I'm bringing it in on a rollback Wednesday.

Got a long way to go before this is ever a real farm or machine shop. But I'm planning on trying to move some stuff in this weekend if the weather holds.

Guess I have to swollow my pride and have the dirt contractor bring his dozer back to do a final clean up so I get the P&H parked by the shop. Can't drive it though the ruts in the field that are left from the land clearing.

I told the dirt guy to do a final clean up before he left, but must have "forgotten".....
 

Attachments

  • f5d8d39e5f3c793f5813b2ccb5a1ec1b.jpg
    f5d8d39e5f3c793f5813b2ccb5a1ec1b.jpg
    121.2 KB · Views: 148
  • bac3f8e14012b5756956017542d72c3a.jpg
    bac3f8e14012b5756956017542d72c3a.jpg
    134.6 KB · Views: 141
  • e87ed2881aeaafa1afe833564cd8c4b6.jpg
    e87ed2881aeaafa1afe833564cd8c4b6.jpg
    154.8 KB · Views: 153
  • cad17b32f71c75945556a89769a31270.jpg
    cad17b32f71c75945556a89769a31270.jpg
    151.4 KB · Views: 153
Last edited:

CM1995

Administrator
Joined
Jan 21, 2007
Messages
13,377
Location
Alabama
Occupation
Running what I brung and taking what I win
That's going to be a nice shop when it's done.

It looks like your fighting flat land with soft soils and a lot of rain. The forklift is heavy with skinny tires so it's putting a point load on the rock. What do you have to use to roll the rock in?

At this point with the rock down I would roll what's there down and try to cap it with 3/4 crush or #57's (3/4" washed rock). Depending on how soft your soil is it may take a lot of rock to stabilize it.
 

alskdjfhg

Senior Member
Joined
Jun 21, 2015
Messages
405
Location
Houston TX
At this point with the rock down I would roll what's there down and try to cap it with 3/4 crush or #57's (3/4" washed rock). Depending on how soft your soil is it may take a lot of rock to stabilize it.

Realized the same thing. So last week had 6 more loads of fine crushed (3/4") concrete delivered.

It was enough to flesh out the area in front of the shop and make the approach into the building.0225171707a.jpg

But I need a lot more unfortunatley. I spread it with my small W-11 loader and used the loader with a full bucket load of rock to pack. Didnt worry too much about finish grading it becuase its just gonna get all messed up with the building people running their telehandler in it.

A dozer and vibratory roller would make this a lot easier......
 

Hobbytime

Senior Member
Joined
Sep 21, 2016
Messages
709
Location
usa
with those flat out roofs, Im guessing you never get snow down there?..LOL
 

alskdjfhg

Senior Member
Joined
Jun 21, 2015
Messages
405
Location
Houston TX
Hahah, yeah snow isn't too big a deal down here.

Shop shell is done, they finished yesterday. Need to finish the wiring, lights and do something about doors.

I moved my planer in today. Was a big strech, first move with out Dad as a helper.

Riggers said the machine weighed 24,300 lbs.

0301171449_Burst01.jpg 0301170956a.jpg 0301171356.jpg 0301171444.jpg
 

CM1995

Administrator
Joined
Jan 21, 2007
Messages
13,377
Location
Alabama
Occupation
Running what I brung and taking what I win
Shop is turning out nice. Snow, Houston..:D

24K on the planer, that's some weight to move around. How did you go about it?
 

alskdjfhg

Senior Member
Joined
Jun 21, 2015
Messages
405
Location
Houston TX
I wish I had sealed the floors BEFORE the plane got here, it made a huge oily mess in the middle of the shop and I'm sure it's gonna stain. It's not a big deal really, this is hopefully going to be a working shop not a play thing. But that concrete was awfully expensive, considering it was life insurance that paid for it....

A 25/35 Versalift and a couple of riggers was all it took to move it. Cost 1500 for 2.5 hours of their time, then 900 to haul it, and 990 to buy the machine.
http://s1309.photobucket.com/user/mebunting/library/Planer?sort=2&page=1

The machine came out of an old oil field shop that was finally getting cleaned out. Lots of really cool, old iron that was in really surprising condition.

Hopefully I can find some work for it..... It can be run as a planer mill with the milling spindle it's got, so I think I can find something.
 

Birken Vogt

Charter Member
Joined
Nov 30, 2003
Messages
5,324
Location
Grass Valley, Ca
Wipe up the oil as best you can and maybe soak it up with sawdust. Then flood the area with a flashy solvent like gasoline or brake clean. It will dissolve the oil into itself. Wipe it up before it dries. Very little oil will be left and it will disappear after a short while. Don't breathe the fumes or catch on fire.
 

mowingman

Senior Member
Joined
Jul 10, 2010
Messages
1,237
Location
SE Ohio
Occupation
Retired
Pour out some dry Portland cement onto the oil-soaked areas. Then scrub the dry cement powder into the surface with a really hard bristle brush. I have even used the sole of my boots to scrub it into small oil drip areas. The main thing is to use lots of dry cement and scrub it in HARD. Then, use a stiff bristle broom, followed by a softer broom, to sweep up all the leftover dry cement. USUALLY, the oil/stain, will be gone.
I use this method to clean oil drips/spills off of customers driveways. Ever notice how a hose will always break or leak when directly over a nice clean concrete surface?
Jeff
 

alskdjfhg

Senior Member
Joined
Jun 21, 2015
Messages
405
Location
Houston TX
Thanks for the tips guys, ill be sure to give them a try.

I'm going to try and get what I need to finish my electrical service drop tommorow and see about getting power turned on.

Who knows how big a mess that will be.....
 

alskdjfhg

Senior Member
Joined
Jun 21, 2015
Messages
405
Location
Houston TX
930 and W-11 are now both enjoying a never before felt treatment, being parked under cover. W-11 got a leaking injector line fixed and I'm gonna do fluids and filters ASAP. Then an overall cylinder repack and possibly line bore. Machine probably isn't worth the work, but in the 5 years of owning it. It's been just awesome for so many things, such a handy size and been nothing by reliable.

This week is my spring break so hoping to make some progress. Goal is to finish running the conduit for the power hook up tomorrow.

Also went over to a neighbor to look at a forklift he had. He also had this little Insley with a drag bucket. Cute as all get out, he want's $3,000. Also has a couple of old case backhoes, and case tractors. Thinking clean up one of the backhoes, and maybe a tractor or two to cover the cost of the lot.

Although cash is tight right now and absolutely don't need anymore projects.

Although that little crawler would be super handy as a little yard crane. What do ya'll think?
Supposedly runs, but I'm sure the clutches and brakes are gonna need work since the cab glass is broken out.

0308171554_HDR.jpg
0310171404_HDR1.jpg
 
Last edited:

alskdjfhg

Senior Member
Joined
Jun 21, 2015
Messages
405
Location
Houston TX
A guy that's helped me make some parts for a broken machine is helping me down at the farm. So although I could only work down there 3 days this week, we got some progress.

Moved the planer out of the way.

Got this old combine started and moved out from under the temporary cover Dad built for it and under nicer cover.

I want to say Dad bought this machine about 10 years ago, but I was too little to remember exactly. He then drove it 200 miles to our house in Houston and parked it there for a few years. When he bought the farm we drove it back across Houston and it's been sitting under that temporary shelter he hastily built for it for the last 5 years.

Needed points, a coil, HT lead, free the starter up, clean gas and a hot battery. Also split a hydo hose and sprayed my help in oil from head to toe. Other than that, started and ran good considering it's probably a 50 year old machine that's been sitting for 5 plus years.

Also pulled all 5 cylinders off the W-11 and the guy that's been helping me is going to try and repack them this week while I'm in school.


0314171704.jpg 0315171307a.jpg0317171211.jpg 0317171220.jpg
 
Last edited:

alskdjfhg

Senior Member
Joined
Jun 21, 2015
Messages
405
Location
Houston TX
Recently bought a small 4000lb propane forklift. Much nicer in the side the building than the "bull-in-a-china" shop 25k Hyster.

Starting to do a little more wrench turning.

Case 430, was a family's puttering around tractor since new. When they wore the clutch out decided to go new. Dad got the tractor for less than what the nice late model detachable front end loader it came with is worth. Other than the clutch its in pretty good shape.

Also going through the F600 so I feel safe actually taking it down the road with a load. Weren't in too bad a shape, just new corroded lines, worn drums, siezed bolts, you know the usual.

The lug nuts on the F600 were incredibly siezed though. Took heating/beating and also a 3700ft/lb torque multiplier. One of the budd nuts (is that the right name?), was so siezed had to just let the torque multiplier shear the inside stud off.

Hopefully can get parts here so and start putting these two back together to get them out of the shop.f260c3bfa8c49d45418db5a0a1b775dc.jpg
0415171137a.jpg
 
Last edited:
Top