• Thank you for visiting HeavyEquipmentForums.com! Our objective is to provide industry professionals a place to gather to exchange questions, answers and ideas. We welcome you to register using the "Register" icon at the top of the page. We'd appreciate any help you can offer in spreading the word of our new site. The more members that join, the bigger resource for all to enjoy. Thank you!

Led's for warning lights

TheOldMan

Senior Member
Joined
Apr 20, 2011
Messages
273
Location
North East Florida
Occupation
retired
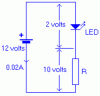
Reworking the dash on my 580C, and visited an electronics surplus store in Orlando, and found some neat red LED enclosed lights. Anybody got any ideas of how to wire them? Would like to have one for oil pressure. figuring on finding an oil pressure switch and teeing it into the pressure line for the gauge. and using a n/o relay. Alternator, however is a different problem - how do you make it work?
 

melben

Senior Member
Joined
Jan 14, 2008
Messages
1,029
Location
Williamsport, Pa
Occupation
Retired 50 Yrs with Case dealership
LED's

Leds only take 1.5 V to make them operate typically although they can be found in varying voltages. You would have to create a voltage dropping system to keep them from being destroyed unless they were designed for 12 V use. I am using one to light the display on a Communications scanner but built a voltage divider to drop the voltage to the required voltage for LED's. Mel
 

bowen

Senior Member
Joined
Nov 13, 2011
Messages
540
Location
N. GA USA
Occupation
Electrical Panel Builder
Do you not already have these lights in the instrument cluster?
The cluster is kinda wired strange. Some of the circuits work of of switched 12V and some work off of switched ground.
The 580SE is the only one I have worked on so I may be of no help to you although I do have lots of details on mine.

LED light are neat and they last forever, but at time they burn real dim because of diode issues etc.
 

GWS

Well-Known Member
Joined
May 21, 2011
Messages
154
Location
Oklahoma
If the LED's are typical 1.5 to 2 volt led's, you need to put a 560 ohm resister in series with each led you use for a 12 volt supply.
 

Attachments

  • LED-diag (Small).gif
    LED-diag (Small).gif
    14.2 KB · Views: 782

nova481

Well-Known Member
Joined
Sep 8, 2010
Messages
196
Location
Howell NJ
Occupation
Retired Union Electrician
The bulbs in the instrument cluster are either numbers 168 or 194. I have seen LED replacement bulbs for cars with these numbers. Because the copper traces separated from the plastic on the circuit board on my 580C I had to hard wire all the bulbs and gauges.
I ended the wires in a new 15 wire plug which I changed on both ends (painless wiring 40012). Attached is a picture of one of the lamp sockets.
 

Attachments

  • DSCN0015.JPG
    DSCN0015.JPG
    100.2 KB · Views: 739

GWS

Well-Known Member
Joined
May 21, 2011
Messages
154
Location
Oklahoma
Nova481 - Where did you get the sockets and plug from? I need to do the same thing.
 

nova481

Well-Known Member
Joined
Sep 8, 2010
Messages
196
Location
Howell NJ
Occupation
Retired Union Electrician
The 15 wire plug is a painless wiring connector number 40012. Just do a search for painless wiring 40012 and a lot of sites come up that sell them. The lamp sockets are the original sockets that twist locked into the back of the instrument panel. What I did was I found metal clips that I soldered to the bulb contacts and then soldered wire to the clips. The clips were believe it or not rail connectors for HO trains. Then I drilled tiny holes in socket base and pushed the wires and clips back in the socket base and heat shrinked the wires.

Also the alternator light must be wired to the alternator otherwise the battery will not charge.
 

GWS

Well-Known Member
Joined
May 21, 2011
Messages
154
Location
Oklahoma
Thanks. I'll look it up. I used 8-32 x 1/2" screws for studs on the gauges and will try soldering wires directly to the runs on the back. They seem to be all connected when I put power to them, just the plug in area is a mess.
 

Attachments

  • DSCN1331 (Small).JPG
    DSCN1331 (Small).JPG
    53.1 KB · Views: 719

TheOldMan

Senior Member
Joined
Apr 20, 2011
Messages
273
Location
North East Florida
Occupation
retired
The only thing I'm using from the old instrument cluster is the tach. Going to use analog water temp and oil press gauges (cappillary powered) volt meter and either fuel gauge or hydraulic temp. From what I read the hyd temp doesn't ever move unless you're doing a stall test, so if I can figure out how the fuel gauge works, I'll probably use it. Like to have warning lts for oil press & alt. if I can figure it out. I had to completely refurb the fiberglass dash assy, since PO had chopped it full of holes. Got the brakes all reassembled, installed and bled yesterday and today, so about time to put the dash assy back in. GWS I saved all the old insts, flex ckt board. lts etc. If you want them just let me know, be glad to snail mail them to you.
 

GWS

Well-Known Member
Joined
May 21, 2011
Messages
154
Location
Oklahoma
The only thing I'm using from the old instrument cluster is the tach. Going to use analog water temp and oil press gauges (cappillary powered) volt meter and either fuel gauge or hydraulic temp. From what I read the hyd temp doesn't ever move unless you're doing a stall test, so if I can figure out how the fuel gauge works, I'll probably use it. Like to have warning lts for oil press & alt. if I can figure it out. I had to completely refurb the fiberglass dash assy, since PO had chopped it full of holes. Got the brakes all reassembled, installed and bled yesterday and today, so about time to put the dash assy back in. GWS I saved all the old insts, flex ckt board. lts etc. If you want them just let me know, be glad to snail mail them to you.

Thanks, I could use the parts to get mine working again. I'll PM you with my address. I'm hoping to have the backhoe back on the tractor this week so the instruments are all that is left to fix and she will be ready for a test run. I would like to see a picture of your completed dash in case this one doesn't work. I did discover that you can use brake fluid and a soft rag to clear up the fogged plexiglass over the gauges.
 

Attachments

  • DSCN1332 (Small).JPG
    DSCN1332 (Small).JPG
    39.1 KB · Views: 895

10ec

Member
Joined
Oct 11, 2011
Messages
22
Location
Middle Tennessee
Occupation
Retired
Since you guys have showed yours, I'll try to show mine. :D

I'm new to backhoes and to the forum and haven't tried to post pictures. My 580C looks pretty rough and has several issues. I have been reading the posts from you and GWS with great interest as my LBH needs are numerous. Unlike your unit, mine doesn't look like the PO owned a grease gun. I'm gonna need to replace several bushings and pins. Nails and bailing wire are used in numerous locations in place of cotter pins. Every time I look at a different item, I see a need. However, I do have fairly good rear tires and the engine, clutch, and transmission seem to be good. The wiring was atrocious, but I have almost completed a rewire.

My picture attempt is of my gauge cluster before and after along with a picture of some LED back lights I installed in the cluster. I had them from a previous dome light installation I did on my truck and I don't remember where I bought them. I know several people have used 12V LED trailer lights and side marker lights purchased either at Northern Hydraulic or Harbor Freight for other similar 12V applications.


Gages Before Rsz.jpg


Gages After Rsz.jpg


Gage Box Lights Rsz.jpg
 

GWS

Well-Known Member
Joined
May 21, 2011
Messages
154
Location
Oklahoma
Really nice work! I like the LED back lighting. What did you do to get the gauge lens' so clear? I thought I was doing good just to get them clear enough to see through. Yours look outstanding.
 

10ec

Member
Joined
Oct 11, 2011
Messages
22
Location
Middle Tennessee
Occupation
Retired
Lens Polish

GWS, Thanks for the comment.

It is a trick I learned in 1969 while serving in the Air Force. My Seiko watch face had some really bad scratches so I took it to the Thai base jeweler for a new crystal. Of course the watch crystal was actually plastic. The guy took some fine sandpaper (appeared to be 1200-1800 grit) and sanded the surface until the scratches disappeared. The surface was really frosted at this point and I watched in amazement as he took "Brasso" and rubbed the heck out of the surface until the frosting disappeared. He kept rubbing and polishing until it looked clear and perfect.

On my 580 panel, since I didn't have any scratches, I didn't use sandpaper. Instead of Brasso I polished the haze out using chrome polish. I wrapped a shop towel around my index and middle finger, applied a small dab of polish on the finger tips covered with the cloth and, with pressure, rubbed the heck out of the plastic windows until the polish dried. Do this a few times and the frosting/haze will disappear (polish out).

If you try it, let me know how it turns out.
 

bowen

Senior Member
Joined
Nov 13, 2011
Messages
540
Location
N. GA USA
Occupation
Electrical Panel Builder
The guy took some fine sandpaper (appeared to be 1200-1800 grit) and sanded the surface until the scratches disappeared. The surface was really frosted at this point and I watched in amazement as he took "Brasso" and rubbed the heck out of the surface until the frosting disappeared. He kept rubbing and polishing until it looked clear and perfect.

This sounds just like the headlight restoration kits. All the auto part places have them.
http://www.walmart.com/ip/3M-Headlight-Restoration-Kit/13023890

They work FAIR if the lens is the right kind of plastic. I thought my cluster was glass, but I better look closer.
Depending on how bad the surface is you start with maybe 600 grit sandpaper and might end up with 1400 grit.
You might need only the real fine stuff. They look terrible at first but in the final step you use a creme polish and buff it off.
If you just had some polish you could almost sand some lenses with cardboard.

On the cluster it would be much easier if the thing was all apart but from this parts list it looks like it does not come apart?
The corners are hard to sand.

580C_Cluster.gif

And Case wants over $100 for the lens: Item 3 # D71334
 
Last edited:

GWS

Well-Known Member
Joined
May 21, 2011
Messages
154
Location
Oklahoma
Thanks guys, I'll give the polish a try. I can see through mine ok but it would be nicer to get them to look like 10ec's does. We used Brasso a lot in the Navy but I did not know you could still get that stuff.
 

alrman

Senior Member
Joined
Jun 20, 2009
Messages
3,308
Location
QLD Australia
Occupation
Diesel Fitter;Small Business Owner;Cleaner
Not sure if you can get it in US - Autosol metal polish
 

Shrmndlit

Active Member
Joined
Jan 21, 2012
Messages
34
Location
Aiken SC
Occupation
Work for Myself!
Hello everyone first post to forum. I just want to say how awsome some of the equipment you all rework. It looks good as new and in some cases even functions better ie led back lights. Anyway I am a three day old owner of a 1980 580c and a 1972 ish John deere 555 track loader. Both have been sitting for a long time so lots of work in store. Starting with ins cluster on 580c
 
Top