• Thank you for visiting HeavyEquipmentForums.com! Our objective is to provide industry professionals a place to gather to exchange questions, answers and ideas. We welcome you to register using the "Register" icon at the top of the page. We'd appreciate any help you can offer in spreading the word of our new site. The more members that join, the bigger resource for all to enjoy. Thank you!

Hitachi EX-120-1 repairs

danc

Well-Known Member
Joined
Mar 11, 2009
Messages
89
Location
ireland
Didn’t get back to this yet with all the other stuff I’m doing with the house.

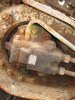
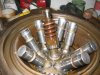
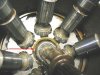
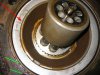
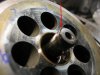
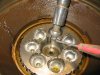
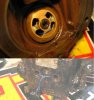
After stripping the good motor while I had it off, from what I can see there are no seals that will cause the motor to have excessive internal leakage.
It will be down to either wear between the surfaces of the pistons, block or top plate..

The only rubber seals within the unit are the brake seals, and o-rings for mating surfaces when the back cover is pulled off.
Unless the brake mechanism can go bad, and fail to fully release when the pressure is applied.

I’ll report my findings when I get it pulled off and stripped down :)
 

danc

Well-Known Member
Joined
Mar 11, 2009
Messages
89
Location
ireland
Still haven’t got around to removing the slow track motor yet, but others are having track motor issues, so I have some pics from when I replaced the output seal on the good side, they may help someone………


The motor is held on with the two bolts marked in green...

The 4 hex bolts marked in red hold the back cover on.

I didn't have a puller suitable so I removed only two of the hex bolts diagonally, and fitted longer bolts , to pull the motor away from the planetary box...
there is an o-ring seal beween the two, revealed when they separate.
 

Attachments

  • IMG_3185.jpg
    IMG_3185.jpg
    59.9 KB · Views: 1,211

danc

Well-Known Member
Joined
Mar 11, 2009
Messages
89
Location
ireland
Some oil will spill out of the planetary box if not drained from the other side.
When the motor comes away, I’d stuff some rags into the box to keep the crap out.

Take the motor to a cleaner place, then remove remaining 2 hex bolts, and pull off back cover.

When pulling off cover watch the top plate doesn’t fall to the ground.

Note the thin metal rod insert through the centre shaft to keep the block steady. Only really need this for alignment when rebuilding
 

Attachments

  • IMG_3196.jpg
    IMG_3196.jpg
    155 KB · Views: 1,205

danc

Well-Known Member
Joined
Mar 11, 2009
Messages
89
Location
ireland
Lift away the metal disc to one side ( red)

2 more o-ring revealed at this point ( green)
 

Attachments

  • first view.jpg
    first view.jpg
    69.6 KB · Views: 1,185

danc

Well-Known Member
Joined
Mar 11, 2009
Messages
89
Location
ireland
Look down the centre shaft of the block, a small circlip holds in place, remove from it’s groove, and slide it up.

The block will then slide off the pistons.

Some rags around the sides, to stop metal to metal contact help protect the pistons when they tip over
 

Attachments

  • circlip for block.jpg
    circlip for block.jpg
    37.4 KB · Views: 1,169

danc

Well-Known Member
Joined
Mar 11, 2009
Messages
89
Location
ireland
Take care not to loose the ball that’s sits at the bottom of the centre shaft.
 

Attachments

  • IMG_3218.jpg
    IMG_3218.jpg
    107.3 KB · Views: 1,194
  • IMG_3219.jpg
    IMG_3219.jpg
    222.3 KB · Views: 1,194

danc

Well-Known Member
Joined
Mar 11, 2009
Messages
89
Location
ireland
When the centre shaft is out, all pistons can be taken out .

I was looking for cracks/damage below these, but all was good.

Beyond this point there are discs and brake seals, no pics, but I’ll get them the next time.

To further strip the unit and change the brake seals, the shaft can be knocked out with a light drift from the other side ( where the output seal is)
 

danc

Well-Known Member
Joined
Mar 11, 2009
Messages
89
Location
ireland
When rebuilding I found that the metal rod shown earlier helps a lot as a guide.

Another thing I did was remove the other 2 small hex bungs for a tie wire to hold the top plate in place
 

Attachments

  • back cover& plate.jpg
    back cover& plate.jpg
    54.8 KB · Views: 1,180

cps

Senior Member
Joined
Jul 13, 2008
Messages
811
Location
Ireland
Occupation
plant mechanic
Your getting real good at this dan!
Think i'l send you any motors i have in the future:drinkup
 

danc

Well-Known Member
Joined
Mar 11, 2009
Messages
89
Location
ireland
Hey cps sure thing :D

I’m hoping to tackle the slow motor when I get a break from working at the house, so gotta do it all again, will be easy next time. As I said getting the big pipe nuts off, is the hardest bit. 5’ levers and lotsa shouting.:bash

Another thing I did was do a rough gauge on bore clearances.
I knew this was a fast smooth motor, it was stripped for a seal failure, no performance issues.

I took each piston with the block removed onto the bench. I coated each piston with a film of hyd oil. Then 1 at a time I let them slide into their bores. On all pistons none dropped through quickly. They slid down the bore nice and slowly under their own weight. Good enough clearances for me.

This for me is my benchmark for the others side when I strip it down, unless there is something more obvious, top plate ..etc… ( or the fault is elsewhere)

BTW there are guys out there that have done lots of these I’m sure, so feel free to comment/ suggest other methods

This motor is back on the machine, and going great
 

AtlasRob

Senior Member
Joined
Feb 8, 2008
Messages
1,982
Location
West Sussex UK
Occupation
owner operator
This motor is back on the machine, and going great

VERY impressed :notworthy

That is a lot of very useful information for anybody thinking about entering a track motor.

Me ! I think I'll pass, thanks :D
 

willie59

Administrator
Joined
Dec 21, 2008
Messages
13,402
Location
Knoxville TN
Occupation
Service Manager
I agree Rob, danc layed out a nice procedure, and the pics are excellent! :notworthy

danc,
are you saying your having difficulty getting the fitting nuts loose? The trick I have done tons of times to great satisfation is a hammer, and AtlasRob will vouch for me on this one :). Take a good size ball peen hammer and give one of the flats on the side of the nut several good smacks, hitting dead square on the flat. And if you can smack a second flat next to it is even better. After this, you should be able to remove fitting nuts with ease. ;)
 

krich

Member
Joined
Jul 12, 2009
Messages
16
Location
Pacific
Danc
Good job, but just some things to remember when stripping motors and pumps, as you have done always mark position of pistons in there bores, normally the critical things to look for are unusual scratch marks particually on the presure plate to barrel mating surface, if you can feel it with your finger nail then it will leak pressure, also base of the piston on the ball, also look down the center of the piston and you will see a small drilling, this should be clear.
The most inportant advice I can give you is keep it clean, dont force it particually when you reassemble it and remount the motor head back on the travel motor housing, it should evenly close together and the last 3 or 4mm should be under some pressure as you are compressing the barrel spring, dont forget the small oring as this operates the brake.
Also most importantly make sure you bleed the air out of the motor when you start it up normally do this can be done by jacking the machine up, engine on low idle and rotating the track slowly in both directions for a couple of rotations, two things kill hydraulic system, no oil and air.
Good luck.
 

Mopar Todd

Member
Joined
Feb 5, 2011
Messages
14
Location
Puget Sound ( Off the Washington coast)
Occupation
Mobile fabrication and repair
Good info guys . . . way to help the man out. I have a couple ideas as well.

* Have the lines been traced all the way from the valve stack to the slow motor? If the steel lines in forward or reverse have been smashed, the flow from the pump will be impeded which will slow the motor. If there are any sections of hose they would be suspect as well. I've seen hose liners fail even when the hose looks fine from the outside. The liner can wad up inside and restrict flow. If there are any bent tube fittings look to see that they have not been pulled on and bent further. ( A bent tube 90 should not be bent 120 degrees and flattened out)

* Remember, since the case drains are tee'd together the internal seals of each motor feel the same pressure as case flow exceeds diameter of case drain line. Pressurized oil finds the path of least resistance. If the slow motor has a healthier shaft seal than the fast motor, the fast motor shaft seal will fail first, even if the slow motor is the one with large case flow.

* Heat is a clear indicator of excessive motor or pump clearances. If the bucket is placed against a VERY stationary object and the machine is tracked forward, the case drain line on a bad pump or motor won't take long to heat up. I've seen bad pumps and motors turn blue paint brown from the amount of heat produced.

* Also, port reliefs at the valve bank could be allowing pump flow back to tank on one side.

Hope this helps, Todd :beerchug
 

danc

Well-Known Member
Joined
Mar 11, 2009
Messages
89
Location
ireland
Hello back after a long break, I’ve been doing very little travel with the machine since

but I thought I’d post the root cause of the track motor seal failure on my fast motor.
( I never got round to stripping the slow motor.. it’s moving upward on my to-do list before summer!! )


The track motor output seal failure was due to a blockage in the case drain, in the upper section of the swivel joint.
After resealing the swivel joint, during refitting, all ports were stuffed with rags..
Fearing the crap from the upper body would enter the ports, when pushing it through the large rubber grommet on the frame.

Main ports point upward, case drain to the side. The short fitting to the case drain port must be removed,or it will tear on grommet, it’s a tight fit.
So a rag was stuffed flush into the port….
Usual story got called away in the middle of fitting the swivewljoint, :rolleyes:back 2 hours later, removed all rags, fitted fittings, and pipes…forgot there was a rag stuffed in the case drain port…:Banghead
 

mexlee

Member
Joined
Nov 30, 2011
Messages
10
Location
malaysia
Dear danc,
I had hitachi ex120-1 and got the same problem like yours.the other side track move faster than the other.before that both track wont even want to move an inch,so i ask mechanic to fix it.they install a new vavle plate ,rotor ( cylinder block ) and piston assy. After the new part was installed, there was still the problem. However, after the mechanic did some adjusting to the main pump, both of the track move with same speed. Hope this help :) .
 

mexlee

Member
Joined
Nov 30, 2011
Messages
10
Location
malaysia
Skitched-image0.png

Dear all,
Recently i just bought a second hand hitachi ex120-1 with tons of things to be done to be perfect running machine, the 1st owner used this machine for 16 years and lots of things has been modified, lots of wiring were missing. The tortoise/rabbit buttons were unplug, no lights, no diesel fuel gauge meter to look onto, all of those sensor and the electric wiring were gone. But still the machine run ok for now. Im planning to connect all those sensor and do a new wiring, for your information im a newbie in excavator world with zero knowlege without any manual book to seek help LOL, i just had a basic knowledge with cars so i think this will help me a bit. As u see the picture with rounded green marking,im wondering is it a sensor or what? Where is it to connected to? Mine still attach but without the wiring someone cut it. Im stuck in this and my brain blowed off LOL, can someone help me with this? Any advice?. Oh by the way can i install intercooler for my ex120-1? I want to install it but need some advice before doing it..
 
Top