• Thank you for visiting HeavyEquipmentForums.com! Our objective is to provide industry professionals a place to gather to exchange questions, answers and ideas. We welcome you to register using the "Register" icon at the top of the page. We'd appreciate any help you can offer in spreading the word of our new site. The more members that join, the bigger resource for all to enjoy. Thank you!

Grove MZ66B swing gearbox help

MX45

Well-Known Member
Joined
Oct 19, 2010
Messages
220
Location
Australia
G'day,

I have a Grove MZ66B - I have been going through the process of trying to get it operating better. I have also been trying to check the lubricant levels/condition. Please see below two photos of the drive motor for the turntable. One photo is closer than the other. Is the plug at the top under the elbow in the pipe the filler hole for the gear oil in the drive motor????

Are the other two screws which are parallel with one another - just like fill and drain holes on a vertical drive motor used as the drain holes??? It seems to me that they would not be low enough to drain the oil???

Thanks for any help,

MX45.
 

Attachments

  • Image0363.jpg
    Image0363.jpg
    82.4 KB · Views: 631

MX45

Well-Known Member
Joined
Oct 19, 2010
Messages
220
Location
Australia
Cant get 2nd photo to attach? Anyway there is a second 'plug' screw further behind the cylindrical drive motor at the same level with evidence of faint oil weepage.

Thanks again for any help.
 

MX45

Well-Known Member
Joined
Oct 19, 2010
Messages
220
Location
Australia
SWING MOTOR HELP - I opened the filler plug and the stench that came from there may have been oil at some time but just sludge now - I am judging by the odour and the thickness that the oil has not been changed in the 3000 hrs or so the machine has done. I tried to use my sump pump to suction the oil out but the copper pick up tube would not fit with the angles and plastic tube as at first too big and then when I did get a section of nylon air line in to use as a suction pick up it would not go far enough - go 300cc out of what is meant to be a litre - maybe there was only 300cc left but I dont know. IN any event the nylon line got caught on something and snapped on the way out. In my attempt to get the remainder out it irretrievably went back in.

I guess it was always a good idea to split the gearcase and wash it out now it is even more necessary.

Does anyone reading this know if those twelve bolt head with half inch sized heads are what retain the hydraulic motor and top plate cover to the gearbox???

I expect it would have a gear affixed to the bottom of the hydraulic drive and should simply unbolt and then I can remove it to the side and have access to the gear box from above to clean it thoroughly and retrieve that plastic tube and probably 15 years of gunk and no servicing?????

Are there any catches to pulling this apart anyone knows about???????????????? Anyone?????????????????

Thanks for any assistance to guide me through this,

MX45

Can any of the supervisors rename my thread to swing motor - better suits my needs.
 

willie59

Administrator
Joined
Dec 21, 2008
Messages
13,396
Location
Knoxville TN
Occupation
Service Manager
I changed your thread title as you requested MX45. :)

Yes, that pipe plug is the rotation planetary gearbox oil level plug. Would also be used to fill gearbox to that level by removing one of the opposite plugs, fit oil hose to one of the open plug holes, and fill gearbox until oil comes out opposite plug hole. You have no access to the drain plug with unit fitted to machine as drain plug is in the very bottom of the unit if it has one at all.

As for cleaning the old oil from the planetary box, you would have to remove the unit from the machine. I can't recall for certain where the rotation gearbox was located on the MZ66, seems I recall it was in one of the side door compartments and not in the center of the machine under the boom. If that's the case, you need to secure the turntable rotation by either using a house lock pin (if Grove fitted one), or extend the boom a bit and lower boom until boom tip contacts the ground, which will prevent house from rotating when gearbox is removed. If swing gearbox is located under boom, it's a different method altogether.

Once turntable is secured, you start out by removing small motor on the very top of swing gearbox (not shown in pic). Once you have motor removed, you'll have some threaded holes to install lifting eyes. Yes, you're going to have to employ some form of lifting device as that gearbox is a bit weighty. At this point, remove the large head bolts (15/16" I believe) that secure the planetary gearbox to turntable base. Once these bolts are removed, lift the entire unit from machine.

Now you have two choices, 1) a simple rinse, or 2) more thorough cleaning. For simple rinse, open fill plug hole, lay gearbox on its side and drain as much old oil as possible. Then add some Varsol or Naptha to fill hole, install plug, and roll unit on ground to rinse inside of gearbox. Drain solvent, repeat until it comes out clean. If you go with choice #2, that's a bit more involved.
 

MX45

Well-Known Member
Joined
Oct 19, 2010
Messages
220
Location
Australia
Thanks Willie,

the turntable does have a locking pin and as luck would have it is still with the machine - so I will use that and drop the boom to ground to secure against another murphy's law act.

I have no choice but to split the gearbox having failed in getting the old oil out and I cant imagine it coming clean without being split. However I was wondering if I could split it in place - ie remove the hydraulic drive motor on top and having removed the twelve smaller holding bolts lift it off completely - no it wont be light - and then I could get access to the top of the gearbox??? That would allow me perhaps to get access to the top plane of the gearbox and use cleaning agents, etc to throughly clean the gearbox. Having lost a piece of nylon air line (very hard) as well as the state of the oil it just has to be done. so much for me just checking the oil level!!! I cant imagine any seals lasting any time at all with nylon cutting them up.

The photo shows the larger bolts at the bottom and the smaller bolts at the top - my thought is to remove the top bolts and try to remove the top motor first p is that right???

The drive is in the side compartment - so access is OK - but lifting something??? I have an excavator with hook but could be tricky??? I will see what it looks like once the top motor is off but would be pleased for preparatory advices on what is ahead of me. Oil out through the drain hole will not do the job at hand & so maybe losing the nylon air line does not matter as it has to come apart anyway rather than taking a short cut.

So tell me about choice 2 - albeit he harder choice.

I will supply pictures as I go along willie,

Regards, MX45.

nb I would supply a picture of the oil but if you can imagine a black hole with a pungent odour you would get the picture - I think it is the worst condition of any oil I have ever had to change.
 

willie59

Administrator
Joined
Dec 21, 2008
Messages
13,396
Location
Knoxville TN
Occupation
Service Manager
MX, if you're going to bust into the gearbox, proceed with due focus and take notes as you go, there's a good bit of goodies inside those things. And you will likely have to remove the entire unit to properly flush it inside because with swing gear box planetary units, any debris (metal wear) or fragments always drift to the bottom bearing of the unit, thanks to gravity. If you disassemble the unit with the lower housing still fitted to the machine, not likely you'll be able to properly clean out the very bottom of the unit.

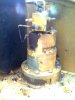
If you remove the house covers on that side of the machine, I don't see an issue with you disassembling unit on machine as opposed to yanking it as a whole to keep from having to deal with the weight of an assembled unit. The first thing you would do would be remove hyd motor (not show in pic). Then you'll be left with the swing brake and planetary housing still in place. The swing brake would be the housing that the hyd motor is mounted on, it should have a hyd line going to it. Once you've removed the hyd motor, disconnect the hyd pipe going to the swing brake, remove the bolts that fit the swing brake to the upper planetary bearing carrier and remove swing brake unit.

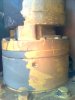
Now you're down to the planetary unit. Before you disassemble that unit, you need to put some marks on the components for reassembly. Don't bother with a center punch to make marks because the planet gear ring is hardened steel and will knock the tip off a center punch. Instead, use a die grinder with a cut off wheel to grind some marks on outside of planetary housing components as noted with red lines in pic below. This will help you to orient parts when you go to reassemble.


MZ66B swing gearbox.jpg


Once you get these reference marks made, remove the 1/2" bolts that fasten the bearing carrier to top of planetary housing, remove bearing carrier. At this point, this is where I'd much prefer having the planetary unit removed from the machine. By now you'll see a good bit of parts inside there, and myself, I wouldn't hesitate removing those parts, but pay close attention to the location of the various components. Yet, even if I pulled the guts from that unit with it mounted on machine, you still cannot properly clean the very bottom of the unit where all the debris has settled. I would much rather remove those bolts that mount the planetary housing to the turntable base and yank it so I could rinse the housing with solvent and flip it upside down to remove debris.

Keep in mind, I'm only offering brief description of the process you're going to have to follow, you will find components that you will have to decide how to deal with them when you encounter them, hard for me to note a detailed description for disassemble and reassemble. And you will need some new o-rings to seal the parts that you have disassembled. :)
 
Last edited:

MX45

Well-Known Member
Joined
Oct 19, 2010
Messages
220
Location
Australia
Thanks Willie,

I am going to be saying that a lot in this coming week or two,

Can I remove the hydraulic motor and brake assembly as a unit from the bearing carrier???????????? Please say yes?

That would save some disassembly???

Regards, MX45
 

willie59

Administrator
Joined
Dec 21, 2008
Messages
13,396
Location
Knoxville TN
Occupation
Service Manager
It's been a long time since I've worked on Grove units MX45, I really don't remember how those were assembled. But with most swing boxes I've worked on, when you mount the hyd motor it covers the bolts that mount the brake unit to the planetary housing bearing carrier. I think it will become obvious to you once you start disassembly as to what will be required.

Be sure and take some pics as you go. :)
 

MX45

Well-Known Member
Joined
Oct 19, 2010
Messages
220
Location
Australia
Starting -

G'day Willie,

Probably wont get much further this week as very full week but here attached is the start I have made.

Protection Panel removed - a number of the small bolts removed but I cant get to the ones at the back as insufficient space to turn a spanner - so whole unit has to come out to be worked on.

Loosened the bottom large bolts - very tight - however the last one under the half inch frame around the main hydraulic cylinder is very difficult to get to. I have had a 450mm adjustable wrench on it and with hammer cant break the bolt loose - not much room to move under the boom???

If you have some ideas they would be welcome. I have marked the units as you suggested and will probably spray a little paint as well to be certain I line everything up the way it is supposed to on the way back together.

I could use a large cold chisel to move it but that will damage the bolt head???? Socket too tall to fit it and the arm??? I have sprayed it with WD 40 but I think it is simply a function of being tightened to over 120ft lbs and not been moved since it went in???

Any ideas welcome to move that bolt - it is high tensile -
Regards, MX45

NB Four photos showing the troublesome nut, marks on parts, acrow prop under basket just in case, and boom overhead to which I will attach a chain and block to lift the unit up and lower down to wheelbarrow.
 

Attachments

  • G1.jpg
    G1.jpg
    96.1 KB · Views: 483
  • G2.jpg
    G2.jpg
    153.9 KB · Views: 495
  • G3.jpg
    G3.jpg
    114.8 KB · Views: 507
  • G4.jpg
    G4.jpg
    84.8 KB · Views: 481

willie59

Administrator
Joined
Dec 21, 2008
Messages
13,396
Location
Knoxville TN
Occupation
Service Manager
Yes, those bolts can be a bugger to get to. I think I would begin disassembly process with it mounted on machine. First, remove the hyd motor with crossover relief valve mounted on motor. Then remove brake from bearing carrier. At this point, you may be able to pull the bearing carrier off of the planetary gearbox housing. If you can make it that far, you may be able to slip a good size drift shaft behind planetary box, place tip of drift on top of bolt head, and give drift some good hard whacks with a sledge. Sometimes this impact helps relieve bolt tension and allow you to remove bolt with proper size box end spanner, not an adjustable spanner or open end. Remove all the bolts you can, working your way to the ones on the backside. If necessary, use a gas ax to put a little heat on the mounting ring that bolts screw into, don't have to get it red hot, just a little heat on the outside of the ring right where bolts thread into it.


MZ66B swing gearbox assembly edited.jpg
 

MX45

Well-Known Member
Joined
Oct 19, 2010
Messages
220
Location
Australia
G'day Willie,

I put the big cold chisel to the nut which could not be got to easily and soaked it in WD 40 for a few days. I managed to take an edge off but in a way that assisted as I was then able to get a 3/8th drive 21mm socket and bar on to it by wriggling - pure luck! Of course I still could not move it - but got a very thin piece of alloy tube - must have been strengthened in some way - and put it over the end of the bar and wobbled a lot. It cracked twice getting it loose but all good now. But out of time this week so I will get back to it in a couple of weeks and let you know my progress or lack of it. I think the tension the alloy tube soaked up as I pushed on it actually assisted the breaking of the nut - seemed to store the energy to maintain the tension on the bolt.

Very lucky for me - I had been looking for answers in the tool store that were economical.

Be back soon,

Regards, MX45
 

MX45

Well-Known Member
Joined
Oct 19, 2010
Messages
220
Location
Australia
OK - after some other dilemmas got back to the drive - block and tackle over the top - disconnected the bearing carrier and the main connecting hydraulic supply and the connecting hydraulic line - that allowed me to swivel the whole unit which was necessary to get it up and out. I hve just tried to attach three photos - hope it worked. Any advice Willie now I have the bottom section removed. I did have a washer fall out as I dismantled - you can see it on top of the bottom assembly in the third photo. It either goes there or under that large planetary gear?

Thanks MX45
G5.jpgG6.jpgG7.jpg
 

willie59

Administrator
Joined
Dec 21, 2008
Messages
13,396
Location
Knoxville TN
Occupation
Service Manager
It's been a long time since I've been into one of those units, don't recall the disassembly procedure. Pic is really bright, hard to see details, is it just the pic or does that shaft look a bit gnarly on the end? The washer you refer to is likely the thrust bearing washer, will likely be one above and below the planetary unit, possibly even a flat needle bearing thrust bearing that rides on washer.

On some units, that shaft in the center which drives the sun gear will now pull out of the planetary unit, then the planetary unit will lift out of the ring gear case. If you have to pull the output shaft, there's typically a retainer bolt accessible once you pull the planetary unit. Many times that bolt is tight, might have to drop the dissassembled lower section back in place on machine so it will engage the ring gear of the turntable, put a couple of bolts back in the planetary case to secure it and put some meat to the bolt to break it loose.

Be sure and take pics of components as you disassemble, might help you when you put it back together.
 

MX45

Well-Known Member
Joined
Oct 19, 2010
Messages
220
Location
Australia
G7.jpgG8.jpgThanks Willie - I have dismantled the gears and they pulled out easily. Not so easy to see the thrust washers as the oil was so dark and clingy that it made them blend in with the gearing. However it makes sense the way I have pulled it apart and set it piece on piece as it came out. All degreased and sitting in a plastic container. Gears look fine - there is a little movement in the bearings but no real noise or marks of consequence that I can see. The bottom of the main drive shaft does not have any visible marked oil leakage and there is no real evidence of significant oil leakage under the drive unit. The gear at the bottom appears to be held on by two screws but without the oil seal warranting replacement and bearing serviceable I think it is better left alone. I have to wait for two new o rings as they did not have them in stock. So no rebuilding for a week or so until they can arrive in town.

Of course if that oil seal should fail it would be a complete dismantle again???

What are your thoughts???

MX45
 

willie59

Administrator
Joined
Dec 21, 2008
Messages
13,396
Location
Knoxville TN
Occupation
Service Manager
Now that you mention it, you may be right, that bull gear on the bottom may be retained by some bolts, remove them, remove bull gear, and shaft goes out the top. With no access to diagrams, I can't verify that. Things are actually looking pretty good in there, which is a good thing. Concerning your second question, should I or shouldn't I, ahh, that's the age old question. No way to answer it, but it's one of those things, if that seal starts leaking promptly after you put it back in service, it's always discombobulating when one finds ones self kicking his arse with his own boot leather. It sure would be nice to take it all the way, and go ahead and fit a new seal in the bottom. I will warn you though, not that I can say this unit will be this way, but typically that output shaft is rather snug in the bearings, takes a good bit of persuasion to push it out or drive it back in. Keep us posted with the progress. :)
 

MX45

Well-Known Member
Joined
Oct 19, 2010
Messages
220
Location
Australia
G'day Willie - I have time to think - there is a circlip on top of a washer over the bearing on the inside of the bearing carrier - I am guessing the circlip would allow the gear to be pressed out the bottom although possibly the two slot screw heads on the bottom of the gear that enages the ring gear might reveal another connection. My leaning is to leave it alone as the bottom of the bearing case has no evidence of an oil leak and I use the machine sparingly when running. Just got overquoted a few times to remove a few tree limbs in the figures of hundreds and then thousands of dollars. So for $8k delivered I thought the machine was worth it. I have used it many times now for jobs I would have had to contract out. Easily paid for itself and I still have the machine albeit it requires some TLC. The bottom bearing as much as I can see has no big scar marks or sense of hardening being gone from wear - but of course cant see it all. So when the o rings come in a week or so I will put it back together - with pics and troubles as I find them. Once I have got it back together with some good peace of mind about oil and not sludge I can get back to trying to adjust the pot that works on the control panel for swing - it is way out of whack giving trouble. That is another story. Hopefully I wont cause myself grief by making a damaging error on rebuild.

Thanks, MX45
 

willie59

Administrator
Joined
Dec 21, 2008
Messages
13,396
Location
Knoxville TN
Occupation
Service Manager
I got ya, and I can't see the retainer ring you speak of in the pic, but I know what you're talking about. That probably is the removal procedure, remove retainer ring, press shaft out the bottom, and "press" is required, that shaft is typically snug in the bearings. I'd dump some kerosene in the housing, rotate the shaft to rinse the bearings good, dump it out, repeat until it drains clean, then invert the unit to let kerosene drip out until dry. The reason I say this is any debris, wear filings, etc, settles to the bottom in those bearings. If you're not going to drop that shaft, at least clean out the junk in the bottom of the unit. :)
 

MX45

Well-Known Member
Joined
Oct 19, 2010
Messages
220
Location
Australia
G'day Willie - got to take the little fella to his swimming lessons next so last contact today - I used degreaser and let it saturate the bottom bearing - washed out with garden hose - sprayed with WD40 whilst on side and did get metal filings out - turned the bearing centre shaft and sprayed again. then repeated today with WD40 again. Will probably give it a few more turns yet to be as sure as possible - WD40 has a fine plastic long nozzle so I could get inbetween the rollers. Oil that came out had like two layers when drained - one thick sludgy clingy and the other still black as night but thinner??? Sort of some elements of the oil clagged together and separated from the rest???

Cheers - MX45
 

willie59

Administrator
Joined
Dec 21, 2008
Messages
13,396
Location
Knoxville TN
Occupation
Service Manager
Yep, you're seeing what I'm describing. All the "dregs" of use settle and wind up in that lower section, where the output shaft bearing are. WD40 is a decent solvent for that application, clean it as best you can and proceed with assembly, hopefully you'll have no worries for a couple of years. ;)
 

MX45

Well-Known Member
Joined
Oct 19, 2010
Messages
220
Location
Australia
G'day Willie,

Well got some time today and made some errors. Got the whole unit back together and aligned all the marks but after a couple of hours of trying it was obvious it was not aligned??????????????????????????? So story is when you think about it the planetary gears although aligned with the ring gear and all the external marks are aligned I had naturally moved the drive gear when cleaning the old oil and debris out. So thinking, thinking, thinking! I took the top half of the drive off - the brake and hydraulic drive which allowed me then to remove the planetary gears which then allowed me to move the base unit to line up the bolt holes - not possible before - and then reseat the ring gear on the aligned marks and bolt the brake and hydraulic motor back on. But wait there is more. In doing so I noticed the ring gear was off set but thought the new o ring would press into place. Bad mistake. So with oil migrating up the sides and out from the joins took it apart again. O ring destroyed and caught on the lip and cut to pieces. so picked the best of the two old o rings - not too bad and put in much more carefully and made certain it was seated without pressure before bolt tightening - which I was getting more proficient at as the day wore on. Oil came up out of the boltholes but I am presuming I spilled oil in there and as I tightened it came up with nowhere to go. I cleaned the outside with WD40 and will check tomorrow for any new oil seepage - I hope I dont find any.

Tricks - took forever to try to get the drive aligned so the gears would engage. Tolerance for the moulding of the drive unit and base is very tight. Used grease on the mating parts and meant to be slide fittings to make it easier - I think it would have been very difficult without doing this. NOt a unit designed to be worked on readily but OK I guess if you do it all the time. I will let you know in a few days how it turns out if I have a bit better luck.

MX45
 
Top