• Thank you for visiting HeavyEquipmentForums.com! Our objective is to provide industry professionals a place to gather to exchange questions, answers and ideas. We welcome you to register using the "Register" icon at the top of the page. We'd appreciate any help you can offer in spreading the word of our new site. The more members that join, the bigger resource for all to enjoy. Thank you!

Fork Attachment Trojan Loader

chansey

Well-Known Member
Joined
Mar 21, 2010
Messages
171
Location
New Mexico
Occupation
Retired Project Engineering Manager
SDC10761_zpsfb71e896.jpg


At some point or other we all wish we had a fork lift or a fork attachment for our skid or wheel loader. Looking at the yard, I realized that everything looked bulky and heavy. The use of the bucket on my Trojan 1500Z to do the work wasn't cutting it.

Started shopping around the web and everything that looked good was priced between $5,000 and $15,000. NO WAY ... I then started looking at the scrap I had for a DIY Fork Attachment. I had a broken Alamo Mower that looked like I could build a carriage frame. The bucket modification would have to be done whether I purchased one or made one. Pickup some heavy duty forks on Purplewave for $105. The fork eye is 2-1/2" and weigh about $150 lbs each.

Follow along as I build a truly a heavy duty Fork Attachment.

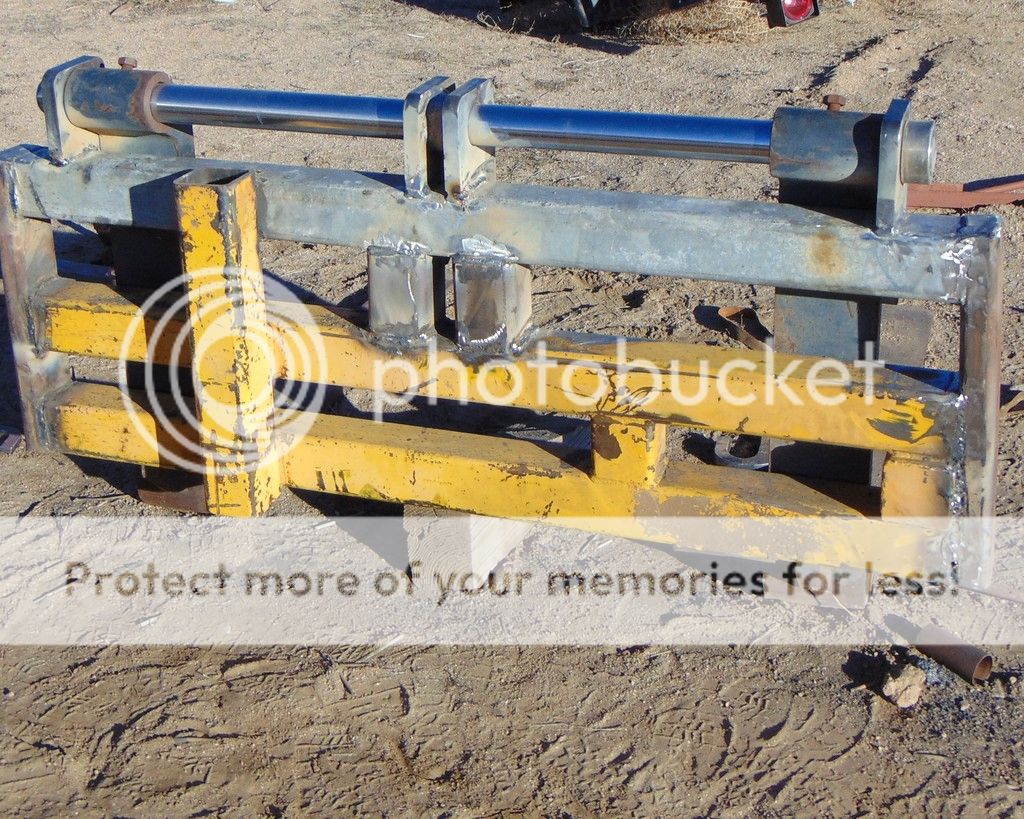
I cut off part of the frame support from the mover as it measured 65" wide and with some modification, it would work as a carriage. I pickup some 2-1/2 shafts from a hydraulic shop.

Fork%20Frame-2_zpszhmc3kgg.jpg


At this point I moved the carriage up to the forks to make some measurements for plates to attach to the frame and bucket. I made paper cut-outs for each piece to make sure they were accurate. The parts were drawn up on AutoCad to be plasma cut. The plates are dead on as far as dims go and the cuts were very smooth. The only grinding required was the the ID on the plates where the shafts go into the plate. There wa a slight burr where the plasma started and stopped. The forks and carriage were plumb and level. It is obvious that the Fork Attachment is being built in the field.

Fork%20Plates_zpst5cgczg1.jpg
 

chansey

Well-Known Member
Joined
Mar 21, 2010
Messages
171
Location
New Mexico
Occupation
Retired Project Engineering Manager
Continued to work on the Fork Attachment over the week end, Added additional support at the center where the forks meet. Also fitted as many of the brackets as I could. Looking at the assembly, it seemed as though were very several miles of welding a head.

Fork%20Hoist%20Frame_zpszmljazzb.jpg


Carriage-1_zpstijczh7e.jpg


Next will be the bucket attachment
 

chansey

Well-Known Member
Joined
Mar 21, 2010
Messages
171
Location
New Mexico
Occupation
Retired Project Engineering Manager
Haven't worked on this project in the last 4 days. Will try to get a full 8 hr day today and see if I can finish up and get ithe Fork Attachment ready for paint which I hate with a passion.

The welding with Ranger 8 is is going well and runs smooth 95% of the time. It's the only labor I have on the project.

More progress picks later today.
 

chansey

Well-Known Member
Joined
Mar 21, 2010
Messages
171
Location
New Mexico
Occupation
Retired Project Engineering Manager
This is the AutoCad Dwg that was used for the plasma to cut out the parts for the fork attachment. All of the holes for the pins were tight to begin with and after the plates were welded in place, all the pins remained a slip fit. Apparently there was no distortion of the 1" material.

Fork Attachment Plates.JPG
 

chansey

Well-Known Member
Joined
Mar 21, 2010
Messages
171
Location
New Mexico
Occupation
Retired Project Engineering Manager
Made some progress on the Fork Attachment.

The Fork Hook required a little more work. Had to cut down the lead on the hook to clear the pin on the bucket. In this photo the tube was cut down to the top of the first hole. Drilled 1" weld-plug holes on 3 sides to hold the hooks on to the tube.

Fork Hook-1.JPG Fork Hook-2.JPG
Fork Hook-3.JPG
This photo shows how the metal on the tube was moulded around the hook. It gives the part a finished look. Still have a lot of wlding to do like fill in the plug holes and the 4 X 4's are only partially welded.
 

chansey

Well-Known Member
Joined
Mar 21, 2010
Messages
171
Location
New Mexico
Occupation
Retired Project Engineering Manager
Mounted the Fork attachment to the loader bucket to see how it fit and functioned. Very happy with the results. Worth every bit of the time I spent building. Unless I purchased an attachment that replaces the bucket ($18,000) anything else would have to be custom built.

Fork Mounted-1.JPG Fork Mounted-2.JPG

Thanks for following along. All the structural steel was from scrap that I had in the yard. Total out of pocked cost was less than $500. Will post a final pic after the welding is finished, wire brushed and painted.
 
Top