• Thank you for visiting HeavyEquipmentForums.com! Our objective is to provide industry professionals a place to gather to exchange questions, answers and ideas. We welcome you to register using the "Register" icon at the top of the page. We'd appreciate any help you can offer in spreading the word of our new site. The more members that join, the bigger resource for all to enjoy. Thank you!

Ford 555 power steering leak: HELP

Lokel Yokel

Active Member
Joined
Aug 6, 2013
Messages
28
Location
Vermont
Occupation
Transportation.
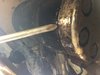
The steering valve located under my gauge cluster is leaking from the last seam for the bottom cap. It has maybe 5 recessed bolts holding that cap on. Anybody seen this before? I tried giving them a little snug but they are not loose. Still leaking. It’s a 1985 Ford 555A Backhoe.
 

Attachments

  • 06ED5852-A348-4E7F-92CA-3000EBE051B7.jpeg
    06ED5852-A348-4E7F-92CA-3000EBE051B7.jpeg
    172.4 KB · Views: 51

highwayghost

Senior Member
Joined
Nov 1, 2019
Messages
315
Location
Pittsburgh, PA
Occupation
Emissions Analyst
My Case 580SL steering valve is also leaking. Making a mess as it drips on top of the trans and some into the cab by the brake pedals. The parts manual shows a kit for it. Not much in it, a seal and a few orings. I figured I would pull it, rebuild and replace the four hoses. Not an easy place to get to. Anyone ever do this? Any tips would be helpful.
 

Attachments

  • steering valve.pdf
    101.9 KB · Views: 10

DMiller

Senior Member
Joined
Feb 21, 2010
Messages
16,579
Location
Hermann, Missouri
Occupation
Cheap "old" Geezer
If eroded or has a seat issue these used to be exchangeable at most hydraulic shops. They would turn and true the faces on those that needed.
 

alrman

Senior Member
Joined
Jun 20, 2009
Messages
3,308
Location
QLD Australia
Occupation
Diesel Fitter;Small Business Owner;Cleaner
The steering valve on the 555 is very similar to Case 580 backhoes of the same era.
The seal you need to replace (#38) is actually a rubber tube or sleeve that is about 1.75" long.
To reseal one of these valves is a little tricky.
The valve will need to be removed to replace the seal - they also need to be timed.

I strongly suggest you get a service manual before you attempt this.

ford 555 steering valve.png
 

Check Break

Senior Member
Joined
Jan 21, 2012
Messages
469
Location
USA
I did one in place about 15 years ago. Just replaced the bottom seal (No. 38) and new bolts (No. 41). [Updated the bolts because the originals stretch]. A PITA doing it upside down, but much faster than removing the steering motor. Bought the parts from CNH because they had the cheapest price. The steering motor was made by Ross Hydraguide (now Parker) and the motor used to be a Model HGA. I found a manual online. Here's a couple of links to the one I used.
https://www.numeralkod.com/cross/archivemanuals/parker/2751-001.pdf
https://www.pirate4x4.com/tech/billavista/PR-Hydro_Steering/hga.pdf
If you take it out and take it apart, be careful. They're not easy to put back together.
 

Lokel Yokel

Active Member
Joined
Aug 6, 2013
Messages
28
Location
Vermont
Occupation
Transportation.
Just a follow up.

Sure enough, item 38 was the problem. I carefully pulled the steering wheel, unplugged the gauge cluster, removed the outer housing and short steering shaft, unhooked the four short hydraulic lines at the firewall, removed the four bolts which hold the steering motor in place and carefully let it drop out the bottom.

when you uncap the thing immediately thread in a couple of bolts with the heads cut off. This keeps everything in the stack from getting messed up. Make note of item 39. It’s a washer that you could lose if you don’t look for it. Slide the outer housing....item 37 off and then remove the seal...item 38.

I got the new seal from Messers farm equipment in Pennsylvania. I think it was 38 dollars.

My motor was working good but leaking. Don’t dig deeper than this if you don’t need to. I did and there are little parts...the valve springs for example and a technique that you need to do to get item 33 to line up with the torque tube and the valve plate. (You rotate the steering input shaft until everything meshes the way it’s supposed to.)

one last point. When I torqued the end cap on to the max recommended 19 foot pounds my input shaft would no longer rotate by hand. I decided to interpret that word MAX to mean I could go less. So I think I ended up at 12 foot lbs. torqued down in a criss cross pattern.

Wire brushed it down and touched it up with black satin paint and got it all put back together.

Thanks again guys! The old 555 is serving me well once again. Talk to you again soon I’m sure!
 

Attachments

  • D447D495-3110-467B-8F9B-8551BC0728BB.jpeg
    D447D495-3110-467B-8F9B-8551BC0728BB.jpeg
    1.5 MB · Views: 26

Borkjerky

Member
Joined
Dec 13, 2021
Messages
15
Location
Youngstown,Ohio
Additional info:
While doing this project I was perplexed at the size difference from the old seal to the new: the new being much taller. I thought Messicks sent me the wrong part, however I found a post on another forum about the same issue. The new seal is supposed to be taller and will compress when torqued down (2-3 ft lbs, then 17 ft lbs crisscross all bolts).
Resized_20211218_134620.jpeg Resized_20211218_134627.jpg Resized_20211230_165844.jpeg Resized_20211230_170014.jpeg
 

Check Break

Senior Member
Joined
Jan 21, 2012
Messages
469
Location
USA
Additional info:
While doing this project I was perplexed at the size difference from the old seal to the new: the new being much taller. I thought Messicks sent me the wrong part, however I found a post on another forum about the same issue. The new seal is supposed to be taller and will compress when torqued down (2-3 ft lbs, then 17 ft lbs crisscross all bolts).

Makes you wonder if the extra length is an upgrade. I never took a new HGA apart so I don't know if the original seal was the same length as the replacement. In any event, it seals the leak.
 

rockwind1

New Member
Joined
Apr 3, 2022
Messages
2
Location
las vegas
I did one in place about 15 years ago. Just replaced the bottom seal (No. 38) and new bolts (No. 41). [Updated the bolts because the originals stretch]. A PITA doing it upside down, but much faster than removing the steering motor. Bought the parts from CNH because they had the cheapest price. The steering motor was made by Ross Hydraguide (now Parker) and the motor used to be a Model HGA. I found a manual online. Here's a couple of links to the one I used.
https://www.numeralkod.com/cross/archivemanuals/parker/2751-001.pdf
https://www.pirate4x4.com/tech/billavista/PR-Hydro_Steering/hga.pdf
If you take it out and take it apart, be careful. They're not easy to put back together.
question for you,,, what size bolts did you use to replace the other ones? they seem to be an odd size per the diagram,, either 5/16-2 5/8"s for one style motor and 5/16-2 11/16"s for another,, as seen here.

https://www.messicks.com/commoncatalog?vendor=nhc&modelId=130534

also,, how did you do it in place,, didn't the parts want to fall out and down?
 

Check Break

Senior Member
Joined
Jan 21, 2012
Messages
469
Location
USA
I didn't have any issue with parts falling out. You match the bolt length to the model number of the Hydraglide steering motor, or you can pull one out and measure it.
 
Top