• Thank you for visiting HeavyEquipmentForums.com! Our objective is to provide industry professionals a place to gather to exchange questions, answers and ideas. We welcome you to register using the "Register" icon at the top of the page. We'd appreciate any help you can offer in spreading the word of our new site. The more members that join, the bigger resource for all to enjoy. Thank you!

ford 4500 steering problems

Rforce1024

Member
Joined
Jan 17, 2012
Messages
8
Location
NJ
does anyone know where i can get a new or used power steering cylinder for my 4500 backhoe?
As i looked at it today, something is deff. not right and my neighbor looked at it too and saw that the shaft is broke.. (the piece where the anchor bolt goes through the eye and holds the cylinder in place) i am hoping i can cold wield it with a wielder if possible.. any info will help..
btw i looked the cylinder up on New holland's website and their number for the cylinder is 03D03? And i have a complete manual for my backhoe but doesnt tell you much...
 

oldhousehugger

Well-Known Member
Joined
Apr 15, 2007
Messages
122
Location
Dallas
4500 steering problems

As far as the piston rod end being broken off, I had mine welded back on and then had the shop clean up the weld on the lathe so I could maintain the piston travel. Take it to a shop that specializes in hydraulic cylinder repair. It will be worth the extra time to get it done right. New parts are WAY to expensive. They come out of the Ford/New Holland parts museum inventory somewhere in tractor heaven and are priced accordingly. Aftermarket parts are cheaper but the quality varies widely. When you reinstall the cylinder make sure to shim the rod end up properly on the connector pin where it attaches to the front casting or it will bind on the pin and break off the piston rod end again.
The pin which attaches the cylinder to the steering arm is a tapered fit and required heat and a hydraulic jack to get it to pop loose. My previous post describes the difficulty I had getting the pin out of the front casting. The main steering arm pivot pin is locked in with a big bolt. After you get the keeper bolt out there is a threaded hole in the top of the pivot pin where you can thread in a puller bolt to lift the pin vertically out of the hole.

There is a reason you don't see power assist hydraulic steering cylinders like this anymore. They don't work so good when there is wear in the linkage and require everything to be tight and new to work as designed. In addition the repair manual covers adjustment of the Ford 4000 power steering system which has built in travel adjustment but only peripherally covers adjustment of the 4500 system. This is because the 4500 system has no travel adjustment between the steering arm and yoke. It was not designed to survive this long.

After all the fixing I did on my 4500 steering system it worked OK but it would pull to the left and when the front wheels came off the ground, it would start hammering - fluttering. I was afraid the hammering would break off the end of the steering cylinder rod again which would have put me back to square one again. After much cogitation, I finally decided that the hammering was caused by excessive wear in the pin and socket connection between the main steering arm and the actuator yoke, which attached to the cylinder.
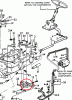
The way this steering system works, is that you have the yoke attached to the main steering arm by a pivot pin. The yoke is held in place on the steering arm by a cotter pin through the pivot pin. There is a socket hole in the yoke a couple of inches away from the pivot pin in which travels a pin which sticks up from underneath from the steering arm. As the yoke is pulled on by the pitman rod, it wants to turn on the pivot pin on the steering arm. It turns a little, but the pin and socket connection only lets it move a small amount. Since the back of the cylinder is attached to the steering arm and the yoke is attached to the valve, it is the small rotation of the yoke in relation the steering arm that moves the valve back and forth. When everything is new and tight, a little movement from the steering wheel moves the yoke in relation to the steering arm and causes the steering valve to try to “catch up” to the yoke. Sadly the maximum travel for the valve in and out is less than 1/8th either way. If the hole and socket becomes excessively worn the valve gets moved to far one way or the other and it starts to malfunction.

Hard as it may be to believe, I was able to remove the power-steering pump and drive shaft and then the cylinder yoke without tearing everything back apart. Since I had already reinstalled the radiator and shroud/hydraulic tank, I was not about to take it all back apart without looking for another solution. The air cleaner was still off at this point so I had that much room to work with.


In order to work on the yoke I had to get it off the tractor once again. This required removing the tie rod back to the steering box. However, I had to use oxyacetylene to heat the casting around the pitman ball joint to get it to pop out. It took a lot of twisting and turning of the parts but I eventually was able to get the yoke back off without tearing everything back apart to check out the hammering problem. It all finally came apart and I was able to remove the parts from below behind the axle or from in front without pulling the radiator.
After measuring the hole in the yoke and pin in the steering arm in both directions I found it was out of round about an 1/8th. I then looked at how much travel the cylinder valve actually allowed and it was equal to or less than the play in the hole. Since there was more travel in the linkage than the valve would allow, it was bottoming the valve and making it hammer.
My Solution:
I drilled and tapped a hole in the yoke at the side of the socket hole where it met the pin in the steering arm for a 5/16 allen head bolt. I also made a steel bushing out of a soup can to shim the pivot pin-hole connection where the yoke rotates on the steering arm. By using the tip of the allen bolt as the point of contact I was able to effectively eliminate the wear in the pin and socket and therefore eliminate the hammering. It still pulls to the left a little but I was able to adjust most of that out with the turnbuckle on the cylinder. The left pulling problem is an internal leak in the valve, which will just have to wait for another day to be fixed.
 

Rforce1024

Member
Joined
Jan 17, 2012
Messages
8
Location
NJ
cropped%20backhoe%20picMA31770441-0001.jpgcropped%20backhoe%20pic%202MA31770441-0002.jpg
i am going to try to post 2 pics of the pin that i need to remove if i can in order to remove the power steering cylinder
 

oldhousehugger

Well-Known Member
Joined
Apr 15, 2007
Messages
122
Location
Dallas
to remove that pin/bolt

View attachment 87632View attachment 87633
i am going to try to post 2 pics of the pin that i need to remove if i can in order to remove the power steering cylinder.. anyone have a solution? thanks

You must get under the front end to make these repairs.
I believe the bolt is supposed to have a tapered fit into the main steering arm casting. I believe it pivots on a bushing in the cylinder casting.

I jacked up the front end of the tractor and supported it on jack stands Then I swung the arm around so I could get a jack under where the tapered bolt sticks out the bottom of the steering arm. Pull the cotter key and take the nut off. Once the nut is loose on the bolt, thread it back on with the castle up to protect the threads and the castle.

Block up a jack under the nut and raise up on it to try and force the bolt out of the taper. Be careful you don't lift the tractor off the jack stands.

Once you have upward force applied to the bolt, heat the casting around the joint with a gas ax until it pops loose. I separated all my steering connections which were mated with a taper the same way. You won't damage the heat treatment of the forging if you don't get it hot enough for it to start to turn red. If I remember right the paint was just starting to smoke when the joint came loose.
You still may need to rap it some with a hammer but be very careful not ding the threads or you will be cursing yourself for the transgression.
From my limited experience, patience, thoughtfulness and restraint have caused far fewer blunders than the alternative. Sometimes it's better to walk away for a while than to get mad at an inanimate object and do something which just makes the repair more expensive in the end.

Good luck and remember under the right circumstances heat and gravity can be your friend.
John
 

Rforce1024

Member
Joined
Jan 17, 2012
Messages
8
Location
NJ
thanks john,
I ended up get the pin out, kinda easy once you figure how to do it.....did what you said about getting a jack under the bolt..jacked the jack up snug to bolt then hit the steering cylinder next to bolt, one good hit.. came right up.. the cylinder is at the shop getting the eye piece wielded to the shaft.. will have it back tomorrow.. then the fun part, putting everything back together...:):) thanks again..
 

Rforce1024

Member
Joined
Jan 17, 2012
Messages
8
Location
NJ
Just wanted to say thanks to everyone who helped me.... I got my backhoe up and running today.. so far so good... will probably run it some more tomorrow... again thanks
 

fatkid

New Member
Joined
Mar 29, 2012
Messages
2
Location
ohio
Old house hugger are you saying that there should be no play at all between the steering arm and the the yoke . I have replaced all pind and bushings and rebuild the cylinder but still hard steering . I do see when i turn the wheel the upper arm that attaches to the cylinder actuator and the lower arm that connects to the cylinder does have some play in it . Not were the pin and cotter key is but were the the center pin is. ???? Any help would be great
 

sparlash

New Member
Joined
Apr 2, 2012
Messages
2
Location
australia
I have a ford 4500 loader had major problems with steering tried the adjustment didnt work renewed pins and bushes no good tried different oil renewed all seals still not working sometimes worked one way and not the other investigated different types steering too expensive In the end studied the parts manual and found a pin 1/2 to 3/4 in dia which i think is a get you home or manual steering pin pulled it out and it now works good do get oil leaks I think the steering arms change shape over the years old age and cant cope with fine adjustments
 

sparlash

New Member
Joined
Apr 2, 2012
Messages
2
Location
australia
unamed pin

if you go to www.mcinto*****son.com.au
go to parts.
new holland
model
4500
4500 3 cyl industrial tractor
front axel and steering
front axel steering and related parts
look for no 29 29 is spacer
follow line down thru spacer and you will see a pin its about 2ins long dia maybe 3/4 it has no number its under the numbers 55
i am pretty sure thats the one i will check tomorrow when i go to the farm .
I got it out using a drift and a hammer i think i put bucket down and got the front wheels off the ground so i could move the front axel
you may have a ford parts book it will probally be the same
 

alrman

Senior Member
Joined
Jun 20, 2009
Messages
3,308
Location
QLD Australia
Occupation
Diesel Fitter;Small Business Owner;Cleaner
This might make things a little easier :)
 

Attachments

  • ford 4500 steering.gif
    ford 4500 steering.gif
    36.5 KB · Views: 9,238

livetolearn

Member
Joined
May 10, 2012
Messages
21
Location
northeast
Occupation
retired
Hi,
I just finished fixing the same problem on my 1966 Ford 4500. You will need to replace all the bushings and pins in the power steering assembly and it will steer with
ease once again.

Live to Learn
 

livetolearn

Member
Joined
May 10, 2012
Messages
21
Location
northeast
Occupation
retired
Yes,if you are talking about the 37.5mm dia. pin. The taper is something like 2 mm from top to bottom.
I will try to look up the exact new size and required bushings.
 

livetolearn

Member
Joined
May 10, 2012
Messages
21
Location
northeast
Occupation
retired
If you are talking about pin number 31 in the above drawing, then no that pin is not tapered and uses identical bushings numbered 52.
 
Joined
Jan 28, 2013
Messages
15
Location
Rockport,thousand islands
Occupation
Marine technician
I'm having a similar steering problem with a 68 ford 2wd 4500 series tractor.There has been no assist or very low steering assist for some time and very sloppy steering linkage.i have the nose off and the steering assist cylinder and valve unit out for repair as I believe the cylinder is defective. I am trying to remove the centre pin which has 3/8 fine threads in it and a circlip which I have removed.i have heated the yoke in which it goes through and tried to pull it up but will only move 3/8 of an inch,is there a clip on the bottom as well,or what method could I use to remove other than cutting it out,thanks for your help roger
 

livetolearn

Member
Joined
May 10, 2012
Messages
21
Location
northeast
Occupation
retired
I'm having a similar steering problem with a 68 ford 2wd 4500 series tractor.There has been no assist or very low steering assist for some time and very sloppy steering linkage.i have the nose off and the steering assist cylinder and valve unit out for repair as I believe the cylinder is defective. I am trying to remove the centre pin which has 3/8 fine threads in it and a circlip which I have removed.i have heated the yoke in which it goes through and tried to pull it up but will only move 3/8 of an inch,is there a clip on the bottom as well,or what method could I use to remove other than cutting it out,thanks for your help roger


Roger, no clip on the bottom. The arm is secured down via the cotter pin only. I used plenty of liq. wrench, two pry bars under the arms and then tapped the center pin with a hammer. When you
re-assemble with all new bushings and maybe new pins also, the system must be tight, no wiggle anywhere.
Good luck.
Ron
 

oldhousehugger

Well-Known Member
Joined
Apr 15, 2007
Messages
122
Location
Dallas
Roger the big center pivot pin has a 1 inch bolt that acts like a cotter key thru the side the center pivot. Once you get that out, chase the threads in the center hole of the pin and insert a piece of threaded rod long enough to extend up above the frame of the tractor. Then lay a piece of stout material across the frame with a hole drilled in the center to put the rod thru. Tightening a nut down on the crossbar will pull the pin straight up pretty as pie. I finally got the steering to work by replacing all the worn bushings and pins and installing a set screw to reduce the travel between parts 13 and 14. There is a pin in 14 which inserts into an oversize hole in 13 which gets worn. By threading the setscrew into the side of the hole and reducing the travel of one relative to the other I was able to eliminate excessive play in that joint.
There is a reason they don’t make them this way any more.

Also there is a grease fitting which feeds the bottom of the big pin joint which can only be gotten to from under the tractor. Make sure to clean that hole out before reassembling the pin into the hole. It is the only way grease can be gotten to the underside of the joint and one of the many reasons these old things fail.

Also the big pivot pin I got from A&I did not have the machined notch in it which was required to put the keeper bolt back through. It was also very soft compared to the original one. I was able to mark the A&I pin with a file. I sent it back and procured an OEM exact replacement part out of old stock from a retired dealer in Kansas by shear luck.

The attached picture shows the bolt thru the center pivot


Ford 4550 backhoe painted parts 048 small.jpg
 

csthompson12

Well-Known Member
Joined
Nov 25, 2010
Messages
208
Location
usa
Oldhousehugger, It sounds like I have the same problem you had. I replaced quite a few parts including the center pin and bushings. I still have play between 13 and 14, which is giving me poor steering assist power. If I watch the linkage while someone else steers, you can tell that 13 just wobbles on the pin before it can fully engage the steering cylinder valve. Apparently there is no bushing on that pin. I was thinking about making some kind of bushing, but your idea of a set screw sounds easier. So a set screw worked good for you? About what size did you use? I guess you would tighten in up just enough to take out play, but not bind. Thanks
 
Top