• Thank you for visiting HeavyEquipmentForums.com! Our objective is to provide industry professionals a place to gather to exchange questions, answers and ideas. We welcome you to register using the "Register" icon at the top of the page. We'd appreciate any help you can offer in spreading the word of our new site. The more members that join, the bigger resource for all to enjoy. Thank you!

D5G tilt cylinder advice

Dig_Texas

Well-Known Member
Joined
Mar 10, 2012
Messages
82
Location
Texas
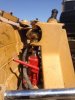
Yesterday when I was starting on a stock tank, I noticed the blade on the dozer seemed very loose and wandered back and forth on the tilt axis. When I checked out the connections, I found the tilt cylinder ball joint completely destroyed (the one attached to the dozer and not the ram end) and that was causing the movement. I've had good luck with this dozer and never had to replace any joints so I'm unfamiliar with the procedure. It is possible to only buy the ball joint or do I need to buy the whole cylinder? I've attached a photo of the damaged area...it's covered in grease so its hard to see but the ball joint is completely missing.

Also, does the pin just slide out(with a little tap from a mallet) or do I need to press it out?

Any advice is greatly appreciated!
 

Attachments

  • tilt cylinder comp.jpg
    tilt cylinder comp.jpg
    28.8 KB · Views: 889

d9gdon

Senior Member
Joined
Feb 12, 2010
Messages
1,517
Location
central texas
You can buy just the bearing.

D5G Tilt Bearing.gif

The pin is not pressed in there. I don't remember having any trouble replacing it on mine.
 

Dig_Texas

Well-Known Member
Joined
Mar 10, 2012
Messages
82
Location
Texas
Thank you for the info Don! From the photo it looks like 1 each 6A and 6B is all I need.
 

CM1995

Administrator
Joined
Jan 21, 2007
Messages
13,413
Location
Alabama
Occupation
Running what I brung and taking what I win
I am interested as well how it comes apart as I have a D5G too. If it's anything like the D5M in the other thread, I'll start greasing it twice a day.
 

d9gdon

Senior Member
Joined
Feb 12, 2010
Messages
1,517
Location
central texas
I don't think it's made the same way, cause I replaced mine once.

The bearing on an FDH serial number is 4D0298 and it takes two rings 3Y2768, by the way. I think the rings are just spacers.

The bearing on a D5M takes a 160-0305(396-9945 Classic) bearing and I can see a snap ring like in the other dreaded post.

Here's the D5M:

D5M Bearing.gif
 
Last edited:

Dig_Texas

Well-Known Member
Joined
Mar 10, 2012
Messages
82
Location
Texas
It doesn't look like the D5M setup. I know it will come apart easily as there is no more spherical part any longer. I'll let you know how everything works out. My field service setup is a bare minimum so if I can fix it then it shouldn't be too bad....(beat to fit and paint to match)

For me, the worst part of the repairs are dealing with the local cat parts counter people.

It seemed odd that it would get destroyed so quickly as I grease the machine every day of use and use cat approved high $$$ grease and not the cheapo stuff.
 

Lindsey97

Well-Known Member
Joined
Dec 5, 2010
Messages
173
Location
oklahoma
my 1992 D4c eats one of these in the exact same cylinder every 800 hours. i grease it pretty often and it seems to fail anyways. but we push big trees on our farm and the dozer performs more work than it should. yes the pins should slide out with a tap from a 5lb. hammer. clean the pins and deburr it along with the hole so reassembly goes smoothly.
 

caterpillarmech

Senior Member
Joined
Nov 7, 2011
Messages
533
Location
Florence Texas
Occupation
Field Service Supervisor
5g and 5m are tow entirely different animals. It is not a terrible job. Pull the hoses an pins. Put the cylinder on a good work bench and you can pound out the bearing. Be watchfull as they like to chip when hit. Clean all the holes and pins a reassemble.
 

Dig_Texas

Well-Known Member
Joined
Mar 10, 2012
Messages
82
Location
Texas
Time for cutting torch yet?

I got the parts today and tried everything I could think of to get the pin out short of the flame wrench and it would not budge. In the photo I have a 20-ton bottle jack under the pin and it would not move. I liberally soaked it with PB Blaster, tried to turn it with a 48" pipe wrench and cheater bar, beat on it with a 5# hand sledge and tried to make it move with the hydraulic jack. Does anyone have any other tricks I can try? Just before I attempt to cut it out I am thinking about welding a short 3/4" solid rod on the top of the pin and really wail on it with a full size sledge. :Banghead
 

Attachments

  • jack under pin.jpg
    jack under pin.jpg
    29.6 KB · Views: 534

Nige

Senior Member
Joined
Jun 22, 2011
Messages
29,474
Location
G..G..G..Granville.........!! Fetch your cloth.
It doesn't look like the D5M setup. I know it will come apart easily as there is no more spherical part any longer. I'll let you know how everything works out. My field service setup is a bare minimum so if I can fix it then it shouldn't be too bad....(beat to fit and paint to match)
Hmmmmmmmmmm famous last words.................

First up, when you put the jack under it does any part of the pin try to move, or is it just bending the 2 "ears"..? If it's bending both the ears when you apply pressure to the jack then it's time for the gas axe. Heat both top and bottom ears until they are the next best thing to cherry red and then put some pressure on with your jack. Last up whale on top of the pin with the biggest FBH (f*****g Big Hammer) you can find. A 10lb sledge might work, 20lb would be better. If that doesn't shift it you may well end up gas axing the pin out.
 

Dig_Texas

Well-Known Member
Joined
Mar 10, 2012
Messages
82
Location
Texas
I tried every way to get the pin out without a torch and in the end I had to torch it out. I heated both bushings twice with no effect, welded a big bolt on the end and tried to beat it out with a BFH and then decided not to waste any more time and replaced the rosebud tip with a cutting head and went to work. After I separated the top part from the bottom, the bottom half of the pin came out with a couple of taps. The top half of the pin was really stuck and I had to blow a hole thru the center and carve away the pin until enough pressure was relieved to beat it out. Got to the cat dealer last night with 15 minutes to spare for a new pin and two new spacers. Its raining now so I'll have to wait to get everything installed. I felt like a delivery driver yesterday putting over 300 miles on the truck between the job site, the shop and to Dallas and back to the shop.

dozer_repair.jpgdozer_repair1.jpgdozer_repair2.jpg
 

TXGOAT

Well-Known Member
Joined
Mar 30, 2013
Messages
46
Location
TEXAS
Does cat have a tool for pushing those out? A heavy steel frame that would reach around both ears, with a large, (1" +) fine thread bolt that could
push on the pin... Wind the bolt as tight as you dare, then smack it with a sledge....usually that will allow the bolt to go a little tighter.
A few repeats of the process will get most anything moving.
 

Nige

Senior Member
Joined
Jun 22, 2011
Messages
29,474
Location
G..G..G..Granville.........!! Fetch your cloth.
Does cat have a tool for pushing those out? A heavy steel frame that would reach around both ears, with a large, (1" +) fine thread bolt that could
push on the pin... Wind the bolt as tight as you dare, then smack it with a sledge....usually that will allow the bolt to go a little tighter.
A few repeats of the process will get most anything moving.
Even if they did I'd bet you money that on a machine like this where the pin has probably not been moved for years you'd still end up using the gas axe and the FBH .......

As an example there is factory tooling for any model to remove TTT equalizer bar centre pins. Apart from on new machines within the first maybe 3-6 months of their lives I've never had consistent success getting those pins out other than gas axing them out or using a small air-arc. They get beaten on something rotten when the machine's working.
 

d9gdon

Senior Member
Joined
Feb 12, 2010
Messages
1,517
Location
central texas
That tree pushing is hard on those PAT blades. I think Cat forgot that people use a bulldozer for that purpose.

The next item to fix will be that pin that you see in the picture that is welded in at an angle for the pitch adjustment. It has a trunnion made onto it that is welded onto/into the structure and the weld will break out around it. Nothing a good professional welder can't fix in a half a day.

It's not from abuse either. I think that tractor just gets a lot more grunt to the ground than the blade was designed for.
 

Lindsey97

Well-Known Member
Joined
Dec 5, 2010
Messages
173
Location
oklahoma
try an air chisel in a situation like this next time. you will be surprised what a small air chisel can accomplish. i agree with d9gdon on getting plenty of power to the ground and the occasional parts failures in the six way blade. even if it is a small kitty, the business end still gets used.
 
Top