• Thank you for visiting HeavyEquipmentForums.com! Our objective is to provide industry professionals a place to gather to exchange questions, answers and ideas. We welcome you to register using the "Register" icon at the top of the page. We'd appreciate any help you can offer in spreading the word of our new site. The more members that join, the bigger resource for all to enjoy. Thank you!

D5G multiple problems

Crackerjack222

Active Member
Joined
Apr 19, 2020
Messages
31
Location
South Texas
Update: Ok, so I had someone familiar with Cat D5G come out to help troubleshoot with me. Before he got there, I took the inspection plates off. When I took the floor plate up, I saw there was a purple wire that someone had added over the years that had been chewed thru. I stripped the ends and tied it together and BINGO! all was good, no action light and everything worked. About that time the mechanic showed up and I let him splice that wire and two others and all was good to go. I think the purple wire went from the computer to the decelerator pedal.
To discourage rats, over time I have put in dryer sheets that seemed to do no good. So now I have put in pieces of Irish Spring soap and splashed in some peppermint oil. Don't know if it will work, but the machine smells good!!;)
 

Welder Dave

Senior Member
Joined
Oct 11, 2014
Messages
12,657
Location
Canada
I think peppermint oil helps but you have to keep spraying it for it to remain effective. There's also pouches that are supposed to help. Called Fresh Cab or Cab Fresh or Grandpa Gus's mouse pouches. Farm or RV stores carry them. Cab Fresh used to say to repel mice but had to remove that from their packaging in order for it come to Canada. It was because of 1 of the ingredients in it. I'm not sure if ingredient was removed or not. I've used peppermint oil and the pouches and sprayed the pouches with peppermint oil. Have also used no name/cheap peppermint tea bags and sprayed them with peppermint oil in my 5th wheel. Seems to help but have to respray about every 4 to 6 weeks or so.
 

Crackerjack222

Active Member
Joined
Apr 19, 2020
Messages
31
Location
South Texas
OK, so I am back working on this machine again. The wiring problems of last year are resolved, all was working good until it developed a hydraulic leak. I dropped the belly pan and removed the leaking line and had it welded up. While I was doing this, I replaced the batteries an took the blade angle cylinder off to have it resealed. Now I want to replace one of the end bearings on this cylinder while it is off. Problem is, I don’t have the correct parts manual for this machine. I have a parts manual for a later D5G but the bearing I ordered from this manual does not fit.
Any chance anyone can send me the correct parts manual for D5G sn:FDW005xx?
Or even the correct pages (diagram and part no.s) for the blade angle cylinder?
 

Nige

Senior Member
Joined
Jun 22, 2011
Messages
29,678
Location
G..G..G..Granville.........!! Fetch your cloth.
Can't help with the Parts Manual apart from the information that the Cat Publication is SEBP3363. It covers all FDW-prefix machines.

Regarding the blade angle cylinder there are two possible Part Numbers. With a complete Serial Number I could probably identify which one of the two it is.
 

Crackerjack222

Active Member
Joined
Apr 19, 2020
Messages
31
Location
South Texas
Can't help with the Parts Manual apart from the information that the Cat Publication is SEBP3363. It covers all FDW-prefix machines.

Regarding the blade angle cylinder there are two possible Part Numbers. With a complete Serial Number I could probably identify which one of the two it is.
The last three digits are: 562
 

Nige

Senior Member
Joined
Jun 22, 2011
Messages
29,678
Location
G..G..G..Granville.........!! Fetch your cloth.
According to the information I can see for that Serial Number the angling cylinder assembly is a 201-1056. Check the barrel close to the head, there may be a tag on it with the Part Number.
The spherical bearing for that cylinder is a 4D-0298 and the snap rings (x2) to retain it are 1L-4775.
The other option of angling cylinder I mentioned earlier uses a different Part Number of bearing - 9J-9812.
The 4D-0298 bearing is 2.4375" O/D, the 9J-9812 is 2.8125" O/D.
 

Crackerjack222

Active Member
Joined
Apr 19, 2020
Messages
31
Location
South Texas
The old bearing measures 2.44”.
The cylinder has a tag with 1838459. And CHO 02. And 02 04. (Date mfg?)
I ordered a bearing based on the parts manual I have and the bearing I got measures 2.795”. And that bearing apparently uses the clip rings whereas the one I need uses two pressed-in rings for retention.
I am confused….
 

Nige

Senior Member
Joined
Jun 22, 2011
Messages
29,678
Location
G..G..G..Granville.........!! Fetch your cloth.
The cylinder has a tag with 1838459. And CHO 02. And 02 04. (Date mfg?)
That confirms it. The tilt cylinder assy on your machine is 183-8459 according to the parts list.
The spherical bearing for the barrel end (6A) is the same 4D-0298. The rings (6B) are 3Y-2768.
Despite being different references the bearing & rings for the rod are the same two Part Numbers.

1708625570122.png
 

CM1995

Administrator
Joined
Jan 21, 2007
Messages
13,458
Location
Alabama
Occupation
Running what I brung and taking what I win
I would do both ends of the cylinder since you have it off. It's like $100 for the bearing and the ring.

Dg5 tilt cylinder parts list.jpg
 

Crackerjack222

Active Member
Joined
Apr 19, 2020
Messages
31
Location
South Texas
I ordered the correct bearings, two each, and rings for my machine and they were delivered yesterday. The bearing was $11.98 at https://www.agkits.com/caterpillar-spherical-bearing-4d0298.aspx. The rings are about $8 each at the same place. So for a little over $50 including shipping I have all I will need. Next week I will go to the ranch and install them and the cylinder. The "eye" of the rod end is wallowed out just enough that one ring does not press in tight. I plan to tack weld it in place.
I also ordered the correct parts manual for my machine so maybe I will not have to ask for so much help here.... I do appreciate all the help you guys have given me. Thanks!!!
 

Crackerjack222

Active Member
Joined
Apr 19, 2020
Messages
31
Location
South Texas
So now I need to replace/repair the right side track adjuster on this machine, D5G sn:FDW005xx.
My current plan is to replace the yoke and the tube it slides into. The spring is good so will reuse that.

Do I have to split the track? Is there enough room to slide the idler forward enough to get the yoke out without splitting the track?

And, I assume I can use the nut on the shaft inside the spring to compress the spring, but doesn't that lock the tube in place? How do I get the tube out?
 

Nige

Senior Member
Joined
Jun 22, 2011
Messages
29,678
Location
G..G..G..Granville.........!! Fetch your cloth.
So now I need to replace/repair the right side track adjuster on this machine, D5G sn:FDW005xx.

Do I have to split the track?
I would suggest that you do. The recoil spring does not have to be touched in order to disassemble the track adjuster. This is actually good because they should only be touched if absolutely necessary. Often referred to as Death Springs, so be careful.

If you split the track and remove the front idler the Yoke Assembly #16 can be pulled right out of the tensioner cylinder to replace the seals without disturbing anything else. My question is why you think that both the Yoke and the tensioner cylinder require to be replaced.?
 

Attachments

  • Disassembly.pdf
    647.1 KB · Views: 2
  • Idler Gp.pdf
    239 KB · Views: 1

Crackerjack222

Active Member
Joined
Apr 19, 2020
Messages
31
Location
South Texas
I am sure the yoke will need to be replaced, I have the shroud off the adjuster assembly and the exposed yoke shaft is very badly pitted. It is slightly cocked in the tube, therefore I want to replace the tube instead of hoping new seals and yoke would fix the problem. I want this to be a "one and done" project.
I have split the track on my JD 555 track loader and do not want to have to do that on the D5 if there is any way around it.
 

Nige

Senior Member
Joined
Jun 22, 2011
Messages
29,678
Location
G..G..G..Granville.........!! Fetch your cloth.
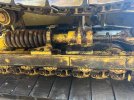
If you had posted that photo first your needs would have been a bit more obvious. In that case you have to pull the recoil spring & track adjuster out as an assembly but even then it will require splitting the tracks at the end of the procedure otherwise you will not have sufficent space.

Attached the procedure. Your challenge after getting the assembly out of the machine is going to be the disassembly of the complete unit to get at the RH track adjuster cylinder #17. This will require the services of a pretty large press. You CANNOT de-tension the recoil spring after removal by unscrewing the retaining nut.

Here's a question. Have you priced up parts yet.?
 

Attachments

  • Recoil Spring.pdf
    666.6 KB · Views: 4

Crackerjack222

Active Member
Joined
Apr 19, 2020
Messages
31
Location
South Texas
Nige, thanks for the reply and info.
I did not post the photo in my original post because I only wanted two questions answered: Do I HAVE to split the track to remove/install the yoke? And how do I get the spring and tube out after compressing the spring.
The info you posted answered the second question for sure. I did not see how to get the rear end of the spring out after it was compressed. I now see the compression nut will go thru the hole in the rear bracket after the spring is compressed slightly and the stops are removed. I thought the compression nut was behind the rear bracket. Dumb me, I know. I pressure washed it yesterday but did not think to look at the nut.
And I have priced the yoke and tube and it looks like I can get both aftermarket parts, tube and yoke for less than $900 plus freight.
And, I had already planned to take the spring and tube to Holt Cat in San Antonio to get them to compress the spring.
The machine is 100 miles from San Antonio and the likely mobile mechanic(s) capable of splitting the track so I want to minimize the necessity for hiring that help. If I can get the assembly out, take the new parts plus old spring to Holt, then have someone out to split the track and install the assembly, I can get by with one service call instead of two. I can cut the yoke to get it out if it will not extend far enough to get past the idler with the track still intact.

You see any flaws to this plan?
 
Top