• Thank you for visiting HeavyEquipmentForums.com! Our objective is to provide industry professionals a place to gather to exchange questions, answers and ideas. We welcome you to register using the "Register" icon at the top of the page. We'd appreciate any help you can offer in spreading the word of our new site. The more members that join, the bigger resource for all to enjoy. Thank you!

Cat 215, some questions

a65l

Well-Known Member
Joined
Mar 24, 2023
Messages
61
Location
virginia
Agreed, and that's pretty much the plan. I'm trying to not touch anything that isn't required.

On a different note, I did score a paper manual off Ebay, $130, looking thru the list of forms it seems I have everything... nice!

And I managed to get all the hydraulic filters changed. The book spec's 10w hydraulic fluid, I'll have to reach out to the former owner to find out waht they're running, unless, of course, I want to drain it and replace. And I don't.
 

a65l

Well-Known Member
Joined
Mar 24, 2023
Messages
61
Location
virginia
So, a question. The injectors have 2 seals. One is a large "O" ring that goes under the nut that holds the injector in. Easy. The other seal goes under the union nut for the fuel line, inside the nut. Problem is that the inside surface of the nut is sloped, and there isn't a groove to hold the seal. There is a groove on the body of the injector, but it's well down into the nut, and the seal is way to small diameter to fit over the injector body. The manual isn't any real help there, either. I have the seals just sitting in the top of the nut, with the union nut for the fuel line pushing down on them. that doesen't seem right, but given that the old seals were crusty and hard, i'm not sure it's wrong.

I did put it all together and get it started, still running like **** and no power. Next step will be to get it runnng on the machine's fuel tank, and see if the little tank isn't the issue. It does have a fairly small supply line, so who knows.

The injector lines are also leaking like crazy, I had new ones on order but the seller sent them to somebody in Minnesota instead of me. They're telling me they were delivered, so no problem, but hopefully at some point it will sink in that they sent them to the wrong place.


I met a guy today who will knock a link out of the tracks. We'll also rebuild the adjuster cylinder while we're in there. Hopefully it won't cost a fortune, but we shall see.
 

a65l

Well-Known Member
Joined
Mar 24, 2023
Messages
61
Location
virginia
Ok, obviously I'm installing the seals wrong, as they're getting cut when I tighten the lines down, so...

New lines showed up, as did compression test gauge and adapter. Apex Tool, the adapter looks first rate and the gauge is pretty solid and serious feeling.
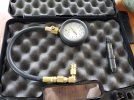
20230426_143525.jpg

So as soon as I could I rushed out and pulled out the injectors. I wasn't able to get a first crank number as it was just me, and I couldn't really tell when the cylinder in question had passed TDC, so I just rolled it over 5 or 6 times and went to check. I gotta say, I was a little on edge when I walked back to look but numbers: from #1 to #4, I got 420, 440, 440, 420. I'd call that pretty good for an old machine. So I think that rules out piston/ring condition and blown head gaskets and such. This was with the engine cold, I didn't see anything anywhere about doing it while the engine was hot or not. I'd do a gas engine cold, mainly because I don't like juggling red hot spark plugs and with an aluminum head you never ever ever remove/install spark plugs while the head is hot.

So, that done, I turned my attention to the glow plugs. I'm not sure I'm getting voltage to the line, but I tried reading resistance thru a couple plugs in place and got infinite, so I guessed they were burned out. New ones were fairly cheap, so I splurged and got 4. I couldn't locate my 5/16" 1/4 drive deep socket anywhere, and my 8mm was just a little too loose. I managed to borrow one from a buddy and pulled the #4 glow plug, as it was right there. It came out very easily.. I was very surprised. It even seemed a little loose, to be honest. I forget what the specified torque is on them, but it's not really low. Anyhoo, I drug it into the shop and cleaned it up a bit and dug out the multimeter. After a little scratching, I got a reading thru it... 5.8 or so ohms. The new ones measured right at 6 ohms, so I'd say at least that one is good. I went to install the new one, and found an issue.. there is a shelf on the glow plugs that hits a collar inside the socket, the end result being that I can't engage the hex to tighten it. Not an issue with the original plugs. So, sadly, since I only had the one socket I put the old glow plug back in, albiet with some fresh anti-sieze and went on to the injectors.
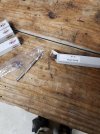
20230425_195133.jpg
Sorry I didn't get a pic of old and new next to each other. The new ones aren't an exact replacement, but the glow-y part that sticks down into the precombustion chamber is exactly the same length to the first thread as the old one, and I'm guessing that's teh critical dimension there.

After installing them I got out my shiny new lines. Again, a shoutout to global parts warehouse, they did screw up at first, but got replacement lines out in less than a day, and to me in just a couple. So good on them.
20230425_195147.jpg

They seem pretty good quality. I'm sure made with care and craftsmanship in the land of the Dragons.
20230426_164558.jpg
Well, some minor adjustment required...
 

a65l

Well-Known Member
Joined
Mar 24, 2023
Messages
61
Location
virginia
And, eventually, everything lined up and tightned down easily. Well, I guess I don't have a picture of the lines installed... I still need to put on the spacers, and there will be more tweaking when that happens.

So, I left the injector nuts loose and cranked 'er over with the throttle wide open... back around and I had fuel on the outside of all the nuts, so I tightned everything down and tried to get it to start.

No joy. So, I guess back up for another round of bleeding. Although I do see it blowing a good bit of white smoke. I was hoping it would fire right up...

I did finish filtering out the fuel I drained out of the tank, and I"m refilling as I go. I'll top it off with fresh diesel, and then hook up the tank for the first time in quite a few years. One step closer...
 

Welder Dave

Senior Member
Joined
Oct 11, 2014
Messages
12,720
Location
Canada
A little ether won't hurt just don't use the glow plugs. Some engines it just needs that little bit extra to start after changing filters or something. If you have any smoke you're getting fuel.
 

Cmark

Senior Member
Joined
Jan 2, 2009
Messages
3,183
Location
Australia
So, a question. The injectors have 2 seals. One is a large "O" ring that goes under the nut that holds the injector in. Easy. The other seal goes under the union nut for the fuel line, inside the nut. Problem is that the inside surface of the nut is sloped, and there isn't a groove to hold the seal. There is a groove on the body of the injector, but it's well down into the nut, and the seal is way to small diameter to fit over the injector body. The manual isn't any real help there, either. I have the seals just sitting in the top of the nut, with the union nut for the fuel line pushing down on them. that doesen't seem right, but given that the old seals were crusty and hard, i'm not sure it's wrong.

It IS right. The important sealing job is done by the taper on the end of the nozzle. The two seals are just there to stop rain water getting in and rusting things up.

In your parts book, you see that there are several clamps on the injection lines? If you are planning on keeping it for any length of time, you should install these. If you don't, you will start to get broken lines.
 

a65l

Well-Known Member
Joined
Mar 24, 2023
Messages
61
Location
virginia
I've got the clamps, they're on the old lines. They will get installed, just ran out of daylight yesterday.
 

Acoals

Senior Member
Joined
Dec 15, 2019
Messages
1,368
Location
Wisconsin
Occupation
Jack of all trades/Master of none
Ether would be a excellent tool . . .

For wrecking those brand new glow plugs.
 

a65l

Well-Known Member
Joined
Mar 24, 2023
Messages
61
Location
virginia
I've been a little overwhelmed with other stuff, but I did manage to get some work in. I cleaned up the battery room, and found some issues with the wiring on the solenoids, which I corected. I found a 5/16 socket that was drilled out deep enough to clear the collar, so I also swapped out the glow plugs. I was very pleased to see the ammeter dip when I selected glow plugs for the first time, and with about 20 seconds warmup the engine fired right up. Still runs rough, but hey... it does it quicker. I also got a temp gauge and verified that it's not overheating, I ran it for about 30 minutes, from idling to full rpm, put some load on it (at least as much as I could without stalling) and water temp never got much over 190, oil temp was around 150. So all good there.
 

a65l

Well-Known Member
Joined
Mar 24, 2023
Messages
61
Location
virginia
So finally got some time to pull the valve cover. I must just be lucky, as it seemed that #1 was at TDC and on the power stroke.. both valves were loose. I couldn't put a bolt in the hole in the flywheel, so not exact, but close... valve cleareances were good, if anything just a bit on the loose side. I checked the other valves that you check at that position, and they were good as well. I guess I'll need to pull the starter, or pull the accessory belts to use a strap wrench on the flywheel. That's probablly easier, as the starter is in an akward place and fairly heavy, I'm guessing.

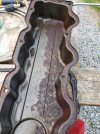
Had a little surprise when I pulled the valve cover....

20230511_165720.jpg

Rusty. Damn.

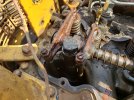
20230511_162622.jpg

Rusty? And note the crap lying on top of the cylinder head...

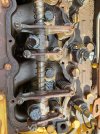
20230511_162611.jpg

Not as rusty, but still...

At the suggestion of my neighbor I ran a magnet along the rocker arms and over the head, it collected quite a bit of gunk. I'm a little worried about what got down into the pan while it was running. I need to source a couple small magnets and put them near the drain galleries in case more stuff comes off.

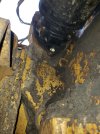
20230511_191324.jpg

Not sure but I think there should be a bolt there... Ah well. Easier to get it off, I guess.

So, I need to figure otu how I'm going to rotate the engine and check the other valves, then check pump timing. I did verify that the timing pin is in the pump, and id'd the bolt I have to remove to put the pin into the cam. So, time to do some stuff. Tomorrow.
 

a65l

Well-Known Member
Joined
Mar 24, 2023
Messages
61
Location
virginia
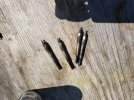
Bonus pic... old glow plugs. Of course I don't have a picture of one of the new ones...

20230506_105052.jpg


I'll clean them up and do a resistance check... might still be good.
 

Welder Dave

Senior Member
Joined
Oct 11, 2014
Messages
12,720
Location
Canada
Is the rust from condensation or not letting the engine get warm enough? Seems like quite a bit of rust to me.
 

Coaldust

Senior Member
Joined
May 9, 2011
Messages
3,466
Location
North of the 60
Occupation
Cargo Tanks, ULSD, RUG, Methanol, LPG
If you get to fixing everything that isn't quite right, you are going to wind up 50k into it. If that were mine I would get the fuel system patched up, dig the pond and get the machine shipped off to an auction before a $15,000 component takes a digger.
Very wise words. One component failure and huge money the Op shall never recover. But, it’s not my money and I enjoy the posts. Thank you for your service.
 

Acoals

Senior Member
Joined
Dec 15, 2019
Messages
1,368
Location
Wisconsin
Occupation
Jack of all trades/Master of none
Wouldn't there have to be something to cause enough moisture to create that much rust?

Sitting for 5 years . . . maybe somebody left the oil fill loose or something. I doubt you can blame that on short runs, even a 30 second run cycle is going to coat everything with oil.
 

a65l

Well-Known Member
Joined
Mar 24, 2023
Messages
61
Location
virginia
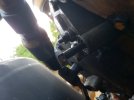
Got TDC set today. Turns out it's actually fairly easy from the crankshaft pulley, once one figures out to slacken the accessory belts and take them off so a. there's more room and b. the fan isn't pinching your fingers on the ratchet. Had a buddy down below and the bolt popped right in. I set the valves I could (all were a little loose, but not terrible) and then the moment of truth.. I pulled the cover off the pump, pulled out the pin and stuck it in. With indeterminate results. I can't see into the hole due to the angle, so I can't tell if there's a notch there or not. I could try and get a picture, but that's sketchy at best. I have a borescope... but what the hell. The pin went in, it felt like it was a little off-center. If it was a rigging pin on an airplane I wouldn't accept it. Here's a picture, or two... if one of you guys who has done this can comment, I'd greatly appreciate it.

20230512_182033.jpg

That's as far in as it goes. It won't rotate freely, feels like it's binding on something or other. Tomorrow if the rain holds off and I get otehr stuff done, I'll try and pull out the flywheel pin and rotate the engine gently while holding the pump pin, see if it slides in easier or not.
 

oarwhat

Senior Member
Joined
Dec 14, 2009
Messages
842
Location
buffalo,n.y.
I just timed my 3208's I'm assuming yours should be similar. It's suggested to be like 1 degree advanced for better running. Try putting a smaller pin in the pump to see if it's close. One or two degrees either way won't make it run terrible. To change timing is a pain in the butt.
 

Acoals

Senior Member
Joined
Dec 15, 2019
Messages
1,368
Location
Wisconsin
Occupation
Jack of all trades/Master of none
If it was a rigging pin on an airplane I wouldn't accept it.

Ah, you're an airplane guy, that explains the obsession with tinkering with everything that isn't quite right instead of just getting your pond dug . . . :D :D

My father was an aircraft mechanic . . .
 
Top