• Thank you for visiting HeavyEquipmentForums.com! Our objective is to provide industry professionals a place to gather to exchange questions, answers and ideas. We welcome you to register using the "Register" icon at the top of the page. We'd appreciate any help you can offer in spreading the word of our new site. The more members that join, the bigger resource for all to enjoy. Thank you!

Case 450C Blade Angle Pivot Repairs

Metalman 55

Senior Member
Joined
Feb 6, 2013
Messages
1,301
Location
Ontario
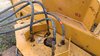
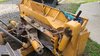
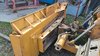
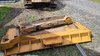
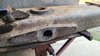
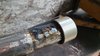
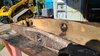
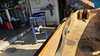
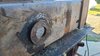
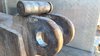
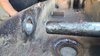
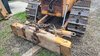
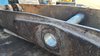
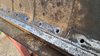
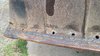
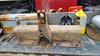
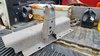
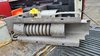
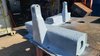
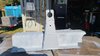
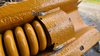
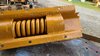
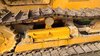
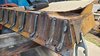
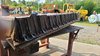
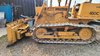
Started into the Case 450C Blade angle pivot repairs today, where the bottom pivot bushing was GONE, so things were quite sloppy to say the least! Decided to salvage the main pivot pin be cause of $$$, so got it off & did some manual wear buildup with my mig welder & then some carefull grinding...…..not perfect, but it will tighten things up 95% I am sure. New bushings for the angle pivot going in too.
 

Attachments

  • 20200903_092956.jpg
    20200903_092956.jpg
    7 MB · Views: 64
  • 20200903_095952.jpg
    20200903_095952.jpg
    7.6 MB · Views: 65
  • 20200903_102018.jpg
    20200903_102018.jpg
    7.8 MB · Views: 62
  • 20200903_102509.jpg
    20200903_102509.jpg
    7.3 MB · Views: 67

Metalman 55

Senior Member
Joined
Feb 6, 2013
Messages
1,301
Location
Ontario
There was originally a retainer plate on the bottom of the pivot pin with a keeper that kept it from rotating & that was missing, so we were able to yank the pin right out the top with the nut being left on! The bottom bushing had made an exit at one point as well, so things were pretty sloppy down there! Filled in some weld to tighten up the bottom hole where the bushing was.
 

Attachments

  • 20200903_102513.jpg
    20200903_102513.jpg
    8.1 MB · Views: 41
  • 20200903_103634.jpg
    20200903_103634.jpg
    8.4 MB · Views: 43
  • 20200903_112854.jpg
    20200903_112854.jpg
    8.2 MB · Views: 41
  • 20200903_120826.jpg
    20200903_120826.jpg
    7.2 MB · Views: 44

Metalman 55

Senior Member
Joined
Feb 6, 2013
Messages
1,301
Location
Ontario
Installed new bushings in the angle pivot after the welding & grinding on the main pin was done to tighten things up some. Note the redneck bushing puller in the one picture using an old mower blade for a washer when pulling it in! Kinda crude but it worked.
 

Attachments

  • 20200903_132154.jpg
    20200903_132154.jpg
    4.4 MB · Views: 41
  • 20200903_163946.jpg
    20200903_163946.jpg
    5.9 MB · Views: 36
  • 20200903_164608.jpg
    20200903_164608.jpg
    5.6 MB · Views: 38
  • 20200904_095157.jpg
    20200904_095157.jpg
    6.5 MB · Views: 37

Metalman 55

Senior Member
Joined
Feb 6, 2013
Messages
1,301
Location
Ontario
Ended up welding up the somewhat oblong holes in the pin bosses for the blade angle frame to which the tilt cylinder is anchored too, then cleaning up with an internal grinder. Pins have some wear too, but decided against replacing them because of $$$ on an old machine. Replaced both bushing sets in the tilt cylinder ends too, so that should tighten things up nicely.
 

Attachments

  • 20200904_095212.jpg
    20200904_095212.jpg
    5.8 MB · Views: 34
  • 20200904_101632.jpg
    20200904_101632.jpg
    6.6 MB · Views: 32
  • 20200904_101641.jpg
    20200904_101641.jpg
    6.4 MB · Views: 33

Metalman 55

Senior Member
Joined
Feb 6, 2013
Messages
1,301
Location
Ontario
The bottom bushing in the angle pivot was long gone before I owned the machine & the hole was very egg shaped, so I welded it up the best I could & ground it as round as I could get it, still not perfect so I welded the bushing in place. An old machine so I doubt of it will ever wear out for my use. All back on now & the assembly is MUCH tighter & its on to some work on the moldboard while it is still off.
 

Attachments

  • 20200904_115504.jpg
    20200904_115504.jpg
    7.1 MB · Views: 37
  • 20200904_162157.jpg
    20200904_162157.jpg
    9 MB · Views: 36
  • 20200904_115454.jpg
    20200904_115454.jpg
    5.6 MB · Views: 35

Metalman 55

Senior Member
Joined
Feb 6, 2013
Messages
1,301
Location
Ontario
Back at it today...… Drilled out where bolts were broken in blind holes at the blade tilt guides. All drilled & re-tapped out now.
Now welding up the bottom of the moldboard where someone made a mess of lengthening the bottom, grinding out bad welds & re welding it properly. They had extended it too long so once welded properly I will plasma off about 5/8" so the cutting edge sticks down as it should. Back at it tomorrow!!
 

Attachments

  • 20200908_111637.jpg
    20200908_111637.jpg
    6.6 MB · Views: 29
  • 20200908_142216.jpg
    20200908_142216.jpg
    7.6 MB · Views: 28
  • 20200908_142226.jpg
    20200908_142226.jpg
    7.9 MB · Views: 29
  • 20200908_142233.jpg
    20200908_142233.jpg
    8.2 MB · Views: 29

Metalman 55

Senior Member
Joined
Feb 6, 2013
Messages
1,301
Location
Ontario
Onto some cancer surgery for the carrier roller pedestal which was bad when I bought the machine a few months back. The main structure looks great once cleaned & so does the recoil spring. Handle with CARE with that loaded spring!!
 

Attachments

  • 20200910_141600.jpg
    20200910_141600.jpg
    7.7 MB · Views: 28
  • 20200910_141615.jpg
    20200910_141615.jpg
    8.1 MB · Views: 29
  • 20200910_150258.jpg
    20200910_150258.jpg
    7.2 MB · Views: 27
  • 20200910_150310.jpg
    20200910_150310.jpg
    7.3 MB · Views: 29

Metalman 55

Senior Member
Joined
Feb 6, 2013
Messages
1,301
Location
Ontario
This is how we pulled the front idler ahead to free up the recoil spring assembly to get it out.
Then onto the cancer surgery for the roller pedestals. Just need some paint now. Good as new??
 

Attachments

  • 20200911_105124.jpg
    20200911_105124.jpg
    9.3 MB · Views: 26
  • 20200911_105113.jpg
    20200911_105113.jpg
    8.3 MB · Views: 27
  • 20200911_162003.jpg
    20200911_162003.jpg
    5.1 MB · Views: 29
  • 20200911_162010.jpg
    20200911_162010.jpg
    5.2 MB · Views: 26

Metalman 55

Senior Member
Joined
Feb 6, 2013
Messages
1,301
Location
Ontario
Finished the carrier roller pedestal repairs, painted the compartmentalized spring assembly, then noticed that maybe the some attention should be given to the part that retains the spring, so cut a segment from 6" sch 40 pipe & cut out the old rotten part & welded the patch in & it fit just right! Got both sides back together with fresh gr. 8 bolts! Too cheap to buy new assemblies, but if the need arises in the near future they should pop out quite easily.
 

Attachments

  • 20200914_102238.jpg
    20200914_102238.jpg
    5 MB · Views: 19
  • 20200914_102247.jpg
    20200914_102247.jpg
    6.8 MB · Views: 19
  • 20200914_110951.jpg
    20200914_110951.jpg
    6.6 MB · Views: 19
  • 20200914_155022.jpg
    20200914_155022.jpg
    8 MB · Views: 19

Metalman 55

Senior Member
Joined
Feb 6, 2013
Messages
1,301
Location
Ontario
Then added these reinforcements to the bottom of the blade where the old ones were about worn off, so bent some 3/4" diam round bar & welded them on which should give some added protection. Then mounted the cutting edge back on while it was on the work bench...…..no bending over!!
 

Attachments

  • 20200914_131221.jpg
    20200914_131221.jpg
    6.9 MB · Views: 22
  • 20200914_161445.jpg
    20200914_161445.jpg
    6.7 MB · Views: 23

Metalman 55

Senior Member
Joined
Feb 6, 2013
Messages
1,301
Location
Ontario
All back together now & the blade is 95% tighter! Was an interesting project.
 

Attachments

  • 20200915_110225.jpg
    20200915_110225.jpg
    8 MB · Views: 18
  • 20200915_110244.jpg
    20200915_110244.jpg
    8 MB · Views: 18
Top