• Thank you for visiting HeavyEquipmentForums.com! Our objective is to provide industry professionals a place to gather to exchange questions, answers and ideas. We welcome you to register using the "Register" icon at the top of the page. We'd appreciate any help you can offer in spreading the word of our new site. The more members that join, the bigger resource for all to enjoy. Thank you!

Broke my cat 941 loader

mopar65

Well-Known Member
Joined
Nov 23, 2012
Messages
70
Location
Laquey MO
Occupation
WG-10 power suport mechanic, work for the us gover
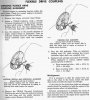
OK my story starts like this. This summer i had to tare down my track loader for the torque converter seal. The seal was leaking pretty good. I noticed while i was taking the flexible drive coupling off to get at the seal, that they were starting to get dry rotted. I think my biggest mistake was i replaced the Joints with after market ones and not factory cat parts. well it ended up costing me.lol I was using the loader tonight before i had it hauled over to my girlfriends house. the old loader was just purring along pushing brush tress etc, when all of a sudden i hear a knocking noise. I am thinking great the engine is knocking etc. It was getting dark on me and i just happened to look down by my feet and saw sparks flying. also it got to the point that the loader did not want to pull its self. So i go get my truck and pull it back to the drive way. I pull the side panels off and found out all for joints P/N 5S7893 are torn in two. No wonder it quit pulling. I guess that's what i get for buying cheep after market crap. luckily it didn't tare anything up i just have to drop the belly pan and replace the joints. I should of just sent them back and got the factory cat one,s. I didn't like the way the after market ones were built, the bolts holes were not as deep as the factory ones i took off and the rubber seemed a lot softer to me. Now i might of caused the problem my self. I had to run a tap in all the bolt holes to get the rubber out of them and make them deeper so the bolts that worked on the factory mounts would bolt all the way down with the new mounts. So the new ones didnt last 20 hours, but the factory ones lasted over 8 years. So what do you guys think? any body else run into a problem like this? thanks Bobby Miller
 

td25c

Senior Member
Joined
Feb 14, 2009
Messages
5,250
Location
indiana
Well .... At least you got the 941 moved to the job / Girlfriends house .:)

So what happened ? Bolts break , threads pull , U- joint cross bust in two ?

I've used aftermarket U -joints on the dozers and not had any trouble .
 

mopar65

Well-Known Member
Joined
Nov 23, 2012
Messages
70
Location
Laquey MO
Occupation
WG-10 power suport mechanic, work for the us gover
Well .... At least you got the 941 moved to the job / Girlfriends house .:)

So what happened ? Bolts break , threads pull , U- joint cross bust in two ?

I've used aftermarket U -joints on the dozers and not had any trouble .

the track loader didn't make it to the girlfriends house.lol it was so posed to get moved this Friday after work. my cat uses a rubber joint sandwiched between 2 thick metal discs.the first pic in this link is what the disc look like. i tore all four disc in two.
http://www.bing.com/images/search?q...D65D49C712300276D18C6A9C3D1BA2200&FORM=IQFRBA
i think the after market ones i got were just a junk part. i was only running a little but below half power when they broke.
 

Bob/Ont

Senior Member
Joined
Sep 18, 2012
Messages
1,605
Location
Ontario
the track loader didn't make it to the girlfriends house.lol it was so posed to get moved this Friday after work. my cat uses a rubber joint sandwiched between 2 thick metal discs.the first pic in this link is what the disc look like. i tore all four disc in two.
http://www.bing.com/images/search?q...D65D49C712300276D18C6A9C3D1BA2200&FORM=IQFRBA
i think the after market ones i got were just a junk part. i was only running a little but below half power when they broke.

You need to do an engine alignment. That was what was wrong with the first set. Need to make sure the engine mounts are solid then shim the engine and side shift it to get side to side run out less than 0.090" and face to face run out less than 0.026".
Later Bob
 

mopar65

Well-Known Member
Joined
Nov 23, 2012
Messages
70
Location
Laquey MO
Occupation
WG-10 power suport mechanic, work for the us gover
You need to do an engine alignment. That was what was wrong with the first set. Need to make sure the engine mounts are solid then shim the engine and side shift it to get side to side run out less than 0.090" and face to face run out less than 0.026".
Later Bob

Bob do you have instructions on how to do that? Also how come the cat ones lasted over 10 years and they could of went more. The after market ones dint even last 20 hours? I am going to have to pull the belly pan to measure the run out right? if so can i just install two of them so i can drive it over to the shop floor? its about 80 feet away.I really dont want to have to pull the belly pan in the mud and dirt.lol thanks for the infro Bob
 

Bob/Ont

Senior Member
Joined
Sep 18, 2012
Messages
1,605
Location
Ontario
Yes but no more than you need. I will give detailed inst. Have done many times before but not sure you can search it out on here. Maybe some one can.
Later Bob
 

Nitelite

Senior Member
Joined
Jul 5, 2013
Messages
905
Location
Ashland City TN.
Occupation
Retired
Bob/Ont is dead on with his post. If the engine alignment is off you will just keep breaking the rubber biscuits.
I bought aftermarket biscuits for my 951C. They have lasted more than a year but they are still hanging on the wall in the package they came in. I also like to throttle down to change directions so as to minimize the strain on the rubber connection biscuits.
 

Bob/Ont

Senior Member
Joined
Sep 18, 2012
Messages
1,605
Location
Ontario
Make sure the rear mounts are solid to the frame. Make sure mount mating surfaces are smooth, not pounded out.
Clean the disk on the engine side around the circumference and the outer face for the dial indicator to ride.
Make sure converter shaft bearings are sound, then mount a dial indicator on the input shaft.
Run the indicator around the circumference of disc, raise or lower the rear of the engine and shift side to side until the run
out is less than 0.090". The closer to zero the better, Clamp down with mount bolts and recheck, Adjust with shims
as necessary. Once that is done run the indicator around the face. The front of the engine needs moving up, down and side to side to get this
run out less than 0.026", closer to zero the better
 
Top