• Thank you for visiting HeavyEquipmentForums.com! Our objective is to provide industry professionals a place to gather to exchange questions, answers and ideas. We welcome you to register using the "Register" icon at the top of the page. We'd appreciate any help you can offer in spreading the word of our new site. The more members that join, the bigger resource for all to enjoy. Thank you!

Another 416C Steering Cylinder Leak

AllDodge

Senior Member
Joined
Apr 2, 2011
Messages
2,313
Location
Kentucky
Read through the below to threads and appears I just need to get a spanner to remove the nut and disconnect the steering linkage.

https://www.heavyequipmentforums.com/showthread.php?25894-Cat-416c-IT-steering-cylinder-removal
https://www.heavyequipmentforums.com/showthread.php?24189-Cat-416c-help

Here is the left side and looks to have the only side which has slots so a wrench can fit on the shaft. There is very little room for an open end wrench and most of mine are a bit to wide. Is this the correct side to remove first?
416C left.jpg

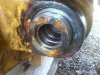
This pic is from the right side and has the large spanner nut. It's my understanding from the previous post to remove this nut and everything will be pulled out from this end?
416C right.jpg

From other threads, another issue is getting the right side linkage off. I have a steering knuckle separator, tuning fork type. Do you think I can remove the tie rod end at the joint with this method and still be able to rebuild the cylinder? Plan to pickup the parts to repair tomorrow (CAT part number 178-7189)
 
Last edited:

Nige

Senior Member
Joined
Jun 22, 2011
Messages
29,423
Location
G..G..G..Granville.........!! Fetch your cloth.
This is what the manual says.....it shows a tuning fork type ball joint splitter being used. The text is edited a bit so that hopefully it makes more sense.

1. Loosen the ball joint end of the left hand tie rod from the steering housing but do not separate. Repeat for the right hand tie rod ball joint. Separate the right hand tie rod completely from the steering housing.

2. Use a heat gun to heat the joint between the steering cylinder rod and the rod assembly of the right hand tie rod to loosen the thread lock.

3. Using a slim open-ended wrench to hold the steering cylinder rod separate the right hand tie rod assembly from the steering cylinder rod. (the "big nut" plus the flats on the cylinder rod in your photo).

4. Repeat Step 2 on the LH tie rod assembly.

5. As per Step 3 separate the LH tie rod assembly from the steering cylinder rod by turning counterclockwise. Remove the locking nut from the tie rod and separate it from the steering housing.

Once you have the tie rods and locking nut remove from the steering cylinder it ought to be a fairly simple matter of loosening/removing the stake nut and washers from the LH side to get the steering cylinder out of the housing from the right side.
 

AllDodge

Senior Member
Joined
Apr 2, 2011
Messages
2,313
Location
Kentucky
Thanks much. I have the manual for this thing but did not find it, probably don't know where to look, but I am missing a couple books

Thanks again
 

ttazzman

Well-Known Member
Joined
Sep 10, 2010
Messages
194
Location
missouri
would be great if you took the time to document with pictures the process and tools you use.....this seems to be a common issue ......i know i will need to do this myself soon
 

AllDodge

Senior Member
Joined
Apr 2, 2011
Messages
2,313
Location
Kentucky
would be great if you took the time to document with pictures the process and tools you use.....this seems to be a common issue ......i know i will need to do this myself soon

I'll see what I can put together and will post the steps with pics.

Currently ordered a hook spanner and just picked up the rebuild kit. Finally got the engine back from the machine shop for my D3, and putting my Bravo 3 outdrive back together. Way to many projects going on right now, sure didn't need the 416C issue.
 

AllDodge

Senior Member
Joined
Apr 2, 2011
Messages
2,313
Location
Kentucky
Tie rod removal

Lifted the front end and placed on blocks. Removed tires (lug nuts 1 1/8) the removed tie rod end nuts (1 1/4). Placed the steering straight and separated the tie rod from the right side. Turned the wheel out of the way. Turned steering full right and heated the nut area attaching to cylinder. Removed tie rod (2 inch) nut to cylinder.
Photo188.jpg

Photo189.jpg

Turned wheel back to center and removed left side tie rod. Turned wheel full left and heated rod end. Place wrench (1 1/16) on rod end which I had to grind a bit thinner to fit slot, and removed tie rod.
Photo190.jpg

It would probably have been easier to remove the front counter weight. I still may have to do that to get the spanner nut off

Edit: BTW you need a 1 1/8 inch separator tool to remove tie rod ends.
 

AllDodge

Senior Member
Joined
Apr 2, 2011
Messages
2,313
Location
Kentucky
Spanner nut removal

Now the next issue, I'm having trouble getting the spanner nut off the steering cylinder end. If I removed the counter weight I would have more room. I'm using a 2 to 4 1/4 inch hook spanner and the nut is 3 inches. Anyone know if there is a trick to it? May need to apply some heat but I reluctant to do it, hope someone else has a better method.
Photo191.jpg
 

AllDodge

Senior Member
Joined
Apr 2, 2011
Messages
2,313
Location
Kentucky
Do not remove the nut

OK I found out how to get the nut off, and did, but DO NOT REMOVE THE NUT.

The nut is only removed IF you need to remove the cylinder and this is normally not needed. In order to remove the cylinder there is a special tool to press it in and out by a CAT dealer. There are only a few dealer locations which have the tool and as before it is not needed. I cut mine out and then found out it was not needed.

DO NOT DO WHAT I DID
Cut the nut off
Photo193.jpg

Reinstalled new nut (comes with kit)
Photo199.jpg
 

AllDodge

Senior Member
Joined
Apr 2, 2011
Messages
2,313
Location
Kentucky
Removing inner cylinder

Remove hydraulic lines from both sides and plug. I plugged the lines using 1/4 inch bolts and some electrical tape. Pushed the bolt and tape inside the center of the line.

Remove outer snap ring off left side of the cylinder. Once off pick out the O-ring from the inside
Photo194.jpg

Now push or tap the end cap further into the cylinder. It needs to move in about a 1/2 inch so you can get at the inner snap ring and remove.
Photo202.jpg

Go over to the right side and push the rod out the left side. I used my foot and pushed it out
Photo195.jpg

There are 3 parts to each end of the shaft seal. Old ones are here showing most inner seal left to outer right side
Photo197.jpg
 

Attachments

  • Photo198.jpg
    Photo198.jpg
    51.3 KB · Views: 741
Last edited:

AllDodge

Senior Member
Joined
Apr 2, 2011
Messages
2,313
Location
Kentucky
Remove and Replace seals

Here is the right side with the new seals installed
Photo199.jpg

The steering shaft and left side end cap. The kit comes with all the seals to do the inner and outer cylinder. All seals are color coded so to speak to indicate where they go, except for one. In the middle of the shaft there are 2 seal used. One is a split plastic type seal which goes on easy. The other which started off tan colored was replaced with a blue one. The seal is fairly hard and will stretch a little but not much. I used my heat gun to warm it up so it would stretch a bit easier. Once on it was a bit larger and didn't fit as tight.

I used some grease on all parts to assist in sliding the items back together.
Photo200.jpg

Inside of the left side end cap
Photo201.jpg

Once seals are replaced slide the shaft and end cap into housing. Push an additional 1/2 inch to install inner snap ring.
Photo202.jpg

Push the shaft and end cap against the inner snap ring from the right side. Install O-ring and outer snap ring.
Photo203.jpg

Used blue lock tite and installed left tie rod first then right side. Keep the hydraulic lines disconnected until after you get the tie rods complete back on and installed.

Since I removed the forward counter weight I reinstalled it. The 550 pound monster took a bit of doing for this old guy, sure glad it's all done
 

Curbster

Well-Known Member
Joined
Aug 26, 2010
Messages
91
Location
Nelson, B.C.
Occupation
Prime Digger on Dog Hill
Really Great pictures! Worth a thousand words apiece! Thanks a lot for sharing this with us. I may have to do this one day and will be glad to have this information. Especially those tricky things I don't need to do, but probably would have attempted anyway! :D
 

ttazzman

Well-Known Member
Joined
Sep 10, 2010
Messages
194
Location
missouri
I want to Thank You also....i would have started just like you did by removing the Retaining Nut.......many thanks.....

Question....were the replacement seals self explanatory on where they go and orientation?

im probably going to have to do this on mine in the next wk or so....starting to drip a stream on both sides when in use...
 

AllDodge

Senior Member
Joined
Apr 2, 2011
Messages
2,313
Location
Kentucky
I want to Thank You also....i would have started just like you did by removing the Retaining Nut.......many thanks.....

Question....were the replacement seals self explanatory on where they go and orientation?

im probably going to have to do this on mine in the next wk or so....starting to drip a stream on both sides when in use...

All seals that are square or round can go in either direction. Lip type seals needs the lips facing toward the pressure (to the inside of the cylinder). The lip seals you will have are the center and outward most seals on each side.

Just note how the old seals come out
 
Last edited:

ttazzman

Well-Known Member
Joined
Sep 10, 2010
Messages
194
Location
missouri
did this project yesterday.......went very well thanks again Alldodge.......i do want to comment that the seal kit from Cat was $200 which was a lot more than i would have anticipated....project took 5-6 hrs woulda took lot longer without information from this thread.......i did end up with 3 seals and the retaining nut left over in the kit since i didnt remove the retaining nut and just replaced the rod seals in place...
 
Last edited:

ttazzman

Well-Known Member
Joined
Sep 10, 2010
Messages
194
Location
missouri
also wanted to add.....i was able to do mine with the counterweight in place.....it was tight but doable....also mine had one more larger piece on the bottom of my counterweight group that makes it larger than the pictures AllDodge shows..
 

AllDodge

Senior Member
Joined
Apr 2, 2011
Messages
2,313
Location
Kentucky
did this project yesterday.......went very well thanks again Alldodge.......i do want to comment that the seal kit from Cat was $200 which was a lot more than i would have anticipated....project took 5-6 hrs woulda took lot longer without information from this thread.......i did end up with 3 seals and the retaining nut left over in the kit since i didnt remove the retaining nut and just replaced the rod seals in place...

Glad to be of help.
You said $200 for the kit, mine dealer still shows $174.96 (plus tax). Wonder if local dealers gets to charge what they want? If the dealer can charge what they what (so long as it meets the minimum) wonder what the price differences are and if we could work it to our advantage? Just an idea ;)
 

PDG X

Well-Known Member
Joined
Apr 27, 2009
Messages
176
Location
Florida
Occupation
Owner Operator
Anyone have a problem getting the knuckle to release from the cylinder ?

The left one unthreaded fairly easily with a heat gun. The right one started to unthread about 3-4 rounds, then pretty much locked up. Additional heating did not loosen it.

Without flats on the right end of the rod to stabilize it, it only provides twisting action to the rod as it’s only held at the left end. Don’t want to f’up the rod.

As others have reported, getting the spanner nut to release is a no. May have to cut it to get the rod out, and deal with the left knuckle then.

Any dealer service input ?

Thx
 

Nige

Senior Member
Joined
Jun 22, 2011
Messages
29,423
Location
G..G..G..Granville.........!! Fetch your cloth.
The right one started to unthread about 3-4 rounds, then pretty much locked up. Additional heating did not loosen it.
The only thought I have is that the threads on the rod may be galling as the end is unscrewed and it will only get worse the further you try to unscrew it. Will it screw back on the other way or is it now locked up totally and won't move in either direction.?
 
Top