
-
Thank you for visiting HeavyEquipmentForums.com! Our objective is to provide industry professionals a place to gather to exchange questions, answers and ideas. We welcome you to register using the "Register" icon at the top of the page. We'd appreciate any help you can offer in spreading the word of our new site. The more members that join, the bigger resource for all to enjoy. Thank you!
You are using an out of date browser. It may not display this or other websites correctly.
You should upgrade or use an alternative browser.
You should upgrade or use an alternative browser.
963 final drive repair
- Thread starter tracksfan
- Start date
tracksfan
Well-Known Member
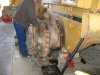
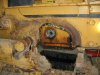
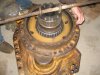
thanks, my dad and I were trying to come up with a way to pull that sprocket of with what we could find around the shop. The bolts didn't allow enough clearance for a hyd jack so we put a block of wood in there. We tightened the bolts and persuaded it with the 20 lb sledge. If you look close in the pic the steel cross bar is starting to frown. It made a good imprint of the spindle in the bottom of the wood block, but in the end it didn't work. It was worth a shot. My dad nipped the bearing out with the torch
tracksfan
Well-Known Member
more pics
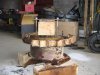
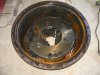
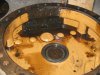
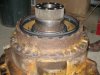
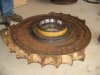
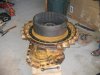
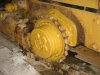
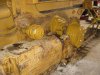
Looks like some water sat in the frame cavity.
A little sludge in the case and planetary cover but no metal.
Looks like some water sat in the frame cavity.
A little sludge in the case and planetary cover but no metal.
Attachments
Tigerotor77W
Senior Member
Hmm... looks fun!
Looks like some water sat in the frame cavity.
A little sludge in the case and planetary cover but no metal.
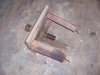
That looks normal.I dont like like to see big metal particals.Here is a picture of a puller I made for sproket & gear pulling.It measures 18 x 18 inches,about 11/4 inch thick,with a 2 inch screw.I dont use it often but when I need it,Its handy.
Attachments
tracksfan
Well-Known Member
That puller looks h-e-a-v-y d-u-t-y! nice work.
That puller looks h-e-a-v-y d-u-t-y! nice work.
It's heavy duty.I use a boom truck to hang it while I mount it on the sprocket.The puller wieghs about 150 lbs.It works good.
tracksfan
Well-Known Member
pics and info
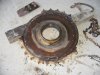
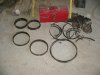
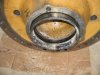
pics of old duocone seals and bearings, and a pic of a bearing cup that i welded in couple of spots to shrink it. It came right out with a couple of taps with a hammer and punch. A pic of the spindle before cleaning.
I cleaned up the the mating surfaces of the case, frame and spindle etc. and the surfaces where the duocones go.
I got my parts from Ohiocat in Broadview Hts. on friday. Excellent service!
A friend who has done these repairs, more than a few times, is going to put it back together. There is nothing like watching someone who is an expert, he makes it look easy.
Attachments
pics of old duocone seals and bearings, and a pic of a bearing cup that i welded in couple of spots to shrink it. It came right out with a couple of taps with a hammer and punch. A pic of the spindle before cleaning.
I cleaned up the the mating surfaces of the case, frame and spindle etc. and the surfaces where the duocones go.
I got my parts from Ohiocat in Broadview Hts. on friday. Excellent service!
A friend who has done these repairs, more than a few times, is going to put it back together. There is nothing like watching someone who is an expert, he makes it look easy.
Sorry tracksfan,I should have asked how you were getting along with the project on post 9.Its a good idea to replace the bearings while its apart.Alot of times they still look good,but I usualy replace them because it is a bit of a job doing the final drive to start with.The welding works great on the inner race.Dose the cat highlift use thin shims to set the bearing pre-load?Good pictures.
tracksfan
Well-Known Member
25c,
Replacing all the bearings is a good idea. In this case I'm putting in new bearings except for the planetaries and on the shaft that goes through the brake assembly.
I don't think the bearings need shims, anyone else know?
Most of the bolts that hold the case to the frame and the spindle to the case were pretty well rotted so lots of new bolts. I had a heck of time getting the old ones out.
dumpchuck
Well-Known Member
I've never done a final drive re-seal on a 963, but have done quite a few on 973s. A few have had shims to adjust the preload on the bearings. If you have a service manual, it should cover this procedure. If not, I always just install the sprocket with bearings, bolt the hub/gear on with the plate (part that uses 1/2" 12 point bolts) tighten it up then give the sprocket a few turns to see how easily it spins. Never had any problems doing it this way. Hope this makes sense and helps. I'm sure some one else can give you a clearer explanation.... Not too swift at the whole typing thing!
tracksfan
Well-Known Member
dumpchuck,
Thanks for the reply. Your typings fine. your suggestion makes sense, give it a spin and if its too tight take out some shims?
I've noticed that my manuals are not detailed enough for an amature mechanic like myself. For example it wil say cool the bearing and install. Well do I put it in the freezer, dry ice, something colder?
Thankfully, this forum is a big help.
I'll put an update on here in a couple of days of it going back together.
25c,
Replacing all the bearings is a good idea. In this case I'm putting in new bearings except for the planetaries and on the shaft that goes through the brake assembly.
I don't think the bearings need shims, anyone else know?
When the annulus retaining plate was removed, you should have found a shim pack underneath. The preload is adjusted with this.
It's impossible to judge the rolling torque on something like this because of the drag of the duo-cone seal, infact you'll find that cat don't specify what it should be. The adjustment will be by measuring the size of the gap between the retaining plate and the stub-axle and installing shims to suit.
However, if you are using new genuine cat bearings I find 95% of the time the preload is correct using the existing shim pack. I would put it back together with the existing shims and if there's no up-and-down movement and it isn't too tight to turn, then it's close enough.
You mention you aren't replacing the bearings on the input pinion. Have you checked them? If not, I would advise that you do. In my experience they take the most wear in these final drives.
Good luck.
tracksfan
Well-Known Member
Cmark,
I'm not sure what the annulus retaining plate is. Is that the plate that holds the ring gear hub to the spindle? How do you measure the gap between the retaining plate and the stub axle? Its all back together but I would still like to know. Serial# 21Z7XX
No shims on install.
I didn't check the bearings on the input pinion. After reading they take the most wear I wish I had.
Thanks!
tracksfan
Well-Known Member
Putting it back together
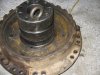
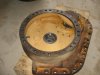
pic #1 some new bearings installed
pics #2,3 planetaries and case cleaned up
pic #4 spindle installed on case
pic #5 installing duocone seal half on spindle
pic #1 some new bearings installed
pics #2,3 planetaries and case cleaned up
pic #4 spindle installed on case
pic #5 installing duocone seal half on spindle
Attachments

dumpchuck
Well-Known Member
Thats basicaly what I was tying or meant to say, If there were shims present at disassembly then put it together with same shims, and if the sprocket turns easily and feels normal, then you're good. You do make a very good point in having to measure the gap between the retainer plate and dead axle. Like you said, 95% of the time existing shims do the trick.When the annulus retaining plate was removed, you should have found a shim pack underneath. The preload is adjusted with this.
It's impossible to judge the rolling torque on something like this because of the drag of the duo-cone seal, infact you'll find that cat don't specify what it should be. The adjustment will be by measuring the size of the gap between the retaining plate and the stub-axle and installing shims to suit.
However, if you are using new genuine cat bearings I find 95% of the time the preload is correct using the existing shim pack. I would put it back together with the existing shims and if there's no up-and-down movement and it isn't too tight to turn, then it's close enough.
You mention you aren't replacing the bearings on the input pinion. Have you checked them? If not, I would advise that you do. In my experience they take the most wear in these final drives.
Good luck.
Last edited:
tracksfan
Well-Known Member
more putting it back together
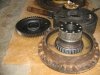
pic #1 the other half of the duocone going onto the sprocket hub
pic #2 bolting the ring gear onto the spindle
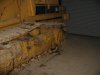
pics #3,4 final drive back on the machine, sprocket segments installed, pivot shaft resealed, fresh paint
pic #5 track and guards on, bolts torqued and track adjusted, and ready to get back in the dirt!
and yes I filled it with oil
:woohoo
pic #1 the other half of the duocone going onto the sprocket hub
pic #2 bolting the ring gear onto the spindle
pics #3,4 final drive back on the machine, sprocket segments installed, pivot shaft resealed, fresh paint
pic #5 track and guards on, bolts torqued and track adjusted, and ready to get back in the dirt!
and yes I filled it with oil
:woohoo
Attachments
Cmark,
I'm not sure what the annulus retaining plate is. Is that the plate that holds the ring gear hub to the spindle? How do you measure the gap between the retaining plate and the stub axle? Its all back together but I would still like to know. Serial# 21Z7XX
No shims on install.
I didn't check the bearings on the input pinion. After reading they take the most wear I wish I had.
Thanks!
Yep. Annulus is just a fancy name for the ring gear. The procedure would be;
Put the assembly together and tighten the retaining bolts to a certain torque.
Insert a depth-micrometer through a hole in the retainer and measure the distance from the face of the spindle to the top of the retainer.
Remove the retainer again and measure the thickness of the retainer.
Subtract the thickness of the retainer from the depth measurement.
This gives you the size of the gap. The service manual will now tell you to either subtract or add a figure to this one. You then make up a shim pack to this dimension.