Has anyone taken off the floor boards of a 555E or similar machine? I have a leaky hose that crosses over the top of the transmission housing from what I believe is the loader control to some split point on the other side. Looking at it I have no idea how I’m going to get to it from underneath. Just wondering if it’s possible from the top.

-
Thank you for visiting HeavyEquipmentForums.com! Our objective is to provide industry professionals a place to gather to exchange questions, answers and ideas. We welcome you to register using the "Register" icon at the top of the page. We'd appreciate any help you can offer in spreading the word of our new site. The more members that join, the bigger resource for all to enjoy. Thank you!
You are using an out of date browser. It may not display this or other websites correctly.
You should upgrade or use an alternative browser.
You should upgrade or use an alternative browser.
555e Floor
- Thread starter cosmaar1
- Start date
Swetz
Senior Member
cosmaar1,
I feel your pain. A couple of years ago I had a hose blow under the machine. I got to lay in the mud created by hydraulic oil and struggle to replace it. It seems like it would have been easy from the top.
Anyhow, I have never taken the mat out, so I do not know for sure (I think NH575E has tho), but from all indications, the cab has solid floors, except for the heater box hole.
Below is from the manual, and it preaty much says the cab must be removed to carry out the tasks, one of which is hydraulics.
I can tell you, in the future I may look into cutting the floor for access to the hydraulics. My hoses are over 20 years old and will surely fail at some point.
If anyone has cut the floor to gain access on a NH E series, I would love to hear about it too.
rumblecloud
Well-Known Member
There is one panel under the pedals that is removable - at least on mine. Don't know if that's original or not. And it is pretty far forward so don't know if it would give access to the hose you need to replace. I've never removed the back mat, only the front.
HarleyHappy
Senior Member
When I redid the floor in mine, I cut it out of one sheet then cut it into 3 pieces as I wanted to be able to pull it up if I had to.
Small skil saw with a metal blade or a cut off wheel on a die grinder and some leathers, lol.
Small skil saw with a metal blade or a cut off wheel on a die grinder and some leathers, lol.
rumblecloud
Well-Known Member
THAT must have been one heckuva PIA.When I redid the floor in mine, I cut it out of one sheet then cut it into 3 pieces as I wanted to be able to pull it up if I had to.
Small skil saw with a metal blade or a cut off wheel on a die grinder and some leathers, lol.
I will look again tonight, but it’s leaking enough that with the machine still sitting in my driveway as it has been for the last year, I might as well keep it here a bit longer Vs doing it out in the middle of the woods 10 miles from home.
NH575E
Senior Member
Very limited access but you might be able to get enough light on it by pulling the panel under the pedals.

My cab model also has a box that looks removable under the seat where the AC evaporator and heater core are but I didn't pull it all the way out.

The seat is one heavy SOB to get in and out by oneself!
My cab model also has a box that looks removable under the seat where the AC evaporator and heater core are but I didn't pull it all the way out.
The seat is one heavy SOB to get in and out by oneself!
Thanks for the pics. Unfortunately where the hose is that I need is more towards the back. No way in heck am I lifting up the cab and I think taking off the seat is going to be a lot more than I want to try. I guess I will just have to see exactly where the hose runs and how best to do it. Can’t ever be easy.Very limited access but you might be able to get enough light on it by pulling the panel under the pedals.
View attachment 307678
My cab model also has a box that looks removable under the seat where the AC evaporator and heater core are but I didn't pull it all the way out.
View attachment 307679
The seat is one heavy SOB to get in and out by oneself!
Controls as in where the parking brake is on the right hand side of the seat?I wonder what it looks like under the controls cover?
Tinkerer
Senior Member
If you can get access to both ends of the hose.
Have a longer hose made and by-pass it in a more convenient route.
Have a longer hose made and by-pass it in a more convenient route.
Swetz
Senior Member
When I had a hose blow on my E series, it wasnt so much thr routing, but rather getting the hose fittings to start. It was on the top side, and I was laying under the machine. There were many hoses between us. I spent hours getting them to start. It sucked! a removable floor pannel would have made it quick and easy. Because of the age of my machine, I expect more hoses to blow. Next time one does, I may cut a pannel out of the floor. When I am done, weld wings on it and use some good tape on it before reinstalling the floor mat. The older Ford machines had several access points in the floor, and it made it much easier! Not feeling it on removing the cab every time a hose blows on an old machine!If you can get access to both ends of the hose.
Have a longer hose made and by-pass it in a more convenient route.
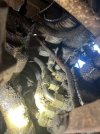
So I crawled under the old girl today and after tracing the hose, it doesn’t look as bad as it initially seemed. Don’t get me wrong it’s going to suck, but luckily the fittings are somewhat in the open. I just hope they aren’t on too tight.
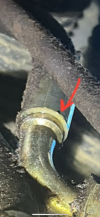
On the first picture, it’s under the machine and on the outside of the loader control valve on the right frame rail. On the 2nd picture it’s accessible through the wheel well of the left side rear tire on top of the frame rail.
It’s leaking right at the burr on the fitting I pointed out. It’s almost like the thing split and when it’s cold it leaks and as the machine gets warm it stops.
Attachments

Swetz
Senior Member
This works well! Leverage is your friend!On the tightness topic one method I use when I have room is to position both wrenches close together and squeeze them with a large pair of channelloc pliers.
Also, if you have the space, a flat bladed air chisel will crack them loose.
When I did mine, I had no space, but both fittings cracked without issue. I purchased a set of Tekton Metric angle head wrenches that fit rite in for me.
HarleyHappy
Senior Member
Not really, made a cardboard template of the floor, made it big on the sides and cut it out.THAT must have been one heckuva PIA.
Then bent the sides up 2” and fit it in.
Then cut it into 3 pieces and screwed the sides in to the fenders with zip screws.
HarleyHappy
Senior Member
Looks like it’s leaking at te crimp, which would explain it leaking less as it warms up.
Never going to stop though.
Never going to stop though.
eKretz
Well-Known Member
Try these:


Very handy indeed. Air hammer with the offset round-nose chisel taps the fittings right loose and tightens them too. Milton Shock-It.
Very handy indeed. Air hammer with the offset round-nose chisel taps the fittings right loose and tightens them too. Milton Shock-It.
NH575E
Senior Member
OMG! Never seen these.Try these:
View attachment 307785
View attachment 307786
Very handy indeed. Air hammer with the offset round-nose chisel taps the fittings right loose and tightens them too. Milton Shock-It.
Sets are pricey but individual sizes are pretty reasonable.
SHOCKIT™
Milton® Industries Inc. | Tire Gauges, Inflators & Pneumatic Accessories
 miltonindustries.com
Swetz
Senior Member
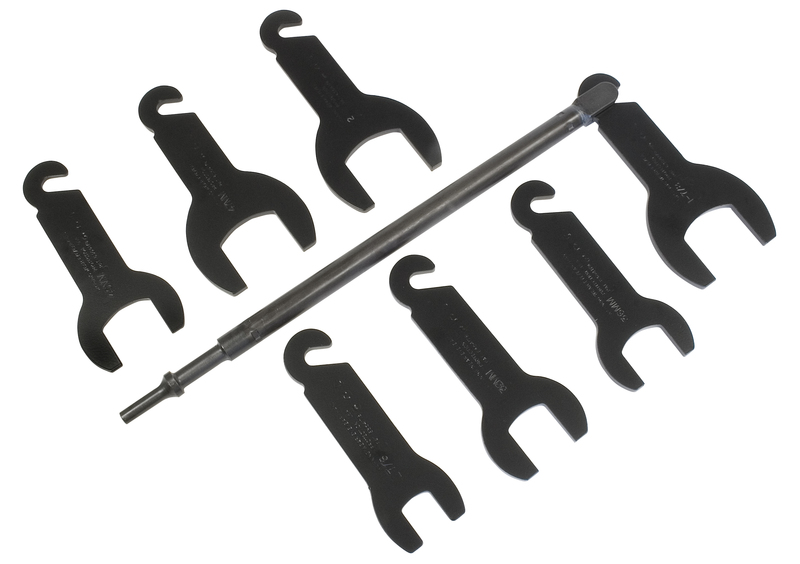
Similar technology. We use these in the shop with great success.
 www.lislecorp.com
43300 Pneumatic Fan Clutch Wrench Set
Quickly Removes & Installs Fan Clutch When Repairing The Water Pump Or Fan Clutch.
www.lislecorp.com