Correction, the AH149194 subs to AHC13485 which I see you have. The AH212089 is a barrel kit, not a rod kit like I mentioned in my last post and it is the correct barrel kit.
To answer you question, #1 (previous picture) goes on the thread side of the groove. The o-ring away from the threads (closer to the oil).
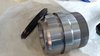
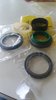
The taper in the guide does not matter. It is the correct guide. I think the seals in your pictures got a little mixed up. You will most likely be adding the seal #1 or #4 in the top picture (sorry I don't remember which is the newer) to the new guide so there will be two seals inside the guide. The seal will be in the groove closest to the oil and installed with the white/grey back up ring towards the thread side with the blue seal on the oil side. Look at the PDF attachment and drawing #1. Your seal arrangement on the "inside" of the guide will be the same (could not find drawing for your new guide).
A photo of the grooves inside and the top of the guide might help. Obviously it hard to tell from pictures but the seals and wear ring that best fit in the grooves (thickness wise) will be the ones needed. I think the seal #2 should be 0.287" thick (thinner of the two) for your new guide??
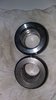
The dust seal (with the green in the top photo and #1 in the bottom photo) are installed with #4 (install tool and it is marked which side to use by seal color) in the bottom photo. Only one will fit your guide so it will be obvious.
View attachment 194586 View attachment 194587


")