• Thank you for visiting HeavyEquipmentForums.com! Our objective is to provide industry professionals a place to gather to exchange questions, answers and ideas. We welcome you to register using the "Register" icon at the top of the page. We'd appreciate any help you can offer in spreading the word of our new site. The more members that join, the bigger resource for all to enjoy. Thank you!

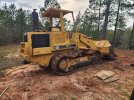
1988 Cat 953 - Caterpillar. My First Track Loader

Georgia Iron

Senior Member
Joined
May 6, 2012
Messages
878
Location
USA - Georgia
Occupation
Concrete building slab and grading contractor
20230401_115300.jpg20230401_115251.jpg20230401_115240.jpg

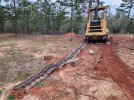
Managing to stick the 53 on the side of a top soil pile that was wet attempting to knock a tree down that needed to be removed.

Had to dig it out with the mustang. All forward movement was stopped. Barely had enough space to get under it with the mustang.
 

Georgia Iron

Senior Member
Joined
May 6, 2012
Messages
878
Location
USA - Georgia
Occupation
Concrete building slab and grading contractor
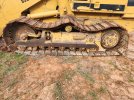
My under carriage is shot. Like completely gone.

20230224_162807.jpg

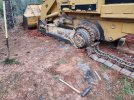
If you are taking the tracks off use some different sized solid metal bar to slide in between the sprockets and the track chain after you loosen the track adjuster grease fitting. This will move the idlers back if the rods are not siezed up.

20230224_162845.jpg20230225_065831.jpg20230225_065815.jpg
 
Last edited:

Georgia Iron

Senior Member
Joined
May 6, 2012
Messages
878
Location
USA - Georgia
Occupation
Concrete building slab and grading contractor
Lots of side to side play and no more adjustment on tightening. Once you slide the idler forward and pump out the adjuster all the way, the idler fork can touch the idler wheel. Once this happens you cant use the machine.

A new under carriage is pricing out at $17,000 plus tax in this after covid world. If you drop a link out of the track you can get 200 to 800 more hours on your under carraige maybe even more, I plan to run it to destruction.
 
Last edited:

Georgia Iron

Senior Member
Joined
May 6, 2012
Messages
878
Location
USA - Georgia
Occupation
Concrete building slab and grading contractor
Rear idler setting20230225_083937.jpg

Front idler setting for worn tracks.
20230225_083945.jpg

It is easy to move the idler housing with tracks out of the way. You have direct access with an air gun.
20230225_082134.jpg
 

Georgia Iron

Senior Member
Joined
May 6, 2012
Messages
878
Location
USA - Georgia
Occupation
Concrete building slab and grading contractor
A friend brought over a track pin press. In hindsight i would torch it apart and reweld the pin without the pin press. It took so much pressure to break them apart. It was dangerous. It took all of the presses power to get one of the pins out.20230305_092154.jpg20230305_084343.jpg

To avoid pressing the pin back in I turned it down on a lathe then welded it back up.
Had enough fun playing with the track press.

20230305_105401.jpg20230305_105832.jpg
 

Welder Dave

Senior Member
Joined
Oct 11, 2014
Messages
12,558
Location
Canada
Could you use the skid steer to power the drive but have the drill rig mounted on your 953 to provide considerably more lift capacity? Does your skid steer have high flow and/or high pressure? They make high torque auger drives for excavators too. A guy used a 1 ton truck mounted rig to drill holes for perculation tests on my former acreage. The augers were only 6 or 8" and he used a steel plate with a slot to hold the auger in the hole while he added extensions. One auger fell in the hole but was only down about 6' so I later dug it out with the backhoe. I think a better way to hold the augers or extensions wouldn't be hard to figure out. I posted it on here a few years ago of a place that spent mega bucks converting a couple Bobcat 975's into custom rubber tracked drilling rigs (Lundrills). I think he could drill either 16 or 20' in one shot. Very impressive units but heard he spent over $100K on each conversion in addition to the original cost of the 975's. Could maybe copy some of the idea's on those. They could drill a 48" hole up to 30' feet deep so I think a much smaller auger could go considerably deeper and a 953 will lift quite a bit more than a 975 Bobcat. Lund Enterprises has some pics. on their website.
 
Last edited:

sawmilleng

Well-Known Member
Joined
Jul 9, 2009
Messages
220
Location
Central Kootenays, Canada
Bin there, done that.... meaning looking for an inexpensive way of drilling water wells.

Back in about 1985, freshly married and on a wilderness acreage with a wife and a new son and another on the way, we needed water. The father-in-law was on an adjacent parcel and had drilled wells in the '50's. He swore up and down there was no well water on the dry mountain side we were both on. He had previously got water rights on a creek down in the bottom of the little valley we were in, which was about 1500 feet from his land. And vertically up by about 500 feet. He rented an excavator and dug in a PVC water line to his place, casting a concrete storage tank at his house. The major issues around that method of getting water was rights of way and permission to cross a road by the creek and no permission to dig an infiltration system into the creek. He eventually made everything happen and had water.

I did not want to go this route, as dealing with the government was getting tougher as time went on. I wanted a well on my 8 acres without having to get permission from anybody. So I wanted to be able to drill wells cheaply if he was truly right that the country was "dry". So I was wanting a way to drill a few dry wells without breaking the bank. I told everyone that I was going to "ventilate the countryside until I found water". This was problematic because just hiring a well driller with a conventional air-rotary rig was expensive, and the cost had to be paid even if they didn't find water.

Being an engineer, I hit the books first to find out about drilling methods and what I could do myself. The modern rigs were immediately rejected--I didn't have the cash to buy anything that approached an air rotary. I soon found that the old ways of drilling worked just as well but took time: The cable tool drilling rig. It's an OLD technology that goes back at least a thousand years: the Chinese used the method a long time ago, with wooden tools and fiber ropes. Newer cable tool rigs were still pricey but I found a decent rig that someone had built themselves. It was mounted on an old single axle flat deck 3 ton. I got it for about $2500. It had a drill bar and a bunch of random drilling bits with it. Found an old US military instruction manual about drilling with a cable tool rig which helped me with how to actually do the drilling. Father in law helped the most, since he had actually operated a cable tool rig in the past.

So we started drilling, dumping 5 gallon pails of water down the hole to make the stuff we drilled into mud. When we had enough, we pulled the drill bar out of the hole and dropped down the mud bucket on the "sand line". It had a one way valve in the bottom of the bucket that allowed the mud to fill the bucket, and we pulled out the full bucket and dumped it. We would use the drill bar to hammer the casing further into the drilled hole and also used the drill hoist to pull up more casing pipe to weld to the casing that we were advancing into the ground.

Since the drill bar cutting bit fits inside the casing, it drills a hole a little smaller than the casing. The casing has a hardened "drive shoe" welded to the end of the pipe which scrapes the drilled hole as you drive it down the smaller hole made by the drill bar. This dirt has to be be beat up into mud with the drill bar and removed by the mud bucket. The only issue here is if you drill thru a solid boulder bigger than the drill bar and casing. In that case you clean out the hole and hang a stick of dynamite down the hole right in the center of the boulder you just drilled through and break it up. The hole can then be cleaned out and the casing be driven through the now shattered boulder. This happened once with my drilling. I had anticipated this and took a course to get a blasting license.

I will never forget the feeling when we realized, at about 200 feet down, we were pulling up MORE!! water in the drilled mud than we had dumped down the hole. By the way, Father in law said he had drilled a well to 600 feet with a cable tool rig back in his day, so they can drill a long way.

So we struck water on the first hole, on that "dry hillside" that Father in law swore there was no water. At a cost of a couple of grand for an old drill rig. We resold it for the same money that we paid for it.

So, my suggestion to you is to take a close look at an old cable tool drill rig...they are simple compared to anything you are looking at and can do the job to whatever depth you are considering.

Not as fast as an air rotary but not costly.

If you are interested in having a look, a quick search on the 'net for "cable tool drilling" or "Bucyrus-Erie 22W drilling rigs" would be a good start. They are dead simple and easy (and cheap) to keep running, especially if you want to do it yourself.

YMMV!

Jon.
 

DMiller

Senior Member
Joined
Feb 21, 2010
Messages
16,599
Location
Hermann, Missouri
Occupation
Cheap "old" Geezer
The other notation is casing, water wells here only case to mudline or dirt end, casing extends some 10-1(‘ into solid rock and stops, not cased full depth.

A water driller will set a 500’ hole here in a matter of hours, to me did not waste a week pounding and mucking out a hole then driving a casing that had to buy for that depth. Soon gets to a six/1 half dozen the other.
 

Georgia Iron

Senior Member
Joined
May 6, 2012
Messages
878
Location
USA - Georgia
Occupation
Concrete building slab and grading contractor
Sawmilreg,

Those cable rigs are nice. I did not find any for sale in my area. I am making a home made auger type drill. Getting close to having it ready. Other work and machines have put it on the back burner for a month or so.
Bin there, done that.... meaning looking for an inexpensive way of drilling water wells.

Back in about 1985, freshly married and on a wilderness acreage with a wife and a new son and another on the way, we needed water. The father-in-law was on an adjacent parcel and had drilled wells in the '50's. He swore up and down there was no well water on the dry mountain side we were both on. He had previously got water rights on a creek down in the bottom of the little valley we were in, which was about 1500 feet from his land. And vertically up by about 500 feet. He rented an excavator and dug in a PVC water line to his place, casting a concrete storage tank at his house. The major issues around that method of getting water was rights of way and permission to cross a road by the creek and no permission to dig an infiltration system into the creek. He eventually made everything happen and had water.

I did not want to go this route, as dealing with the government was getting tougher as time went on. I wanted a well on my 8 acres without having to get permission from anybody. So I wanted to be able to drill wells cheaply if he was truly right that the country was "dry". So I was wanting a way to drill a few dry wells without breaking the bank. I told everyone that I was going to "ventilate the countryside until I found water". This was problematic because just hiring a well driller with a conventional air-rotary rig was expensive, and the cost had to be paid even if they didn't find water.

Being an engineer, I hit the books first to find out about drilling methods and what I could do myself. The modern rigs were immediately rejected--I didn't have the cash to buy anything that approached an air rotary. I soon found that the old ways of drilling worked just as well but took time: The cable tool drilling rig. It's an OLD technology that goes back at least a thousand years: the Chinese used the method a long time ago, with wooden tools and fiber ropes. Newer cable tool rigs were still pricey but I found a decent rig that someone had built themselves. It was mounted on an old single axle flat deck 3 ton. I got it for about $2500. It had a drill bar and a bunch of random drilling bits with it. Found an old US military instruction manual about drilling with a cable tool rig which helped me with how to actually do the drilling. Father in law helped the most, since he had actually operated a cable tool rig in the past.

So we started drilling, dumping 5 gallon pails of water down the hole to make the stuff we drilled into mud. When we had enough, we pulled the drill bar out of the hole and dropped down the mud bucket on the "sand line". It had a one way valve in the bottom of the bucket that allowed the mud to fill the bucket, and we pulled out the full bucket and dumped it. We would use the drill bar to hammer the casing further into the drilled hole and also used the drill hoist to pull up more casing pipe to weld to the casing that we were advancing into the ground.

Since the drill bar cutting bit fits inside the casing, it drills a hole a little smaller than the casing. The casing has a hardened "drive shoe" welded to the end of the pipe which scrapes the drilled hole as you drive it down the smaller hole made by the drill bar. This dirt has to be be beat up into mud with the drill bar and removed by the mud bucket. The only issue here is if you drill thru a solid boulder bigger than the drill bar and casing. In that case you clean out the hole and hang a stick of dynamite down the hole right in the center of the boulder you just drilled through and break it up. The hole can then be cleaned out and the casing be driven through the now shattered boulder. This happened once with my drilling. I had anticipated this and took a course to get a blasting license.

I will never forget the feeling when we realized, at about 200 feet down, we were pulling up MORE!! water in the drilled mud than we had dumped down the hole. By the way, Father in law said he had drilled a well to 600 feet with a cable tool rig back in his day, so they can drill a long way.

So we struck water on the first hole, on that "dry hillside" that Father in law swore there was no water. At a cost of a couple of grand for an old drill rig. We resold it for the same money that we paid for it.

So, my suggestion to you is to take a close look at an old cable tool drill rig...they are simple compared to anything you are looking at and can do the job to whatever depth you are considering.

Not as fast as an air rotary but not costly.

If you are interested in having a look, a quick search on the 'net for "cable tool drilling" or "Bucyrus-Erie 22W drilling rigs" would be a good start. They are dead simple and easy (and cheap) to keep running, especially if you want to do it yourself.

YMMV!

Jon
 

Georgia Iron

Senior Member
Joined
May 6, 2012
Messages
878
Location
USA - Georgia
Occupation
Concrete building slab and grading contractor
I am way behind on maintenance, over grown trees and have seen a need for one of these trucks. I picked up this at auction from the local power company.20230927_123237.jpg
 
Last edited:

Georgia Iron

Senior Member
Joined
May 6, 2012
Messages
878
Location
USA - Georgia
Occupation
Concrete building slab and grading contractor
standard boom, wish it was75 ' and an over center but they were 35 to 45 grand more.

it has a material handler which is good for 1500 lbs at 2' and 750 lbs at 5' on the jib. Other than the front hydraulic winch being taken off and the drivers door falling off it has already done 2 days of work.
 
Last edited:

DMiller

Senior Member
Joined
Feb 21, 2010
Messages
16,599
Location
Hermann, Missouri
Occupation
Cheap "old" Geezer
Worked on over center rigs, hateful awaiting the slack to catch up on over run!!
Be really cautious if upper mast pops and snaps down deep, look for rust at the pivot head to fiberglass mast. Both indicate the epoxy joint connection is failing and is all that holds it together.

Can be Re-Glued but not cheap to pass inspection for safety.
 

Georgia Iron

Senior Member
Joined
May 6, 2012
Messages
878
Location
USA - Georgia
Occupation
Concrete building slab and grading contractor
Worked on over center rigs, hateful awaiting the slack to catch up on over run!!
Be really cautious if upper mast pops and snaps down deep, look for rust at the pivot head to fiberglass mast. Both indicate the epoxy joint connection is failing and is all that holds it together.

Can be Re-Glued but not cheap to pass inspection for safety.
What would cause the mast to pop and snap down deep?
 
Top