
-
Thank you for visiting HeavyEquipmentForums.com! Our objective is to provide industry professionals a place to gather to exchange questions, answers and ideas. We welcome you to register using the "Register" icon at the top of the page. We'd appreciate any help you can offer in spreading the word of our new site. The more members that join, the bigger resource for all to enjoy. Thank you!
You are using an out of date browser. It may not display this or other websites correctly.
You should upgrade or use an alternative browser.
You should upgrade or use an alternative browser.
Case 680G backhoe project: squad
- Thread starter squad_1881
- Start date

Tinkerer
Senior Member
Looks awesome !
Coy Lancaster
Senior Member
Looks good
squad_1881
Well-Known Member
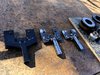
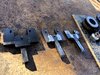
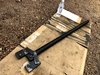
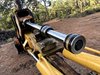
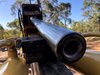
Thanks for that Tinkerer and Coy Lancaster. I got some more stuff to add, hopefully it is somewhat valuable. During the last couple of weeks I ended up with four leaking hydraulic cylinders, therefore decided to repack things by myself, half of the total has been previously done hydraulic workshop, basically another half to go. The first one to deal with was the big one off from the dipper, it has been on the edge for a while until last week when it kind of really gave up and started to run badly. I do not hold much faith into those ebay gland wrenches and therefore made the custom ones out of scrap metal. For this machine four different sizes are required, maybe five if extendahoe cylinder is different again. If anyone needs a CAD file of the gland face surface to make a tool I am more to happy to share the link. Given the almighty gland tool I made to get the dipper cylinder gland moving, it was actually already loose and did come off right away, cap nut was a challenge. With first attempt using breaker bar and impact wrench had no luck, there were some stains around the bolt and instead of using more leverage i heated it up with propane torch to 250°C and that was a win, though those stains were all loctite red, should have been blue. Another cylinders to do are the pair of swing and loader bucket cylinders, I have not worked with those yet only tried to get the glands moving, all good except right loader cylinder, bent the pin from the tool and still no go, probably will weld a plate to the gland and try to hit it with the hammer.
Also I have to replace both rods of the loader bucket, does anyone know are 1045 grade, induction hardened chrome rods the right ones to use?
Also I have to replace both rods of the loader bucket, does anyone know are 1045 grade, induction hardened chrome rods the right ones to use?
squad_1881
Well-Known Member
squad_1881
Well-Known Member


squad_1881
Well-Known Member
squad_1881
Well-Known Member
squad_1881
Well-Known Member
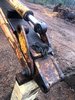
Had a lucky day today, as i started to look how to replace some backhoe linkage bushings and when removing the bucket and linkage arms i noticed some decent back and forward play of the bucket cylinder rod, not good. After taking the cylinder apart the piston bolt was literally hanging by an half a thread inside the rod. Apparently the bolt has become loose previously as well as piston was quite beaten up, barrel must have been replaced as it looked all smooth and fine, threads inside the rod were not too bad either.
Perhaps someone with more experience can comment, would red loctite and 30% reduced fastening torque be better or worse compared to blue threadlocker and torqued to specs as per service manual. I figured that was done by someone when i was resealing the dipper cylinder, red loctite and likely 750ft lb torque with 3/4 impact wrench, which is approx 30% less as in specs, manual says 1000-1200ft lb. I guess the logic behind of that is it does not need that much force to get things assembled and undone, hence using heat.
Perhaps someone with more experience can comment, would red loctite and 30% reduced fastening torque be better or worse compared to blue threadlocker and torqued to specs as per service manual. I figured that was done by someone when i was resealing the dipper cylinder, red loctite and likely 750ft lb torque with 3/4 impact wrench, which is approx 30% less as in specs, manual says 1000-1200ft lb. I guess the logic behind of that is it does not need that much force to get things assembled and undone, hence using heat.
Coy Lancaster
Senior Member
I always use red Loctite and torque to as tight as I can get it with 3/4" drive torque multiplier and a cheater pipe.
Tenwheeler
Senior Member
I do not have a manual but have done some of the cylinders on my 680 several times over the years. Used whatever color loctite I had a 3/4 impact, maybe a 1 inch on the larger hoe cylinders or a 1/2 on the steering cylinders. Never had a problem with that.Had a lucky day today, as i started to look how to replace some backhoe linkage bushings and when removing the bucket and linkage arms i noticed some decent back and forward play of the bucket cylinder rod, not good. After taking the cylinder apart the piston bolt was literally hanging by an half a thread inside the rod. Apparently the bolt has become loose previously as well as piston was quite beaten up, barrel must have been replaced as it looked all smooth and fine, threads inside the rod were not too bad either.
Perhaps someone with more experience can comment, would red loctite and 30% reduced fastening torque be better or worse compared to blue threadlocker and torqued to specs as per service manual. I figured that was done by someone when i was resealing the dipper cylinder, red loctite and likely 750ft lb torque with 3/4 impact wrench, which is approx 30% less as in specs, manual says 1000-1200ft lb. I guess the logic behind of that is it does not need that much force to get things assembled and undone, hence using heat.
More concerned about loctite mucking up the threads taking it apart. If you heat the nut to about 350 degrees F I thank that is enough to melt the loctite and not hurt the metal.
Sounds like Coy does things more proper than I but that has worked for me.
Coy Lancaster
Senior Member
I don't know about more proper I just find what works for me lolI do not have a manual but have done some of the cylinders on my 680 several times over the years. Used whatever color loctite I had a 3/4 impact, maybe a 1 inch on the larger hoe cylinders or a 1/2 on the steering cylinders. Never had a problem with that.
More concerned about loctite mucking up the threads taking it apart. If you heat the nut to about 350 degrees F I thank that is enough to melt the loctite and not hurt the metal.
Sounds like Coy does things more proper than I but that has worked for me.
squad_1881
Well-Known Member
Thanks for the comments, i am leaning towards using red loctite and the impact wrench from here, also ordered half an inch longer bolt for the bucket cylinder for additional assurance. Started to work with backhoe bucket linkage bushing and it is a mess, quite a few are trashed and there are couple of missing ones as well, got some 4140 hollow bar stock for machining shop to begin with.
squad_1881
Well-Known Member

Coy Lancaster
Senior Member
Looks like you might need a new piston. You might be able to clean that one up though.- - -
squad_1881
Well-Known Member
I will try to salvage this one if i can, will let machine shop to straighten out the seal grooves and hopefully it works.Looks like you might need a new piston. You might be able to clean that one up though.
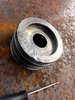
I got old bushings out from the small parts of the bucket linkage, there were couple of missing and most of them were loose. Bushings on the bucket side of the extendable dipper were all loose and the lining housing is slightly elliptical, not great. I was not quite prepared for that but I guess the proper thing to do is to slide the dipper arm out, take it to the workshop and let them to fit new things in.
Coy Lancaster
Senior Member
I don't suppose you have anyone that has a portable boring machine. That way you wouldn't have to take it apart.