• Thank you for visiting HeavyEquipmentForums.com! Our objective is to provide industry professionals a place to gather to exchange questions, answers and ideas. We welcome you to register using the "Register" icon at the top of the page. We'd appreciate any help you can offer in spreading the word of our new site. The more members that join, the bigger resource for all to enjoy. Thank you!

John Deere 310G Stabilizer overhaul help

TXGeoSolarPro

Active Member
Joined
Mar 14, 2010
Messages
40
Location
Texas
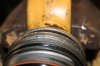
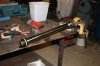
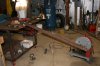
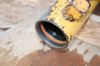
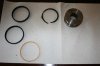
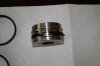
I have a JD 310G with a severe stabilzer drift. I performed the test for leakage and the manual specifies .6oz leakage per minute when operating the control, fluid literally sprays across the shop. I am moderately mechanically able, have replaced the engine in a previous hoe, taken tracks off dozers and excavators and have the reference manual but am a little apprehensive about changing the seals in the cylinders...probably since I have never done it or seen it done. The JD dealer quoted a price where I could almost buy two overhauled cylinders for what they want to rebuild mine. My concerns are proper placement of the filler ring so that the inner snap ring doesn't catch in the groove, installation of the seal ring on the piston (instructions state to place it in warm water but then it needs to be shrunk once on the piston) and reassembly of the parts once all new seals are in place. Can anyone give me any advise? Also, the JD dealer wants to replace the piston regardless of wear on the formed in place bearings. The repair manual advises the piston only needs replaced if the piston bearings show signs of wear or have nicks or cuts.
 

tuney443

Senior Member
Joined
Mar 19, 2006
Messages
1,216
Location
Dutchess County,NY
Occupation
excavating contractor
I would take your entire cylinder to a hydraulic repair shop.You will get it done right and at at least half the cost of Mother Deere--AKA---PRICEY
 

Deon

Senior Member
Joined
Jul 25, 2010
Messages
768
Location
Nova Scotia, Canada
I have a JD310D. It has the snap ring type cylinders. I have replaced quite a few seal kits but have never needed to replace a piston. I cannot imagine what would damage the piston and have never heard of anyone needing to replace one. About the filler ring. The plastic filler ring should be in the cylinder already, just sitting there waiting for you to use it. Once you remove the nut and push in the bearing (I use a hammer and wood block to tap it in) you will find the filler ring. The most important thing here is to push in the bearing far enough to get a good enough space
to remove the snap ring and thoroughly clean out the grove before attempting to place the filler ring. There will be dried grease/dirt and rust in there. I have needed to use a dremel tool with a grinding wheel and then wire wheel to remove rust. Your machine is newer than mine so there may not be any rust. But most important is don't even attempt to put the filler in until you are sure the groove is clean. Once the groove is clean the filler will fit properly. If you need to apply force to fit the filler in then there is still some dirt in the groove. Go back to cleaning. Use a light and a small mechanics mirror to inspect the groove if needed. The rest is not that difficult. Take your time and you'll be fine.
 

willie59

Administrator
Joined
Dec 21, 2008
Messages
13,402
Location
Knoxville TN
Occupation
Service Manager
How do you get that inner gland retainer ring removed? Is there a notch window cut in the side of the cylinder body?
 

Deon

Senior Member
Joined
Jul 25, 2010
Messages
768
Location
Nova Scotia, Canada
How do you get that inner gland retainer ring removed? Is there a notch window cut in the side of the cylinder body?
No Willie 59. The retainer ring snaps into a groove on the inside of the barrel. The nut threads onto the end of the gland to prevent the gland from going into the barrel and the retainer ring prevents the gland from coming out. So remove the nut with spanner wrench and push the gland into the barrel and remove the ring. Install the plastic filler ring to fill the retainer ring groove so that the gland and piston can slide over the groove on the way out. No need to put the filler ring in when installing the piston and gland because the groove is tapered going in.
 

willie59

Administrator
Joined
Dec 21, 2008
Messages
13,402
Location
Knoxville TN
Occupation
Service Manager
TxGeo, that piston seal is likely a two piece configuration consisting of Teflon or Urethane seal ring and a rubber loader ring, not hard to work with. Remove the old piston seal and loader, clean piston well, fit the new rubber loader. Heat the Teflon seal ring in hot water, I typically heat the piston in hot water as well, helps keep the Teflon seal from cooling off during installation. Gently work the Teflon ring into seal groove with very dull screwdriver. Once installed, fit the bearing rings on each side of the piston. Then take an automotive ring groove compressor and tighten it on the piston to compress seal ring. Chunk the piston in a freezer for about 1/2 and hour and your go to go.
 

equip guy

Well-Known Member
Joined
Nov 17, 2010
Messages
95
Location
Massachusetts
Occupation
Ag and Construction Equip mechanic
After warming the seal, I just fold the seal and slide into the groove. You can put it in upside down. Look at the positioning arrangement of the old one while removing. There should be a groove. Also make sure it doesn't twist so it wont sit flush in its holder. Have patientce.
 

TXGeoSolarPro

Active Member
Joined
Mar 14, 2010
Messages
40
Location
Texas
I'm going to try one

My aviation mechanic friend looked at the manual and said we should be able to overhaul the cylinders. I ordered one kit and will be able to try it in two weeks once my work slows down. I'll go ahead and take some photos and hopefully help others who are thinking about tackling this project.
 

joeeye59

Senior Member
Joined
Jun 1, 2008
Messages
355
Location
New Haven, CT
Occupation
A Man with a Backhoe
What is the cost of the stabilizer overhaul kit..? I ask because I asked a local garage what he wanted to rebuild mine, it was over a year ago, at the time $300 each, or was it $350, I forgot now... I would think the rebuild kit has to be quite a bit.... then of course he added thats if nothing else is wrong like the rod is not bent, etc... because I sure would like to rebuild some cylinders on my unit, but worried how I'd get that first nut loose..? I guess I'd make a special wrench to fit right over it, but would putting in a vice do the job? or leave it mounted on the machine while loosening that collar nut..?
 
Last edited:

Deon

Senior Member
Joined
Jul 25, 2010
Messages
768
Location
Nova Scotia, Canada
I have purchased cylinder seal kits and even a whole cylinder from www.conequipmentparts.com. They give excellent service and they are about 1/2 price of OEM. I was unfortunate enough to get a new cylinder that leaked. They rushed a replacement to me immediately and paid all freight charges. This one is perfect. About removing the nut, I would do it on the machine. Leave the barrel end pin attached to the machine's frame. Put your stabilizer down on the ground and remove the pin from the rod end and support the cylinder on a 2 x 10 plank under the cylinder. Leave the plank long enough so you can slide the rod out onto the plank. You can build a support on the outer end of the plank if that makes work easier for you. (like a saw horse). If you leave the plank about twice as long as the cylinder when extended then you can use a come-along to help pull it apart if needed. Good luck.;)
 

TXGeoSolarPro

Active Member
Joined
Mar 14, 2010
Messages
40
Location
Texas
Disassembly complete

I finally got around to working on my stabilizer since our temps are under 100*. The procedure was pretty straight-forward but some of the parts need to be persuaded with a bigger hammer. I followed the directions in the CTM for the hydraulic cylinder removal. My type was the internal grooved bore and the rod guide had to be driven into the bore. It took a 7# hand sledge to drive it down. I used a brass drift per the procedure but after getting it out, it appears some gorilla used a steel one in the past due to some indentations in the guide. When it came time to pull the rod, I tried to pull manually...no luck, then tried to attach a come-along to the bucket and pull it out...no luck, tried to ease it out with the dipper...no luck, finally used the dipper to "gently" pop it out. I had wood supports all around the stab. arm so no damage was done to the rod. Put the rod in a shop vise and tried to break loose with the following: 3/4" breaker bar, 1/2" impact wrench, 4' cheater bar and finally got it removed with a 6' cheater bar. Getting ready to take it to a friends place (he is an aviation mechanic) and wash everything in his parts washer and put back together. I checked straightness and all appears good, no nicks in rod chrome. Only thing I noticed was that the interior of the bore seemed gritty, but I did not notice any parts that had broken off and grinding.

Things I found worn - both urethane bushings on the piston were cracked and one external O ring on the rod guide seemed to have been cut during an install. During disassembly I will look closer at the parts.
 

Attachments

  • Cut_Oring.JPG
    Cut_Oring.JPG
    119.2 KB · Views: 1,758
  • Long_cheater_pipe.JPG
    Long_cheater_pipe.JPG
    177.7 KB · Views: 1,694
  • Ram_in_vise.JPG
    Ram_in_vise.JPG
    143.4 KB · Views: 1,915
  • Short_cheater_pipe.JPG
    Short_cheater_pipe.JPG
    162 KB · Views: 1,709
  • Snap_ring_filler_in_place.JPG
    Snap_ring_filler_in_place.JPG
    128.1 KB · Views: 2,308

TXGeoSolarPro

Active Member
Joined
Mar 14, 2010
Messages
40
Location
Texas
Smoking gun found

As I tore the parts down I could not find the "smoking gun" that caused my severe internal leakage until I took apart the piston seal. Under the seal the expander ring was completely torn apart and missing several sections. IMO the last person working on the cylinder just threw a rebuild kit at it since the piston is expensive...about $106.00 and unless you took off the outer ring everything seemed OK. Everything back together and so far no leaks or drifting. Very satisfied with the result and much cheaper than the $650 labor for Deere to perform the work. As a first timer with average mechanical skills and no special tooling, it took a total of about 6 hours from start to finish.
 

Attachments

  • Torn_backup_ring.JPG
    Torn_backup_ring.JPG
    109.6 KB · Views: 1,681
  • Piston_bad_seal.JPG
    Piston_bad_seal.JPG
    96.7 KB · Views: 1,706

Deon

Senior Member
Joined
Jul 25, 2010
Messages
768
Location
Nova Scotia, Canada
TXGoeSolarPro,

Good job well done. I'm sure you feel good after the successful job.:)
Just wandering where you purchased the seal kit from?
I just yesterday ordered seals from ConEquip Parts.
I need to do the same thing to my right stabilizer cylinder.
 

willie59

Administrator
Joined
Dec 21, 2008
Messages
13,402
Location
Knoxville TN
Occupation
Service Manager
Looks like you're getting it sorted out. Hard to say why that loader ring failed. Could be on the last rebuild someone just replaced the piston seal and not the loader and the old loader finally failed. Could be they didn't replace the piston seal at all because it looked good, those urethane rings are rather durable, but you wouldn't have been able to tell the condition of the loader doing that.

Don't feel bad about your parts cost, I'm noticing pretty much all parts are getting really expensive. I'm rebuilding cylinders from a Kobelco SK480LC, some jackwagon really worked the piston something awful on the stick cylinder during last rebuild, had to order a new piston from Kobelco, a little over 3 grand just for the bare piston.
 

TXGeoSolarPro

Active Member
Joined
Mar 14, 2010
Messages
40
Location
Texas
TXGoeSolarPro,

Good job well done. I'm sure you feel good after the successful job.:)
Just wandering where you purchased the seal kit from?
I just yesterday ordered seals from ConEquip Parts.
I need to do the same thing to my right stabilizer cylinder.

It is a good feeling to accomplish a task that I have never done. Being in the HVAC repair business I enjoy fixing things that are broken.

I got everything from Deere in Dallas. I did it more for speed and convenience and I was able to speak with the service manager ref. installation tips.

For the piston, rod bore kit and piston kit I spent about $260.00. I was glad I went ahead and got the piston since the non-replaceable bushings were both cracked. Always cheaper to do it right the first time.
 

TXGeoSolarPro

Active Member
Joined
Mar 14, 2010
Messages
40
Location
Texas
Don't feel bad about your parts cost, I'm noticing pretty much all parts are getting really expensive. I'm rebuilding cylinders from a Kobelco SK480LC, some jackwagon really worked the piston something awful on the stick cylinder during last rebuild, had to order a new piston from Kobelco, a little over 3 grand just for the bare piston.

The fellow that helped me out with the larger tools is a Challenger jet mechanic and we got talking about the cost of repair parts. Although airplane parts are very expensive, as a function of total equipment cost vs. repair parts cost, equipment parts are PRICIER than jet parts. As and example, an electric hydraulic pump for the jet was about $7K for an overhauled exchange unit. This airplane was $20MM new but only worth about $3MM today due to the bad economy but as a percentage of cost, the backhoe parts are more expensive. He also had to replace a landing gear hydraulic cylinder recently. Cost was about $70K but compare that to the cost for a new boom cylinder.

Rant over...just was interesting on how much it costs to keep equipment repaired.
 
Top