• Thank you for visiting HeavyEquipmentForums.com! Our objective is to provide industry professionals a place to gather to exchange questions, answers and ideas. We welcome you to register using the "Register" icon at the top of the page. We'd appreciate any help you can offer in spreading the word of our new site. The more members that join, the bigger resource for all to enjoy. Thank you!

Job Update

Cat420

Senior Member
Joined
Oct 11, 2004
Messages
527
Location
Pine Bush Ny
Occupation
Construction, small engine and machine shop work
I had posted pictures of some demolition that we did to make way for and addition. All the rain in the northeast has really slowed us up, but it is still going. Here's some updated pictures (about 15 total) if anyone would like see the progress.
 

Attachments

  • IM000313 (Small).JPG
    IM000313 (Small).JPG
    66.9 KB · Views: 563
  • IM000314 (Small).JPG
    IM000314 (Small).JPG
    70.9 KB · Views: 553
  • IM000376 (Small).JPG
    IM000376 (Small).JPG
    61.6 KB · Views: 544
  • IM000377 (Small).JPG
    IM000377 (Small).JPG
    66.6 KB · Views: 549
  • IM000379 (Small).JPG
    IM000379 (Small).JPG
    66.1 KB · Views: 557

Cat420

Senior Member
Joined
Oct 11, 2004
Messages
527
Location
Pine Bush Ny
Occupation
Construction, small engine and machine shop work
More
 

Attachments

  • IM000406 (Small).JPG
    IM000406 (Small).JPG
    71.4 KB · Views: 537
  • IM000405 (Small).JPG
    IM000405 (Small).JPG
    79.5 KB · Views: 545
  • IM000404 (Small).JPG
    IM000404 (Small).JPG
    70.4 KB · Views: 543
  • IM000409 (Small).JPG
    IM000409 (Small).JPG
    67 KB · Views: 529
  • IM000410 (Small).JPG
    IM000410 (Small).JPG
    70.6 KB · Views: 525

Cat420

Senior Member
Joined
Oct 11, 2004
Messages
527
Location
Pine Bush Ny
Occupation
Construction, small engine and machine shop work
More
 

Attachments

  • IM000413 (Small).JPG
    IM000413 (Small).JPG
    74.9 KB · Views: 522
  • IM000412 (Small).JPG
    IM000412 (Small).JPG
    60.4 KB · Views: 509
  • IM000411 (Small).JPG
    IM000411 (Small).JPG
    48.7 KB · Views: 506
  • IM000414 (Small).JPG
    IM000414 (Small).JPG
    59.7 KB · Views: 509
  • IM000454 (Small).JPG
    IM000454 (Small).JPG
    64 KB · Views: 504

Cat420

Senior Member
Joined
Oct 11, 2004
Messages
527
Location
Pine Bush Ny
Occupation
Construction, small engine and machine shop work
Last ones.
 

Attachments

  • IM000455 (Small).JPG
    IM000455 (Small).JPG
    53 KB · Views: 498
  • IM000456 (Small).JPG
    IM000456 (Small).JPG
    66.8 KB · Views: 487
  • IM000457 (Small).JPG
    IM000457 (Small).JPG
    23.2 KB · Views: 495

jazak

Senior Member
Joined
Jun 22, 2006
Messages
331
Location
NJ
Don't you think the addition is sitting kina low?!? Looks like the mud is gonna come right over the side walk and into the house!:eek:
 

Cat420

Senior Member
Joined
Oct 11, 2004
Messages
527
Location
Pine Bush Ny
Occupation
Construction, small engine and machine shop work
It's probably a little low, but we wanted to keep the floor even with the old house. We also haven't even attempted to get the grade near its finished height yet. Due to the poor quality of the previous grade that was done 20+ years ago, they had a problem with water collecting around the house and making its way into the basement. Needless to say, this will be fixed when we bring in a dozer:yup

We also just poured the concrete today, so it was backfilled against the forms. If we left it like it is now, we would have big problems. Here's what it looked like before. https://www.heavyequipmentforums.com/Forum/attachment.php?attachmentid=1555&stc=1&d=1151281244
 

Steve Frazier

Founder
Staff member
Joined
Oct 30, 2003
Messages
6,611
Location
LaGrangeville, N.Y.
Looks good! The only thing I see different than what we do here is the footing you have with the high step. We have to make smaller graduations here.
 

Cat420

Senior Member
Joined
Oct 11, 2004
Messages
527
Location
Pine Bush Ny
Occupation
Construction, small engine and machine shop work
That big step is just in the footing for the concrete porch and it starts right where the footing steps up. We probably have similar regulations for steps in a footing for the foundation. All I know is that we did what the engineer drew and the building inspector is happy.
 

Cat420

Senior Member
Joined
Oct 11, 2004
Messages
527
Location
Pine Bush Ny
Occupation
Construction, small engine and machine shop work
Thanks for all the compliments. We had a good framer, but did the concrete ourselves, because the mason made us mad. My dad used to do concrete work in Jersey, but it bothers his back. I can't believe how well it came out. My dad hasn't done much concrete in years and I never do it, but he had me put the finish on it. If that isn't proof that God watches out for the clueless, I don't know what is:yup
 

murray83

Senior Member
Joined
Jan 23, 2006
Messages
260
Location
new brunswick canada
Occupation
jack of all trades....master of none
i try to stay away from concrete work myself if i can,i get offers to repair curbs and sidewalks for people i know but kinda scared on how it would turn out but after looking at your pics i'm kinda leaning the other way now.

would love to hear on how you finished it.
 

Cat420

Senior Member
Joined
Oct 11, 2004
Messages
527
Location
Pine Bush Ny
Occupation
Construction, small engine and machine shop work
I have only picked up a few of the little tricks from watching, but I'll try and help as best I can.

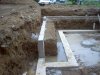
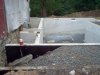
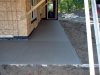
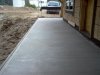
Pouring and getting the right height is easy if you set the top of the forms so that you can run a board along to level it off. Then we run over it with wood floats to bring up the moisture and knock the rocks down. It then got hit with a 3 foot bull float to bring up more moisture and show if anything isn't level or smooth. After it sat for 30 minutes or so it got hit again with a steel float several times. At this point it was about 2 hours after the pour and you can feel it starting to set up. Each time it got hit with the steel float, the marks were becoming smaller and smaller. The finish on this porch was started about 3 hours after the pour and was done with a soft bristle push broom. It has to be done right when the concrete is almost done setting up. You just gently drag the broom over with nothing, but its own weight on the concrete. If you wait too long then you lose it, if you do it too soon then it makes a mess.

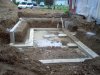
You also have to do the edges during this whole process. You hold a small trowel at an angle and run it over the face of the concrete to push the rocks back. This is what gives a nice smooth edge like you see on the end of a garage. You also have to use a rounded edger tool to give it a nice round edge on the corner.

I hope that doesn't scare you too much. It's always messy and you always rush around and then stand there watching it harden. There's a lot too it, but nothing that difficult once you have seen it done a few times. I would recommend helping someone do it a couple of times. They will appreciate the help and you'll learn something new. Like everything else though, the professionals make it look easy.

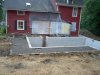
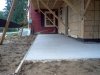
Edit: Here's pictures from today with it all nice and dry.
 

Attachments

  • IM000458 (Small).JPG
    IM000458 (Small).JPG
    49.9 KB · Views: 418
  • IM000459 (Small).JPG
    IM000459 (Small).JPG
    58.6 KB · Views: 421
Last edited:

murray83

Senior Member
Joined
Jan 23, 2006
Messages
260
Location
new brunswick canada
Occupation
jack of all trades....master of none
i've mostly done large pads for tanks and equipment for the local refinery and paper mills but nothing with much finishing it just had to look white :rolleyes: .wish i had pics of some of those pours,bucketing concrete into the units with skid steers and a few with the 950G ohhh good times.
 

Ford LT-9000

Banned
Joined
Nov 17, 2005
Messages
1,484
Location
B.C. Canada
Occupation
Rolling around in the dirt
Looks good it must have been hard to work with all that muck one splash of it onto the concrete its stained forever.

I have done lots of concrete work I don't like doing it I don't have the magic touch to get the finish just right. Done allot of placing I leave the finishing to guys with more patients. When ever I'am bullfloating I always grab a edge and tear out a gouge in the area I just smoothed out :Banghead

The broom finished hides a little mistakes doing a basement floor that needs power troweled to acheive the smooth glass finish not for me leave it to the more experience :yup

Hey you know what ruins a batch of concrete faster than anything is a bag of brown sugar. For some reason concrete and brown sugar doesn't match.

If you want to do exposed aggregate concrete you sprinkle brown sugar on the surface of what ever you want exposed.
 

Cat420

Senior Member
Joined
Oct 11, 2004
Messages
527
Location
Pine Bush Ny
Occupation
Construction, small engine and machine shop work
And here I thought brown sugar was only good for eating:bouncegri

The mud didn't splash too bad, but held onto to your feet making it tough to drag the broom evenly.
 

Cat420

Senior Member
Joined
Oct 11, 2004
Messages
527
Location
Pine Bush Ny
Occupation
Construction, small engine and machine shop work
My dad doesn't think it will need any. I don't know concrete well enough to form an opinion. What's the general rule about when to put them?
 

Ford LT-9000

Banned
Joined
Nov 17, 2005
Messages
1,484
Location
B.C. Canada
Occupation
Rolling around in the dirt
All you need to do is score the concrete to releave the surface tension. Where you could put one would be on a diagonal from the corner of the addition to the corner of the side walk.

A 1/8 thick carbon blade in a circular saw would do it go about 1/4 deep.

When you do a sidewall usually you put the relief cuts in wet.

It all depends on how much bar you have in the concrete and how hard and how thick the concrete is going to depend on if its going to crack.

For a sidewalk like that one I really doubt you will have enough weight load to crack it. It also depends on how much freeze and thaw you guys get. Where its really cold air entrained concrete is used it helps with the freeze and thaw cracking.
 

Cat420

Senior Member
Joined
Oct 11, 2004
Messages
527
Location
Pine Bush Ny
Occupation
Construction, small engine and machine shop work
The plans didn't call for any rebar, but we raised it up so that it is 4-5" thick in the middle and 8" on the outside edge and the inside edge against the house. It also sits directly on the foundation where it is 8" thick. There's probably about 8-10" of stone under it as well. It's not like they are going to drive on it, so we didn't need to go too crazy. If we have to score it a little it wouldn't be the end of the world.
 
Top