• Thank you for visiting HeavyEquipmentForums.com! Our objective is to provide industry professionals a place to gather to exchange questions, answers and ideas. We welcome you to register using the "Register" icon at the top of the page. We'd appreciate any help you can offer in spreading the word of our new site. The more members that join, the bigger resource for all to enjoy. Thank you!

Harvest in full swing:

1693TA

Senior Member
Joined
Feb 27, 2010
Messages
2,687
Location
Farmington IL
Occupation
FAA Radar Engineer, (Retired)
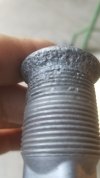
After a quick few minutes of the right side hardware to remove the rust and road grime that builds up on the nuts, they are all getting replaced. I have found two inner nuts with hairline cracks, several with what I consider severe pitting to the bearing surfaces of the ball seat are(s), and several destroyed threads from probably being run loose. This is a single example:

20231117_085543.jpg

I've not run these to completion as of yet but with the percentage of defective, (my call) of the inner nuts, I feel it best to replace all nuts meaning inner, and outer with new. Truck has outboard drums and all the lug studs appear to be clean, so no need to address them yet. That could change as I clean them up with a wire wheel shortly.

I typically run the left and right sides separately as I'm not smart enough to know the difference...... Actually no need fighting finding out you have a L, when you need a R when trying to remount tires so I just keep them separate out of habit. I know the difference between left and right threads but many don't.

Many of the younger set don't know the term "unimount". Only hub pilot, stud pilot, Budd, or Dayton. Of course "Spoke" also. If it ain't a spoke, it's a Budd...... I don't even try to get into discussing multi piece rims.
 

56wrench

Senior Member
Joined
Dec 4, 2016
Messages
2,127
Location
alberta
And, some torque wrenches will not work for LH threads. On mine for LH, i take the ratchet head apart and reassemble the drive square out the other side. I could drill a hole in the opposite side of the detachable handle but it would be too easy to get it mixed up if someone else is helping me. This way, there’s no doubt about which way its set up
 

1693TA

Senior Member
Joined
Feb 27, 2010
Messages
2,687
Location
Farmington IL
Occupation
FAA Radar Engineer, (Retired)
And, some torque wrenches will not work for LH threads. On mine for LH, i take the ratchet head apart and reassemble the drive square out the other side. I could drill a hole in the opposite side of the detachable handle but it would be too easy to get it mixed up if someone else is helping me. This way, there’s no doubt about which way its set up
I have an older AMMCO 3/4" drive torque wrench that is similar but the center section pushes out and flips over to change direction. You pull a small detented pin out on the side and the ratchet section then drops out.

Don't see too many places using torque wrenches on wheel end work around here. It's either rattle till tight, or "torque sticks" in use. I had one employee that wanted to use them as he was sold on their accuracy. My torque wrench, (which is calibrated) did not agree with their rating(s) so it never came up again.
 

cfherrman

Senior Member
Joined
Jun 3, 2022
Messages
1,814
Location
Hays, Kansas
My guy uses a Milwaukee 1" impact that you can set at 450 ft lbs. He said he just goes around twice. We used it around once then put the torque wrench on it and just a little bit and it clicked. Twice around sounds good for me.

All other tire shops put on with a 1" so I don't go to them.
 

1693TA

Senior Member
Joined
Feb 27, 2010
Messages
2,687
Location
Farmington IL
Occupation
FAA Radar Engineer, (Retired)
I have an old CP 1" impact with extended anvil that will easily snap wheel studs off when fed with a 3/4" air line. It starves out on air with 3/8" quickly. I bought that used from a tire guy back in the very late 1970's and don't use it much except when semi truck lugs won't come loose with my 3/4" impact. Most times that impact is sufficient followed up with a click type torque wrench.

I remember well when buying that 1" wrench the guy telling me it will readily crack aluminum Budd rims between the studs. I never have but I really only use it for loosening stuck fasteners. It is so damned heavy and unweildy to use it rarely comes out from under the bench.
 

Old Doug

Senior Member
Joined
Oct 16, 2013
Messages
4,553
Location
Mo
Its a deal keep a old truck in good shape so many things you never think about go bad over time. My 63 f600 the hood is coming apart at the spot welds the head liner is messing up to . I am going to have to figure out if i want to spend a thousand or two into it or get a dump trailer to pull with my 1996 GMC.
 

colson04

Senior Member
Joined
Apr 11, 2016
Messages
2,090
Location
Delton, Michigan
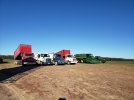
Been a very busy two weeks, but all of our corn is done. Our three bins are full, two ag bags full, and another bins worth hauled off to elevator for later. Overall, it has been a good harvest.

The line up, ready to roll on the neighbors corn starting tomorrow morning.
20231119_145325.jpg
200 acres and we can put it all away for the winter.
 

1693TA

Senior Member
Joined
Feb 27, 2010
Messages
2,687
Location
Farmington IL
Occupation
FAA Radar Engineer, (Retired)
New lugs should arrive this afternoon but I have other things to do outside of the shop so won't be there. Here is the lineup from the LR wheel after a 10 minute clean up blast. They were pretty crusty looking when they went in the basket but I really didn't think they'd come out looking this deficient: 20231120_094740.jpg

The right side looks just as bad and they too are being replaced.
 

1693TA

Senior Member
Joined
Feb 27, 2010
Messages
2,687
Location
Farmington IL
Occupation
FAA Radar Engineer, (Retired)
Nice day today so jumping back onto this job. Blasted the crusty steel wheels, and front bumper clean this morning and they look good. I'll probably paint this stuff up over the weekend as it's forecasted to rain both days.

The rims actually cleaned up a lot better than I'd thought they would so will paint them a nice "off" white, and the bumper either an argent, or black depending on what I have in the shop.

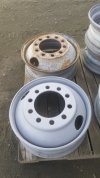
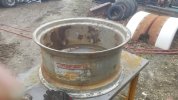
Two best rims staring out. Closest is blasted clean, furthest is as removed from truck:

20231215_104509.jpg

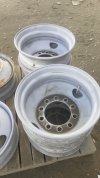
After blasting but prior to final blow off and cleanup:

20231215_104512.jpg

20231215_124451.jpg

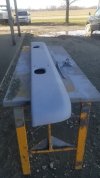
Front bumper:

20231215_124526.jpg

That chain binder has been laying in the driveway at least three years rusted solid. Never could remember to blast it but remembered today. It is not free and works well.

This kind of stuff keeps the boredom at bay. Now heading into dealership to deliver a new skid steer and bring back a trade in 120hp tractor and loader.
 

1693TA

Senior Member
Joined
Feb 27, 2010
Messages
2,687
Location
Farmington IL
Occupation
FAA Radar Engineer, (Retired)
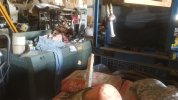
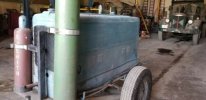
Took these for Dave. Digging out media, (coal slag) to blast the wheels with and remembered this setting back under the junk:

20231215_125723.jpg

20231215_125739.jpg

Over the winter months this one will go onto running gear so it will be easier to get out for remote work. I'll then entertain selling off my GB-318 Hobart engine drive welding machine. But then again, maybe not.

GB-3181.jpg
 

1693TA

Senior Member
Joined
Feb 27, 2010
Messages
2,687
Location
Farmington IL
Occupation
FAA Radar Engineer, (Retired)
Did you leave the valve stems in when you blasted? Will they bleed rust later?

They remained in but will be replaced when tires are remounted. They don't usually leak or creep rust but these are many years old and very well could be original from 1987. Rims are all original to the truck and stamped 1987. They are "Budd" manufactured.

I'll spot blast the areas when the stems are out but didn't have approval when ready to blast to replace as just goes to figure that came this evening. This was the first, or coarse blast and they will be touched up with a much finer media. If you look at the second photo you can see a dark ring in the one rim. It could be camera, or parallax error, but I have a 45 degree blast nozzle and will ensure this is clean before moving to the next step. The small blast pot and hose/nozzle combination in use would not adequately abrade the surface at the needed angle and this will be addressed with another blast hose/nozzle combination.

Once acceptable, a two part epoxy base and a single stage industrial enamel paint will be applied. Cousin was concerned the local DOT cops working the area around harvest time may not like the rusted wheels. I think he thought they were much worse off than they are.

Was hoping to get a dozen conveyor rollers back from the machine shop today I had made. These are to be chain driven via hydraulic motor and will support six wheels at a time rotating them while they are painted.
 

1693TA

Senior Member
Joined
Feb 27, 2010
Messages
2,687
Location
Farmington IL
Occupation
FAA Radar Engineer, (Retired)
Getting back onto this project later today with the rain now moving along. That dark ring was not missed during the blast and was a shadow best I can tell from camera angle. I did however forget to blast the faces of the two rims that are face down on the pallet.

Ordered a new box of stems from the tire service supplier yesterday and he'll drop them today at the shop. Have a couple more farm tractor rims to blast clean along with the finish blast these will receive. I do this blasting in two steps as the coarse media readily strips paint and roots rust out, and the very fine media smooths the surface enough that further prep is not needed.
 

1693TA

Senior Member
Joined
Feb 27, 2010
Messages
2,687
Location
Farmington IL
Occupation
FAA Radar Engineer, (Retired)
I'd meant to update this but have quite a bit moving along with the new year coming and forgot. Fingers are still in a lot of pies but starting to rescind.

The pit idea is moving forward. I could do this myself but going to hire a couple of young bucks to do this work. Talked to the taxing body about it and if I don't install a concrete floor, or plumbing and water in the interior of a steel, or wood space frame shell utility shed/building such as I'm wanting, there will be nothing additional for them to tax as considered "non permanent". Basically another "yard barn" as called around here. Posts such as a pole barn uses are still considered "non permanent" but rather "anchors" to keep the structure from blowing away.

Thinking I'll build a rectangular box in the ground, (pit) of concrete, then compact and gravel much the same as you would a roadbed around the pit keeping elevation low enough to overlay the gravel with planking. This is just an idea. I would most likely incorporate a rolling "jacking beam" into the design of the pit perimeter. If doing this, the complete interior except the pit floor and walls would fit their vision of a non permanent structure. The pit would be masonry with a steel upper support perimeter for the beam to roll upon. I think the structure about 16' in width, 28' in length with 12' sidewalls, and having a 2/12 pitch roof would be about perfect for fitting my dozer or a semi tractor in for servicing. A personnel walkdoor in a sidewall, and 12' wide coil up door in the endwall with a power operator would be good. No need for a drive through setup with this shed idea. Just pull straight in, back out.

I'd insulate the roof to keep the condensation at bay but have to see how much use would be actual before doing anything with the side, and end walls concerning insulation.
 

1693TA

Senior Member
Joined
Feb 27, 2010
Messages
2,687
Location
Farmington IL
Occupation
FAA Radar Engineer, (Retired)
Blasted those two faces and cleaned up the backside of two rims that had flash rust from getting wet. Removed all valve stems and touched the area(s) up with blast media so good for a prime and paint possibly tomorrow. All rims are stamped very close to this and the truck was built in April, 1987:

20231226_131932.jpg

Nice crusty old rims from my mowing farm tractor. Was afraid they were going to blow through but they didn't.

20231226_112448.jpg20231226_112457.jpg20231226_122131.jpg

I have new rear tires for the tractor that are larger so going with new replacement rims there. These are a saleable item so will offset the cost a bit. The original tires are still about 50% but 1984 vintage and original to the tractor.

Get these two jobs wrapped and I'll move onto my drop deck. Going to roll it over onto it's back in the yard to replace spring hangers and torque rods with new. Rusty old trailer but will still do what's needed for me.
 

1693TA

Senior Member
Joined
Feb 27, 2010
Messages
2,687
Location
Farmington IL
Occupation
FAA Radar Engineer, (Retired)
Valve stem hole before and after, but different angle:20231222_112038.jpg20231226_124113.jpg

Center plate which bolts to tractor lugs and rim. This is pretty thick and will bolt to the new rims. It cleaned up well also:

20231222_112026.jpg
 

1693TA

Senior Member
Joined
Feb 27, 2010
Messages
2,687
Location
Farmington IL
Occupation
FAA Radar Engineer, (Retired)
Talked to the guys that did my downdraft paint room trench this afternoon and one of them is going to run out later in the week to see what I'm wanting to do. Also talked for a spell to the somewhat local "Menard's" home center about a post frame building and they'll shoot me over a price yet this week.

May make this happen in the 1st quarter of the new year.
 

1693TA

Senior Member
Joined
Feb 27, 2010
Messages
2,687
Location
Farmington IL
Occupation
FAA Radar Engineer, (Retired)
Received a message in the overnight hours about this project trench. For the job scope basically $3.50 per new laid block and $1.50 for any clean used or provided block they set in any fashion desired on a clean and unobstructed base. This includes any labor, expansion joint, mortar, and sealants required. Also includes a solid top course to which I can stub anchor studs/bolts into for the top, or finish pour.

Once I decide upon finished interior dimensions of the trench, I'll probably dig about 18" wider than this, (each side) and 8" deeper for acceptable floor thickness and perimeter footing, then pour a simple level floor to build the walls upon. I only have a 24" bucket on the backhoe so limited there.

Preliminary thoughts are a 30" width, 20' length with a 60" depth finished interior dimensions. I am open to suggestion on anything but really don't want to be on my knees, or on a step stool each time working under something if possible.
 
Last edited:

Willie B

Senior Member
Joined
Jan 2, 2016
Messages
4,063
Location
Mount Tabor VT
Occupation
Electrician
I went down 5' 10" from finished floor height. Put a 2x6 frame & poured a footing. I had used about a mile of galvanized electric fence wire to lace the footing forms in place & provide reinforcing to the form.
Built 5' tall sidewall forms of plywood & 2x6. I anchored the wall forms to the 2x6 footing forms with 3" drywall screws, a lot of them. The transit mixer brought 8
yards of concrete for the walls, he must have been in a hurry. Dumped his whole load in seconds. it was way too wet. As he was backing away, it sounded like machine gun fire as the 1000? drywall screws broke. All the ruptured form loss was outboard. I did some form revision & they brought another 3 yards late day. Backfill hid the disaster.
Outer form was stripped off. inner cut down to floor level. A Full 2x3 was screwed to the inner form & the floor was poured & screed to it.
 
Top