• Thank you for visiting HeavyEquipmentForums.com! Our objective is to provide industry professionals a place to gather to exchange questions, answers and ideas. We welcome you to register using the "Register" icon at the top of the page. We'd appreciate any help you can offer in spreading the word of our new site. The more members that join, the bigger resource for all to enjoy. Thank you!

Fiat 70CI. Repairs, modifications and stories.

Tarpon140

Active Member
Joined
Oct 31, 2012
Messages
25
Location
Australia
Problem - smoke, burnt out head gasket and destroyed pre com chambers caused by injector pump reconditioning firm putting camshaft back in around the wrong way.
Solution - new pre coms, head gasket and sorted out injector pump.
Update - now injector pump not lining up with drive coupling.

She has fought me the whole way.
 

Jeembawb

Well-Known Member
Joined
Apr 1, 2012
Messages
173
Location
Muckay, Australia
Problem - smoke, burnt out head gasket and destroyed pre com chambers caused by injector pump reconditioning firm putting camshaft back in around the wrong way.
Solution - new pre coms, head gasket and sorted out injector pump.
Update - now injector pump not lining up with drive coupling.

She has fought me the whole way.

Keep your chin up mate - you've come this far

Jeembawb
 

Hillsy

New Member
Joined
Jul 22, 2014
Messages
4
Location
Adelaide Hills
451C in the Adelaide Hills

Hi All,

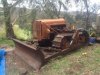
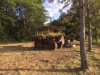
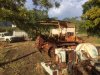
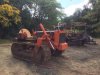
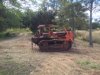
I've been following this thread for a year or so now, and it seems now is the time to make my first post. A 451c came into my care almost 2 years ago. It had been sitting out in the weather, under a tarp for about 5 to 10 years. I'll give a quick history of where I'm at with it:

IMG_2315.jpg

Dropped the engine oil. This was ok.

Dropped the transmission and final drives oil. The final drives and transmission had taken in a large amount of water and came out of the drain hole looking like a light brown custard. I took the covers off the bottom of the final drives and cleaned these as much as possible, but I let the trans/diff drain for a couple of weeks, then replaced it with a cheap motor oil, in order to flush as much of the water, etc out.

Replace the fuel filters, checked air filter, coolant levels, and managed to start it with the help of some aero-start.

The blade wouldn't lift, so found and repaired a hole worn through the hydraulic lines. The blade now lifts, so could can forward and reverse movement. Couldn't turn in either direction.

Tried to free the steering clutches by dropping the clutch with the brakes on. After a while managed to get one free, but the other was well stuck. I'd taken the drain plugs out of the steering clutch housings, and nothing came out, but on closer inspection, the holes were full of grease, so I poked a screwdriver up and out came at least a couple of litres of water out of each side.

IMG_2350.jpg

At this point, I had some shelter sorted out at home, so called up the towing company and they brought it back for me. This was about September last year, and I left the cover off the top of the steering clutch housing over Adelaide's dry summer. This must have helped dry them out as now I have steering in both directions. Not sure of the condition of things in there, but the clutches and brakes seem to be doing what they should.

Now that I can steer, I gave it a run around the driveway and dropped the oil in the trans/diff and final drives again, and replaced with more cheap motor oil. What came out was still a creamy brown colour, but after running it again, it appears to be ok now. Once I'm sure I don't need to change the oils again, I'll get the proper grades for the trans/diff, final drives and engine.

I don't want to get into the steering clutches unless I really need to, as I don't have the tools to split the tracks, unless someone can shed some light on the best way to do this. Do you need a press?

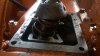
I've removed the main clutch because it was staying engaged for a short time after dis-engaging it. As you can see from the photo, the clutch and housing is covered in oil. I've removed the clutch.

IMG_3358.jpgIMG_3363.jpg


Does this look like it would clean up or would I need to replaced it?
Is there any way to tell where the oil is coming from? It looks more like motor oil than gearbox oil, but i'm not sure.

If it's the seal at the back of the crankshaft, can this be replaced without removing the engine?

I do have a service manual, but some things aren't clear from this.

That's probably enough questions for now. I hope I haven't prattled on for too long. Thanks for a great forum, and I'd really appreciate any advice that anyone has to offer.

Cheers,

Hillsy.
 

Attachments

  • IMG_2315.jpg
    IMG_2315.jpg
    64.4 KB · Views: 387

Jeembawb

Well-Known Member
Joined
Apr 1, 2012
Messages
173
Location
Muckay, Australia
Good 1st post hilly - nice to see lots of pics.

Looks like you got a good machine there when you consider the age of it & how long it's been sitting out in the open. Tarps don't last too long and can act as a funnel sometimes. You did well to get it started (bonus), moving (bonus), hydraulics working (bonus), and steering (big bonus). In one post you've done it all. Next post we need pics using the slasher & pushing some dirt.
The clutch plates are cheap ($80 or so) but you can spend some bucks on the throw out Bearing assy which may not be necessary and even the plates may not be needed (10mm is std new thickness). More time & effort should be put into eliminating as much slop/play in all linkages & shafts from the clutch lever all the way thru to the plate thickness. I would like to design a hyd assist for the clutch on these because they are hard to operate when adjusted properly but require constant adjustment too. Tis worth seeing where the oil is coming from too off course. If it is coming from the rear main it would be sort of ok if it was able to drain from the bottom of the case constantly.

Good work Hillsy - at least the summers are dry in sa which may have saved it a bit - doesn't look too bad for rust on the panels.

Can you post some pics of the blade tilt mechanisms - Tis different from mine.

Cheers JimBob

P.s. Re the aero start - the user manual actually states about one plus minutes of glow. Makes a huge difference.
 
Last edited:

Hillsy

New Member
Joined
Jul 22, 2014
Messages
4
Location
Adelaide Hills
Thanks JimBob,

I get a couple of shots of the blade tilt mechanisms in the next few days.

I'm thinking I'll pull the flywheel off and have a look behind it to see if there is an obvious oil leak from the rear main. As you can see from the photo, the oil is black, and it's been flung all around the clutch housing. I'll clean it up and put it back in and give it another run and see if it's still got the problem. I imagine it will, but hopefully will give me some indication where it's coming from.

There are a few panels that have rusted away. I'm working on reconstructing the seat. The covers over the rollers on the tracks have all but rusted away. Do you have any suggestion for replacements for these?

Good tip on the long glow time. I'll give it a go once the clutch goes back in.

There will be more questions coming up. Thanks for your advice.

Cheers,

Hillsy.
 

Jeembawb

Well-Known Member
Joined
Apr 1, 2012
Messages
173
Location
Muckay, Australia
You can buy a seat frame - it shows up on eBay which will link to gw tractor parts, if it was cheaper I would prob buy it when I'm ready for it but reckon I will modify in a cat seat & frame with fwd/back adjustment- it might turn out better but won't look factory - the plan is for it to be a working dozer rather than a show pony after all.

The mud / Rock covers: the bloke that delivered my dozer was an old bloke that used to work for one of the fiat dealerships in the era of these ones - he had seen someone recreate these covers / guards with fibreglass. Not sure if using the steel as a basis but the idea intrigues me. It could work for light duty for sure, how it will work with rocks might be interesting.

Cheers
Jimbob
 

Tarpon140

Active Member
Joined
Oct 31, 2012
Messages
25
Location
Australia
Rear main seal

Hillsy

This is what we found when we opened up my 351c. After rebuilding the motor I find that ive got oil in the clutch housing again (coming out through the inspection cap above the clutch).
Its definately motor oil so the rear main seal needs attention again. I'm intreseted how you go accessing the main seal through the fly wheel.


IMG_0125.jpgIMG_0124.jpg
 

Hillsy

New Member
Joined
Jul 22, 2014
Messages
4
Location
Adelaide Hills
Hi Tarpon,

I'm going to put my 451c to work in the next couple of weeks pulling some logs up a hill, so I'm going to keep an eye on the clutch housing and see if it gets any new oil in there. I'm trying to get the trees pulled up before it gets to wet, so I bypassed pulling the flywheel off. I imagine the clutch will be out again soon, so I'll let you know how I go.

By the way, I didn't have anywhere near that amount of oil in my clutch housing as you have. It just looked like it had been sprayed around off the flywheel.

Cheers,

Hillsy
 

Tarpon140

Active Member
Joined
Oct 31, 2012
Messages
25
Location
Australia
Recent issue has been 351c getting stuck in reverse.
You can see from the photos the problem was a worn gear pattern.
First of all we cut the pattern out to save dismantling the transmission.
Upon finding we had not built it up enough we ended up welding it 'in situ'.
Problem solved but not without its challenges.
 

Attachments

  • WP_20150623_09_02_23_Pro.jpg
    WP_20150623_09_02_23_Pro.jpg
    35.5 KB · Views: 314
  • WP_20150622_10_59_16_Pro.jpg
    WP_20150622_10_59_16_Pro.jpg
    38.5 KB · Views: 313
  • WP_20150623_09_02_46_Pro.jpg
    WP_20150623_09_02_46_Pro.jpg
    40.7 KB · Views: 310

Jeembawb

Well-Known Member
Joined
Apr 1, 2012
Messages
173
Location
Muckay, Australia
Welded in situ? Good work - I guess nothing's impossible if u have the right attitude, a welder and a grinder. Imagine the old days when the the grinder option was a file (aka manual grinder)?
Jimbob
 

Jeembawb

Well-Known Member
Joined
Apr 1, 2012
Messages
173
Location
Muckay, Australia
Fiat 70ci Project Mix n Match

Some planets have aligned and i now have a crane truck i can use to make this project happen. Update - I have 3x Fiat70ci/AD7 dozers that dont move (at least i dont think they move... it could be like the tractors in the field at night in that Cars movie?). I have pondered (at length) over what is the best way to turn 3 dozers into 2. The pics below is of the "parts" dozer that came as a set with my 1st dozer and was dead in the water due to sitting too long uncovered after the head had been removed when the prevoius bloke looked at doing the head stud replacement job (he baulked). Thing is this dozer has the least hrs on it and looks a bit unloved (not that you could have seen it before i cut the grass around it), but everything in the back end seems pretty tight. Clutch & steering levers and pedals all seem good & even the f/d seals don't seem to be seeping (i should cheeck the oil level I guess?). So... the plan is to take the engine out of the one that got the head stud job (somewhat rebuilt & seems real good) and put it into this one. The crane truck makes this job a whole lot easier than it looked previously.

Phase 1: Cut the grass around the 2 dozers & put the 2 next to each other... coming soon

Jimbob
 

Attachments

  • Clearingtheway.JPG
    Clearingtheway.JPG
    54.8 KB · Views: 266
  • clear2.JPG
    clear2.JPG
    55.1 KB · Views: 267
  • clear3.JPG
    clear3.JPG
    55.4 KB · Views: 267

Jeembawb

Well-Known Member
Joined
Apr 1, 2012
Messages
173
Location
Muckay, Australia
Project mix n match

1st order of the day (last weekend this was) is to unwrap the old girl and move her(with a bit of help from a friend) to a place to remove the c-frame and blade. The to drag her over to the staging area.
 

Attachments

  • image.jpg
    image.jpg
    155.3 KB · Views: 236
  • image.jpg
    image.jpg
    106.9 KB · Views: 235
  • image.jpg
    image.jpg
    137.7 KB · Views: 236
  • image.jpg
    image.jpg
    126.5 KB · Views: 235
  • image.jpg
    image.jpg
    144.8 KB · Views: 236

Billyboy

Active Member
Joined
Jan 4, 2016
Messages
27
Location
Koumala qld australia
fiat 70ci engine rebuild

wow - 1/4" grooves might be too much for JB but brazing could work for that but doing the job right is a new rod in that case i'm sure - or - just before i got #3 dozer i was looking at putting a tilt ram on #1 - i found a rural tractor dealership with BareCo parts that could get a new bareco ram 12" x 4" x 2" for $250ish (definately less than 300) which was cheaper than 2nd hand harvester rams or chopping down another ram to suit.

As to roll over point - the bloke that had my #1 & #2 dozers said that they will slide (with the aid of rocks he said) sideways before they would tip - i guess if they slide & then hit a root or a rock you are in trouble - i am pretty sure i will chicken out way before then - & i'd also like to know where the oil pickup is before going too crazy

Hello fellas hope all are well .Have a couple of spare parts left over after an engine rebuild two spacers sleeves or dowels .They are both black and have obviously been in oil all their lives . One is about 11/4 long by approx 1 in in diameter with a approx 10 mill hole through it. The other is about 1/2 long is stepped is about 1in in diameter and also has a 10mm hole through it. The engine is fitted and running fine .Have looked through the parts manual with a magnifying glass and one could be a dowel from the counterbalance shaft mounting plate [ to the block ] the other could be from the drive end of the counterbalance shaft drive . Any help would be appreciated thanks Billyboy
 

Jeembawb

Well-Known Member
Joined
Apr 1, 2012
Messages
173
Location
Muckay, Australia
fiat 70ci engine rebuild


Hello fellas hope all are well .Have a couple of spare parts left over after an engine rebuild two spacers sleeves or dowels .They are both black and have obviously been in oil all their lives . One is about 11/4 long by approx 1 in in diameter with a approx 10 mill hole through it. The other is about 1/2 long is stepped is about 1in in diameter and also has a 10mm hole through it. The engine is fitted and running fine .Have looked through the parts manual with a magnifying glass and one could be a dowel from the counterbalance shaft mounting plate [ to the block ] the other could be from the drive end of the counterbalance shaft drive . Any help would be appreciated thanks Billyboy
Gidday billyboy
If it goes it's definitely not too necessary. - some photers would be a good thing. I take it you have rebuilt a 70ci? Is it originally an electric start or a pilot motor jobbie?
jimbob
 

nutwood

Well-Known Member
Joined
Apr 28, 2012
Messages
134
Location
Tasmania
fiat 70ci engine rebuild


Hello fellas hope all are well .Have a couple of spare parts left over after an engine rebuild two spacers sleeves or dowels .They are both black and have obviously been in oil all their lives . One is about 11/4 long by approx 1 in in diameter with a approx 10 mill hole through it. The other is about 1/2 long is stepped is about 1in in diameter and also has a 10mm hole through it. The engine is fitted and running fine .Have looked through the parts manual with a magnifying glass and one could be a dowel from the counterbalance shaft mounting plate [ to the block ] the other could be from the drive end of the counterbalance shaft drive . Any help would be appreciated thanks Billyboy
Hmmm, Sounds a s though it running fine without them but if I were asked to make a guess, based on the description, I would say they are some some of oil flow restrictor, designed to fit in a hole and balance up oil flows. That really is just a wild guess but over the years, I've come across similar parts, fulfilling that role. Chances are, if this is the case, you'll probably be ok due to the improvements in oils since that engine was designed.
On the subject of your brakes, I'm inclined to be pessimistic. When I purchased my dozer, the seller (now deceased) told me off the kero trick. My experience was that it might clean the surface of the brake shoe but if it's soaked in oil, nothing is going to fix it except replacement. Replacing the brake shoe is no big deal and in most cases can be done without having to lift the top off the transmission. A more serious concern is the condition of the clutch plates. If there's enough oil in there to affect the brake and you've got the standard clutch plates, I'd be starting to research steering clutch replacement. The steering clutches are the Achilles heel of these machines as the sealing arrangements between the clutches and the transmission are less than ideal.
 

nutwood

Well-Known Member
Joined
Apr 28, 2012
Messages
134
Location
Tasmania
Hi Billyboy, Hope I'm not being a sad sack but I suspect this is what you have to look forward to. I'm trying to soften up the shock.:)Clutch 3.jpg Clutch 1.jpg Clutch 2.jpg
 
Top