• Thank you for visiting HeavyEquipmentForums.com! Our objective is to provide industry professionals a place to gather to exchange questions, answers and ideas. We welcome you to register using the "Register" icon at the top of the page. We'd appreciate any help you can offer in spreading the word of our new site. The more members that join, the bigger resource for all to enjoy. Thank you!

Case 580K brakes binding

Tinkerer

Senior Member
Joined
May 21, 2009
Messages
9,382
Location
The shore of the illinois river USA
It can be cleaned and a new seal kit put in it.
R&R&R is thoroughly covered in the service manual.
If you don't have the service manual, send me your email address in private message (PM) and I can send you a link to download it.
 

alrman

Senior Member
Joined
Jun 20, 2009
Messages
3,308
Location
QLD Australia
Occupation
Diesel Fitter;Small Business Owner;Cleaner
1) I've always removed the brown cowling around the control levers to pull that floor plate - why exactly, I can't say atm as I don't have a 580SK in front of me, but there must be a reason...:rolleyes:

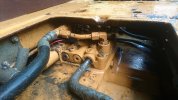
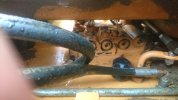
2) Your plan to lift the machine off the transaxle using machine hydraulics - on a 580SK, after you drain the oil to remove the oil suction hoses - you should NOT run the engine as the charge pump will be running without oil supply & you will destroy it.
If this is the only option you have to remove the transaxle - you will need to also pull the torque converter housing (inc charge pump) before running the engine.... creating a little more work.

3) Pulling the wheels is no big deal. They are always the first part I remove. Using the stabilizers, positon the machine so the wheels are just touching the ground, remove all the wheel nuts, & simply walk/rock the wheels toward you & away from the mudguards - no lifting is required, but balancing skills, yes!

4) These machines have no brake slave cylinders, I'm guessing you meant master cylinders. The worst part of this design is that they are retained with bolts & nuts - so it's easiest with two people - one in the cab & the other under the hood. I have had to do this many times on my own, things you learn how to do as neccessity....

** TIP - a pair of extra long reach long nose pliers are useful in removing the pushrod clevis split pins. ;)

The master cylinders do not pit & rust, as do most automotive types using brake fluid - another advantage of using mineral oil - they usually have a fair bit of black sludge in them (dirt) & clean up well.
The one that is tight, if it is because of swollen seals - it may have some scoring inside it - which may hone out - something you will decide when you get to see it.
 

mhobson

Well-Known Member
Joined
Sep 29, 2016
Messages
53
Location
Vienne, France
Hello again, A bit delayed as everything needs to be done at the same time, I have my car with a parasitic drain losing better than 9 amps. Anyway, I have finally managed to remove the rear floor panel, and the bleed screws are not immediately obvious, I had hoped that they would be directly below the rear floor panel, but we know about hope springing eternal. I attach a couple of photos for any comments you may have, thanks again, Michael
 

Attachments

  • Rearfloor1.JPG
    Rearfloor1.JPG
    719.4 KB · Views: 5
  • Rearfloor2.JPG
    Rearfloor2.JPG
    590.6 KB · Views: 5

mhobson

Well-Known Member
Joined
Sep 29, 2016
Messages
53
Location
Vienne, France
I note that the photograph showing the brake bleeders is of a 580SK, mine is just a 580K, it looks a bit different.
 

mhobson

Well-Known Member
Joined
Sep 29, 2016
Messages
53
Location
Vienne, France
My last post seems to have disappeared. Is there an easy way of removing the master cylinders? The outside looks reasonably easy, I may take the windscreen washer tank out to give me a bit more working space but the inside looks awkward, poor access, levers and big springs. Can the cylinders be removed just from the outside, I see that there is a hex at the base of the threaded connection rod, can they just unscrew?
 

mhobson

Well-Known Member
Joined
Sep 29, 2016
Messages
53
Location
Vienne, France
In respect to my last post, removing and replacing the slave cylinders was a nightmare. I removed all of the dash to view all of the internal connections, removed the springs and split pins in the cotter pins, but then problems! The cotter pins would not budge, totally seized in place, even after applying heat. Had to slowly unwind the threaded rods using the double flats with a 7mm open ended spanner. Took ages, to make it easier fitting the new cylinders I put double nuts locked together on the shaft so when refitting it was easier to locate with the female thread on the inside connection. I had to reduce the width of the nuts to get the same clear length of thread as appeared on the old cylinders. I should say that I ran compressed air through the brake pipes and on the right system a lot of black gungy lumps came out, maybe remains of perished cylinder seals. Having an issue getting the brake cylinder header tank back in place, then hopefully tomorrow fill and bleed the system and see it the binding brakes has reduced, cross fingers!
 

alrman

Senior Member
Joined
Jun 20, 2009
Messages
3,308
Location
QLD Australia
Occupation
Diesel Fitter;Small Business Owner;Cleaner
Oh, that sounds like you're having a great time! :rolleyes:

Re those clevis pins, sometimes when they are tight like that, you need to place some vice grips on them to stop the clevis spreading while trying to drive out the stuck pin. ;)

Be sure when you re-install those linkages, you adjust them so that there is pedal free travel, or you WILL be binding those brakes for sure!
 

mhobson

Well-Known Member
Joined
Sep 29, 2016
Messages
53
Location
Vienne, France
Both master cylinders have been changed. Well, good news and bad news. I drove the digger for about 50 metres, brakes were not binding, but pedal spongy and only working close to the floor. I looked at the fluid reservoir, bone dry. I did not check it before I started the short drive as it had been bled after the new master cylinders had been fitted and expected it to be full, so I don't know whether or not it had drained while other parts of the digger were being replaced. The other thing which I don't understand is that the seat will not pivot. Before I would just twist in the seat and around it would go, now solid, I cannot find a control which makes it work.
 

mhobson

Well-Known Member
Joined
Sep 29, 2016
Messages
53
Location
Vienne, France
I thank the members for their valuable assistance again. All up and running now, I would have had no chance without that assistance. Brakes working fine, sharp and no binding, hard pedal when pressed, couple of things to note, the cylinders I bought were not genuine (I only have pensioner funds) I suspect they were chinese, they were OK with one issue, the threads into the tops of the cylinders where the hydraulic hoses connect were about one and a half threads too deep so the conical seats did not connect, which, after quite a lot of leakage took a bit of bodging, but are OK now. One other thing, the front bucket operating levers spring as normal from front to back, but do not spring back to centre from side to side, I seem to have an extra orange heavy spring left over, can someone advise where it is missing from.
 
Top