• Thank you for visiting HeavyEquipmentForums.com! Our objective is to provide industry professionals a place to gather to exchange questions, answers and ideas. We welcome you to register using the "Register" icon at the top of the page. We'd appreciate any help you can offer in spreading the word of our new site. The more members that join, the bigger resource for all to enjoy. Thank you!

Somebody has to do it, and nobody else volunteers: the fixing saga

skyking1

Senior Member
Joined
Nov 3, 2020
Messages
7,662
Location
washington
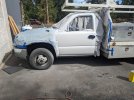
The cylinder is back in and awaiting my snap ring pliers, and a hydraulic oil change. It does not have a drain so I will extract the oil.
 

skyking1

Senior Member
Joined
Nov 3, 2020
Messages
7,662
Location
washington
It's that time of year. Work is slow and the temperature is right for out door painting.
We got the work truck door painted.
PXL_20230716_165619674.jpg

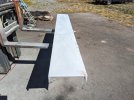
I pulled off the channel bumper and shot a conversion coated it, and then put 3 batches of bondo on it. I had no idea how deformed big channel is from the forming process.

PXL_20230718_173955962.jpg

did a heavy coat of primer and some glazing in the pinholes, and then fogged on some black.

PXL_20230719_182310605.jpg

I'll keep poking along with finish jobs.
 

skyking1

Senior Member
Joined
Nov 3, 2020
Messages
7,662
Location
washington
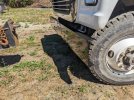
I need to hang mudflaps behind off the edge of the hood/fender, but I think I will dangle one down to keep the mud off that bumper too.
I have to router out the headlight trim to fit and then the hood job will finally be complete.
 

skyking1

Senior Member
Joined
Nov 3, 2020
Messages
7,662
Location
washington
the last couple of days I used bondo on the bed frame and pipe rack on the 1 ton. It was heavily rusted and pitted in places and I cleaned it up and painted it in 2020, but it was starting to look shabby and I was not busy so I decided to fix it up a bit.
This is what I had in 2020
IMG-20200729-184931.jpg


After cleaup and POR15 and painting

IMG-20200813-192238.jpg


It looked OK but the pitting and dimples, and the rough spots where the powder coating had failed were hard to keep clean and the rust was coming back.
I cut down the back 3 pipe rack uprights tonight so I can get it under my carport. That will be huge for keeping it nice after this touch-up. The tools and boxes will stay dry now, I can open things up after a really wet day and blow a fan at the open tool boxes.
 

skyking1

Senior Member
Joined
Nov 3, 2020
Messages
7,662
Location
washington
I started the 250 hour service on the 120 yesterday, and realized I had the wrong oil filter. I got the right one today and then I remembered how bad the filter change is on the 120. I spent hours in the rain failing to get it started.
Whoever signed off on that installation should get flogged!
I got it done and have a few inspections to do on it, and a full greasing.
Some of the old rollers are leaking and I'll give them a spin and see if they need replaced ASAP.
 

skyking1

Senior Member
Joined
Nov 3, 2020
Messages
7,662
Location
washington
All the rollers are free moving, so I will not just toss parts at it.
All this talk of tank sumping and man was I behind on that task. I had a little chainsaw file that I stabbed in there to break up the plug of gunk, and I got clean fuel out of it after a while. I'll change out the primary filter in between deluges next week.
 

skyking1

Senior Member
Joined
Nov 3, 2020
Messages
7,662
Location
washington
The 50 year old shop building at work is on a short timeline. It is coming down in March.
That said, they still use it and the flat roof is leaking all over on the West end. That's over the breaker panels so the boss was a bit concerned about that.
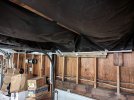
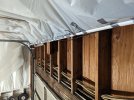
There is no easy fix, so I made an internal roof and gutter system with a ripped piece of 2" pipe, strips of plywood, and 6 mil plastic. I had to do this over two door mechanisms so clearance was a premium.
I catch the rain and put it right back out through the wall.
PXL_20231214_144325839.jpg
That one was pretty easy it is over a mezzanine and an easy reach.
This latest one was over the shop bay and 16' up so I used the scissor lift.

PXL_20231214_144345354.jpg

I finished it up and caught about 10 different rain buckets worth of leaks. I put some 1/2" PVC pipe in the bellies to guide the water down. I cross drilled them at the upstream end, and then I lanced all the boils in the old insulation and released the water. That was gratifying.
 

IceHole

Senior Member
Joined
Aug 14, 2023
Messages
654
Location
AK
I hate working on regular fork trucks just slightly less then the devil spawn telehandlers :mad:

Hyster still has a thing for the chevys too.
Parts are a guessing game at best.

My Mitsushitty f/l has an engine that mostly crosses to some 70s Dodge Colt.
The rest... good luck. I guess it's time to scrap then.
 

IceHole

Senior Member
Joined
Aug 14, 2023
Messages
654
Location
AK
I leave mine in the nearest cart corral. I don't appreciate random carts that may roll into the side of my vehicle during a breeze and cause damage. I expect others to voluntarily do the same. Its never their vehicle that gets damaged:mad:
People that don't or just huck the cart on the curb or ditch are usually lazy POSes. I figure they are so lazy they chew with their mouth hanging open and don't wipe after pooping too.
 

skyking1

Senior Member
Joined
Nov 3, 2020
Messages
7,662
Location
washington
Duct tape!!! The answer to every problem!!
it does the trick there. :)
What I do is hold the plastic taut to the bottom of the pipe and trim it with a razor knife, using the pipe as a cutting board. Then I tuck the plastic into the pipe channel and adjust the plastic tension with the duct tape to create gutter lines. The tape never sees water if it is done right. The trick is reaching around the whole works and backing up the plastic so you get a good bond to it with the tape.
Other places I use it to make some pleats in the plastic to shape the flow lines.
The 1/2 PVC is the ticket though for that. The black plastic has been up for months and just needed a little tweaking and extending to pick up the ever-increasing leakages.
 

skyking1

Senior Member
Joined
Nov 3, 2020
Messages
7,662
Location
washington
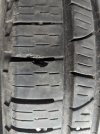
The day after Christmas DW came home with a warning light and low right rear tire. It had a piece of really small cappilary tubing, like a large gauge hypodermic needle through it. That provided a handy channel to let the air out :mad:
My tire shop guy fixed it for free.
Yesterday we are driving past les Schwab and Firestone, and DW feels something. Shortly after the light comes on, same tire.
We stop and I check it, and decide to run for home. This was probably an error.
It is flat when she parks it.
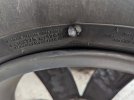
I throw some air in it and find this big jagged leak with removed rubber.
PXL_20240116_002712148-1.jpg

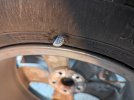
Then I look at the sidewall, Yikes!!
PXL_20240116_002700362.jpg

What the heck is this? I grab some cutters and try to drag it though, but now I know, this is a newfangled steel wheel weight, and the clip is stopping me.

PXL_20240116_003848277.jpg

I don't think this is a coincidence. Apparently they toss off rather easily and those tire shops are seeding the highway there. I think we will avoid that route!
The front tire stood it up for the back tire to stab itself, much like pokey gravel on @Spud_Monkey long gravel road. It may have bounced off the bottom of the car too.
The tire shop has a used 235/50R19 which is a wonder. I will check that out this AM and if it is OK that will get me another season. The tread is like that all around and good for one more.
 

skyking1

Senior Member
Joined
Nov 3, 2020
Messages
7,662
Location
washington
That tire was a $50 bill out the door mt and balanced. Can't beat that with a stick.
Today's problem: Leaky 3406

I thought it was the drain valve, then my brain engaged and I am pretty sure the rear main is leaking. I poked around in there and it seems to be the case.
I hosed down the area with cleaner and tomorrow I will take it to the truck shop.
@Truck Shop , is the rear main job about 10 hours?
 

Truck Shop

Senior Member
Joined
Dec 7, 2015
Messages
16,989
Location
WWW.
@Truck Shop , is the rear main job about 10 hours?
If it's a rear main--pto, gear box, clutch, flywheel. It could be done in 10. But need to check
where rear structure mates to engine block for seepage. There is a steel shim gasket that
seals that area. Original had no steel shim gasket material only. But both types will leak.
If it is, figure 18 plus with rear motor mounts and oil pan removal along with intermediate
stress plate and oil pump. I never try to do it without replacing pan gaskets, have tendency
to leak. Starter has to be removed also.
 

skyking1

Senior Member
Joined
Nov 3, 2020
Messages
7,662
Location
washington
Thanks Mike. The only alternative I can see is to put a basket in there and put oil control mats in there and change them. You can see where I go in rainy weather, you can follow the drips and sheen. One day somebody is going pitch a fit on a jobsite and I don't really blame them.
 

OzDozer

Senior Member
Joined
Jan 18, 2007
Messages
2,207
Location
Perth, Western Australia.
Occupation
Semi-Retired ..
I bought a Clark forklift once, and it had so many oil leaks, that someone had bolted a permanently fixed catch pan with a 1/2" lip, to the whole underside of the forklift, between the wheels!

This catch pan even had a drain plug welded to it, so you could drain the catch pan when it looked like it was going to overflow! :D

I only paid $300 for it, so that gives you some idea of its overall condition!

Oh, did I mention that they'd wrecked the steering box, too? That came with the forklift! - in a cardboard box, in about 20 pieces!! LOL
 

Truck Shop

Senior Member
Joined
Dec 7, 2015
Messages
16,989
Location
WWW.
Thanks Mike. The only alternative I can see is to put a basket in there and put oil control mats in there and change them. You can see where I go in rainy weather, you can follow the drips and sheen. One day somebody is going pitch a fit on a jobsite and I don't really blame them.
The reason I say check the rear structure/engine bell is the age of yours and probably original.
Rear main seals don't normally leak real bad just create a constant mess. When the structure
starts leaking normally is on the right side 2/3's the way up from oil pan rail/bottom of block.
There is a wide spot there/surface area between mounting bolts is a little wide so that's where
the leaks usually start. Very common to see on B series where some one has wiped/smeared
silicon sealer along bell and block trying to slow the leak.
*
Look at it this way if it does have a leak there----just be glad it doesn't have a retarder. $$$$$.
 

skyking1

Senior Member
Joined
Nov 3, 2020
Messages
7,662
Location
washington
the engine is canted right, and the right corner of the back of that structure is wet and not crusty. The seal can drip there I suppose it is well below the crank line, but does this point at that rear structure/engine block gasket?
 
Top