I've ordered all the parts from my local dealer (NC Machinery) I could think of I'd need. There will be lots of stuff missing pieces invariably, but I've ordered most of it. $17,800. Only parts they had locally were basically the filters and ignition switch and keys, so I took them home in a box. The rest should arrive by Wednesday.
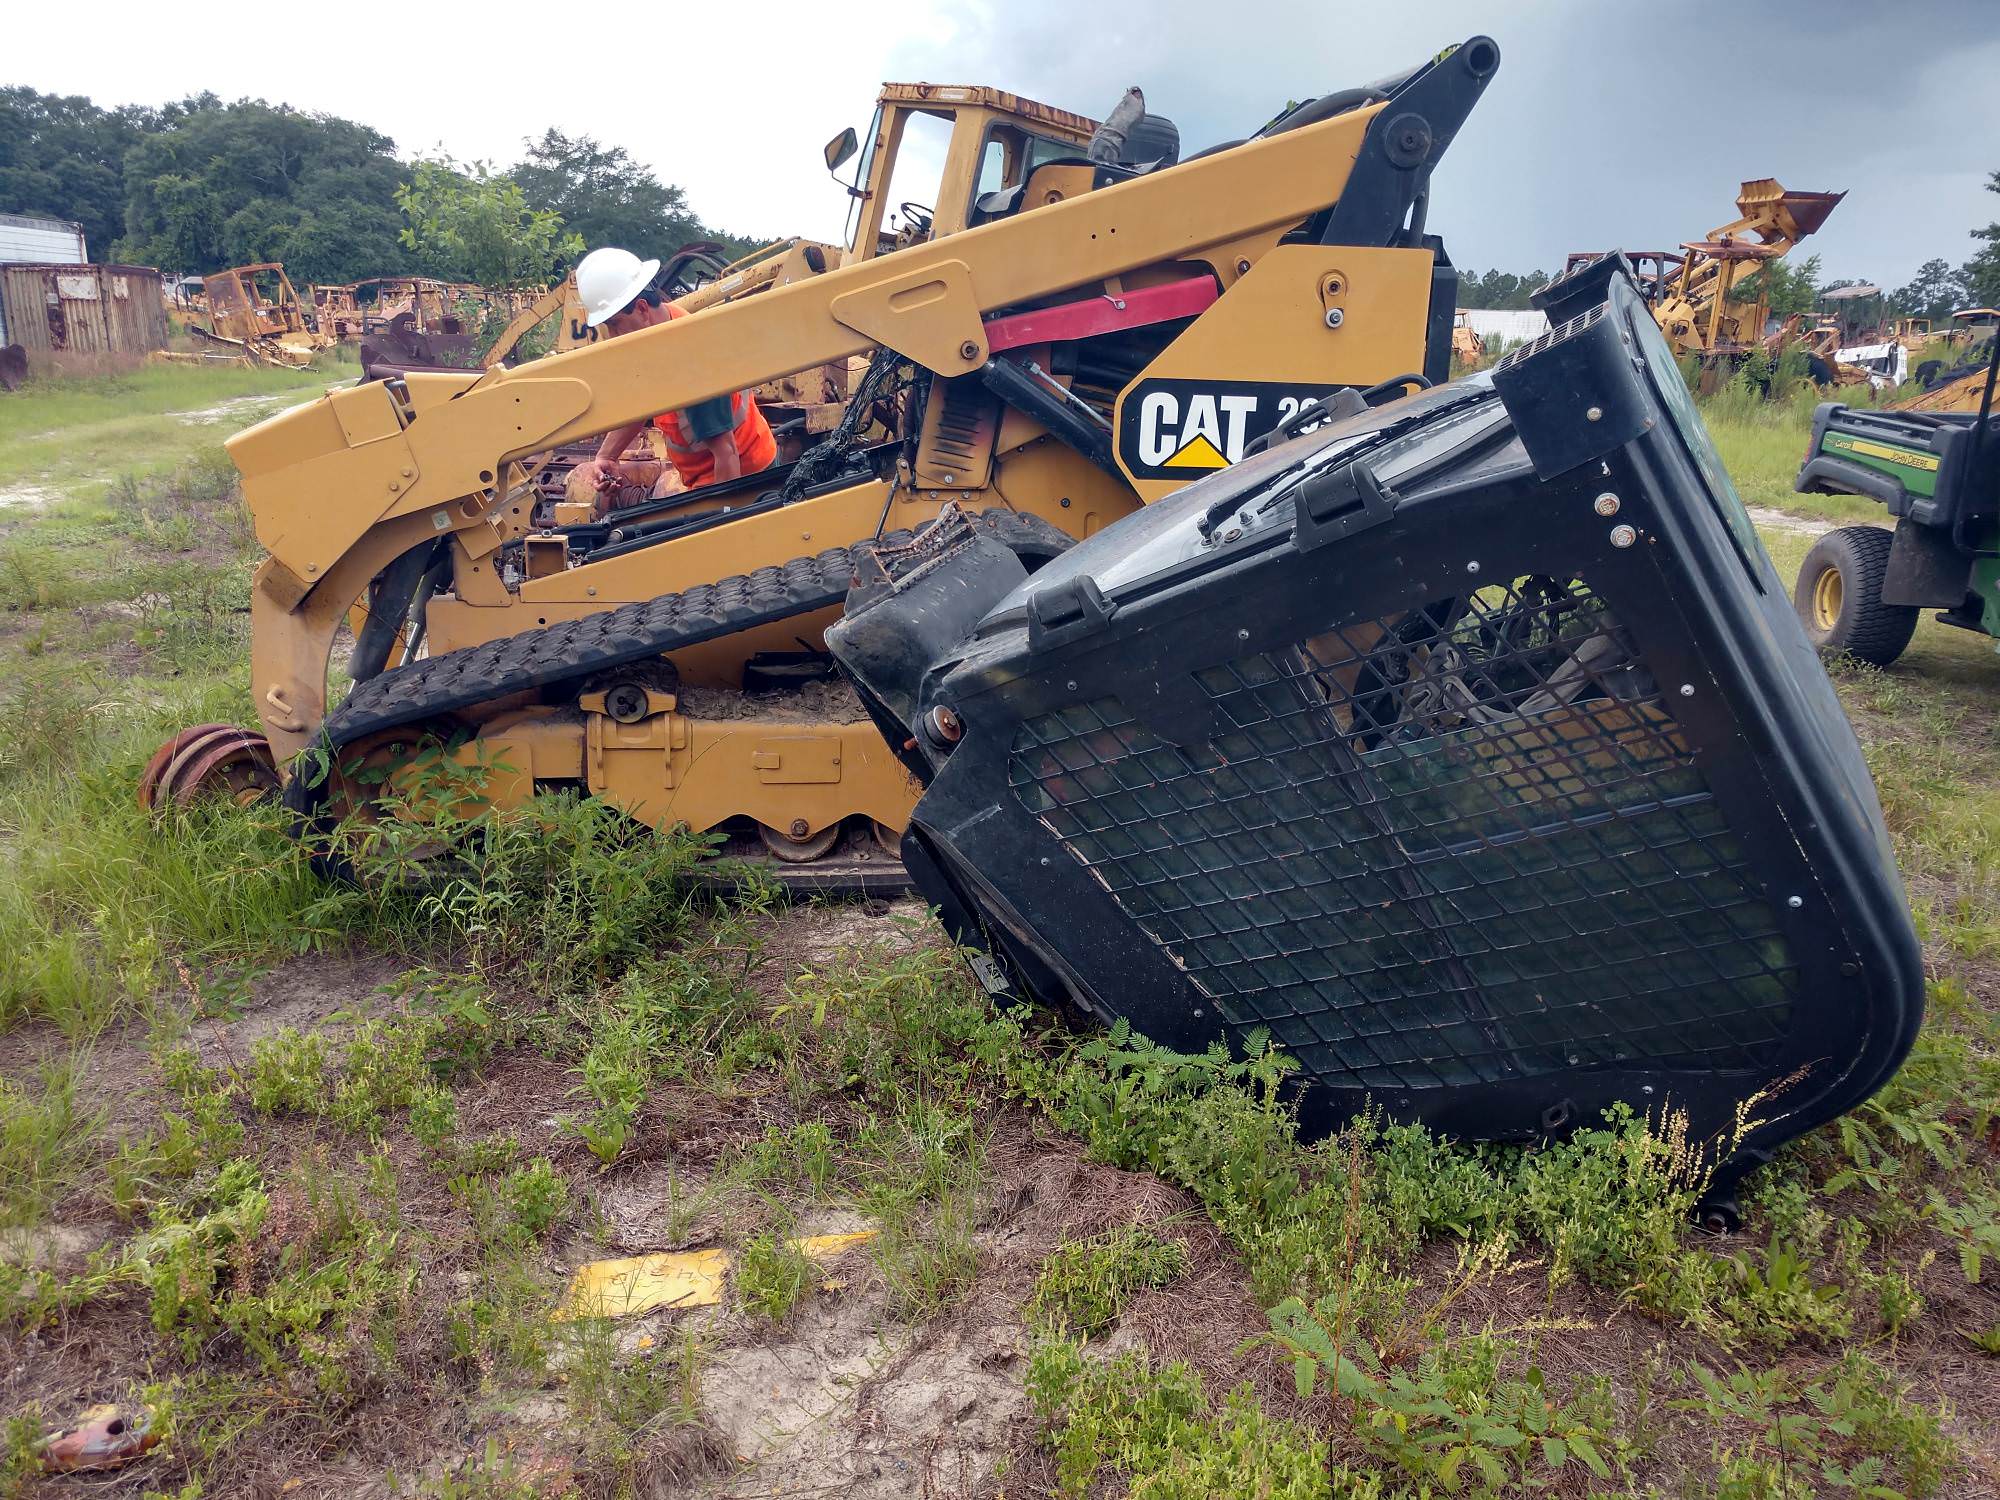
First thing I did was took off the other track. (The machine is already on blocks) The front two idler wheels (left in pic) are on a retractable frame, which is spring-loaded and can be pushed out by injecting grease into a fitting inside that access door. I knew I can loosen the grease fitting and it would let grease out so I can retract the pusher frame, but how to pull the pusher frame back? I finally settled on this:
I put cribbing below the track so it wouldn't sag (just two 2x4's), and jacked it up. You can see here the pusher frame is all the way retracted into the undercarriage. So I pulled out a 2x4 from the bottom and removed the jack.
Well the track weighs 560 pounds so it wasn't easy to wrestle off of the front idler, but I managed to do it. And as I'd removed a 2x4 from cribbing it sagged below the bogie wheels so it was disengaged. At this point I hooked a chain to the front of the track and tried to pull it away with the car, but the whole machine shuddered like it could fall. So I tugged and struggled and and farted it off that back idler, then used a crowbar to get it off the final drive sprocket. THEN I pulled it away with the car to a corner of the property out of the way. Whew.
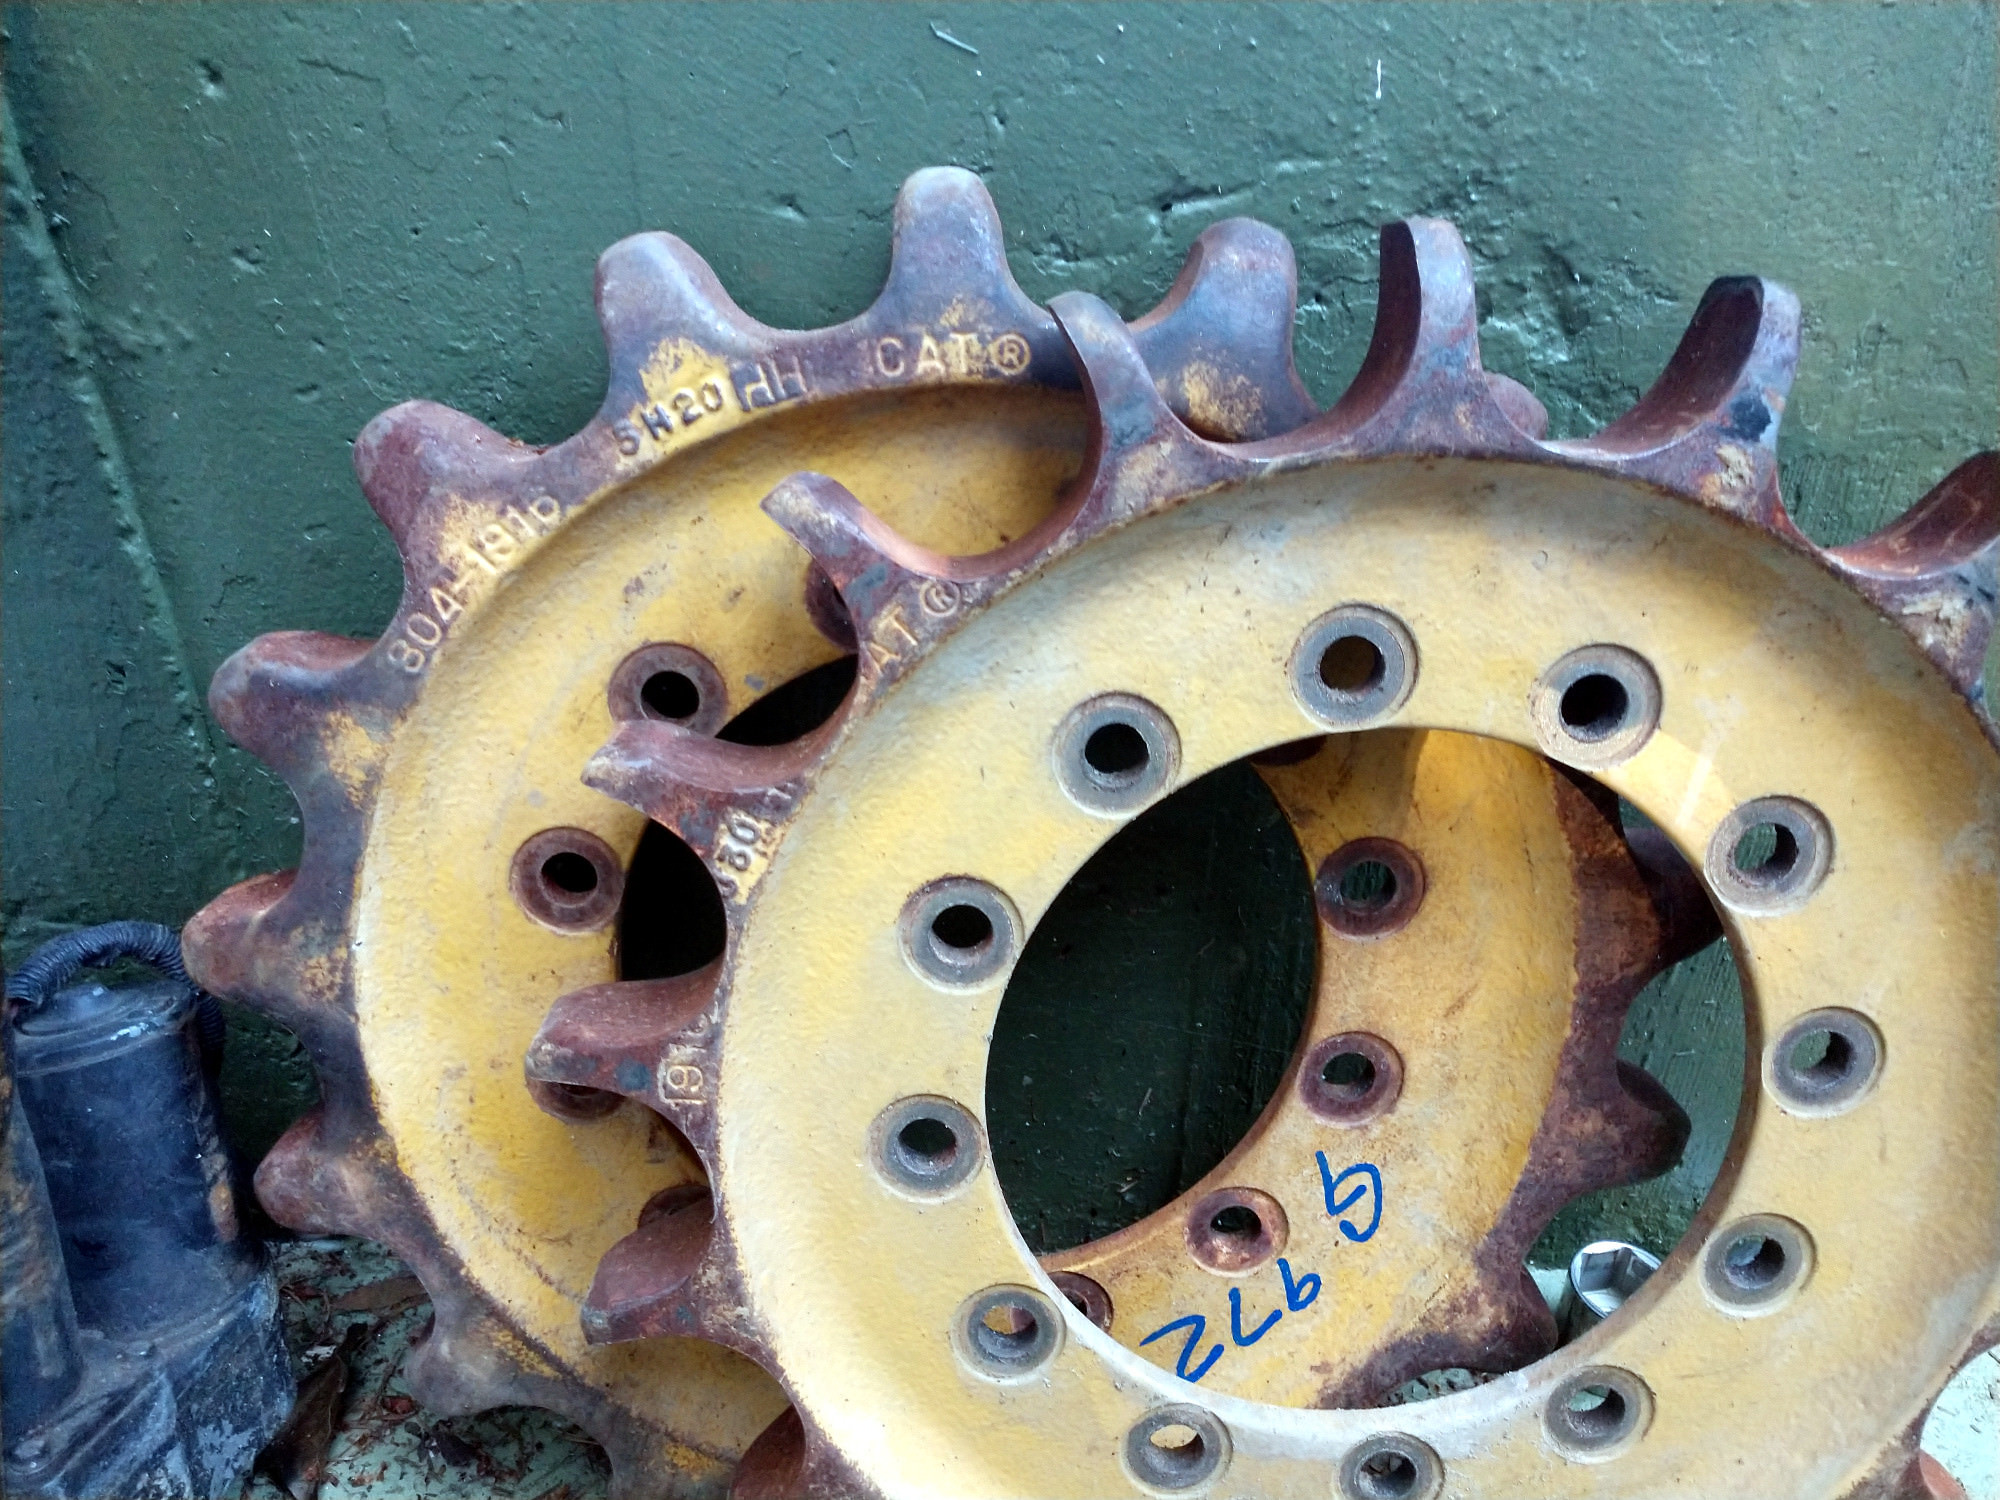
But, something was wrong with the sprocket. It didn't seem symmetrical. Then it hit me, this is the 'worn sprocket' I'd read about but didn't believe. Here it is in front, compared with the junkyard sprocket I'd bought for the other side:
Wow. The wear is real. The worn sprocket was on the port side. So I had to order another sprocket from the Minnesota junkyard and it's on its way.
As of yesterday:
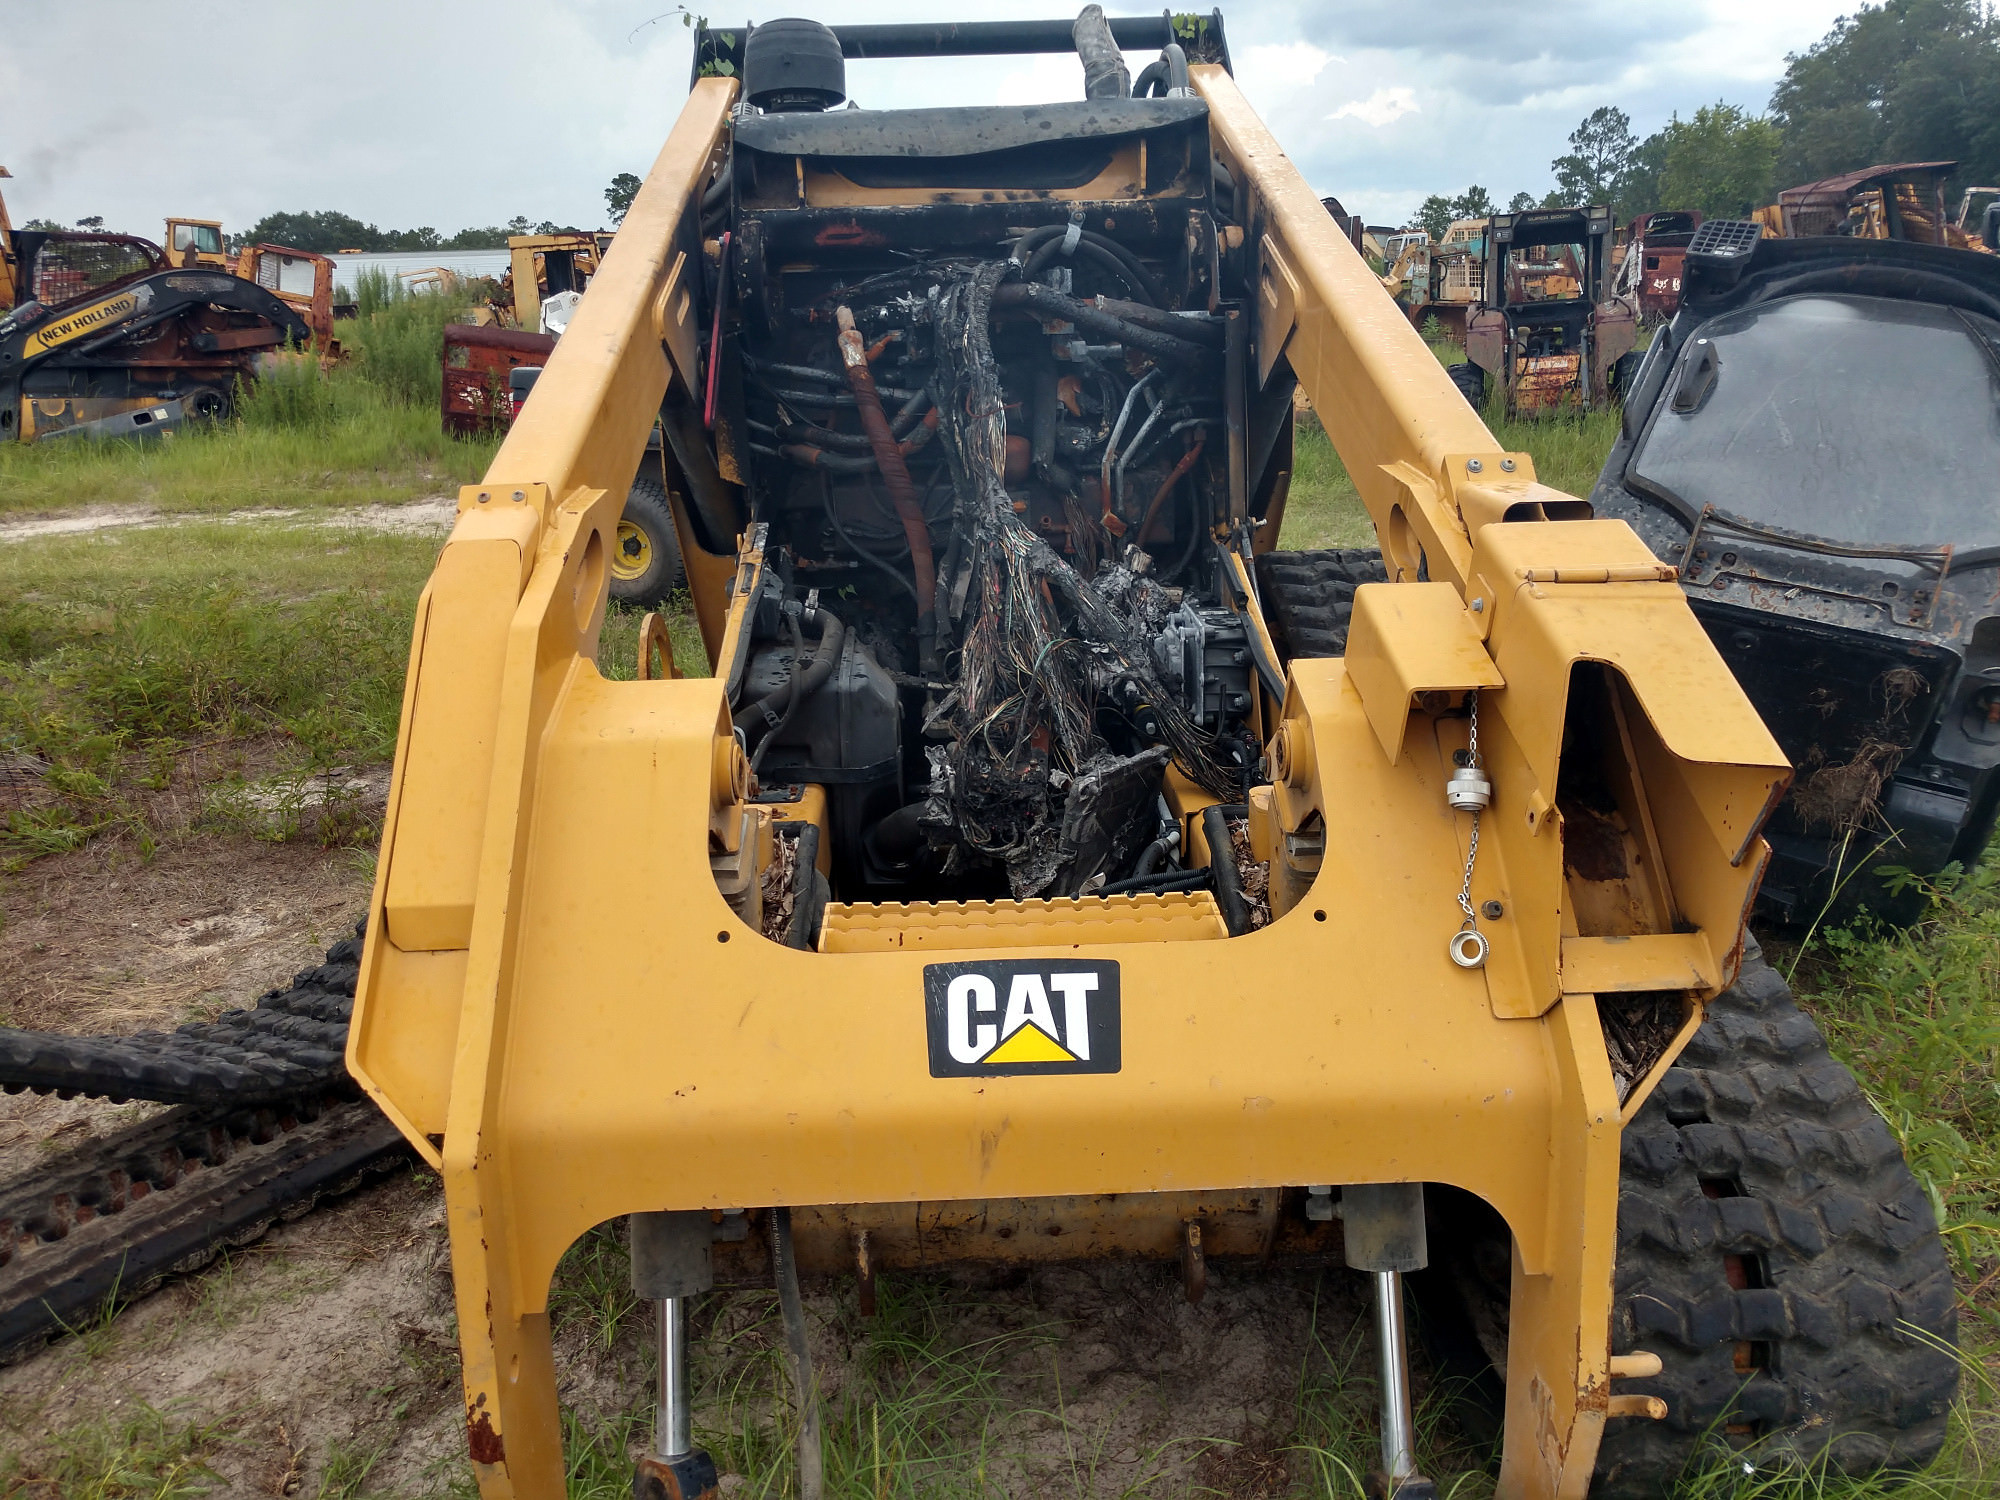
(More progress today) This was all full of the nastiest wet smelly mud and oil you can imagine. The side frame tubes were packed with it too. I still have to remove all those hoses, etc.
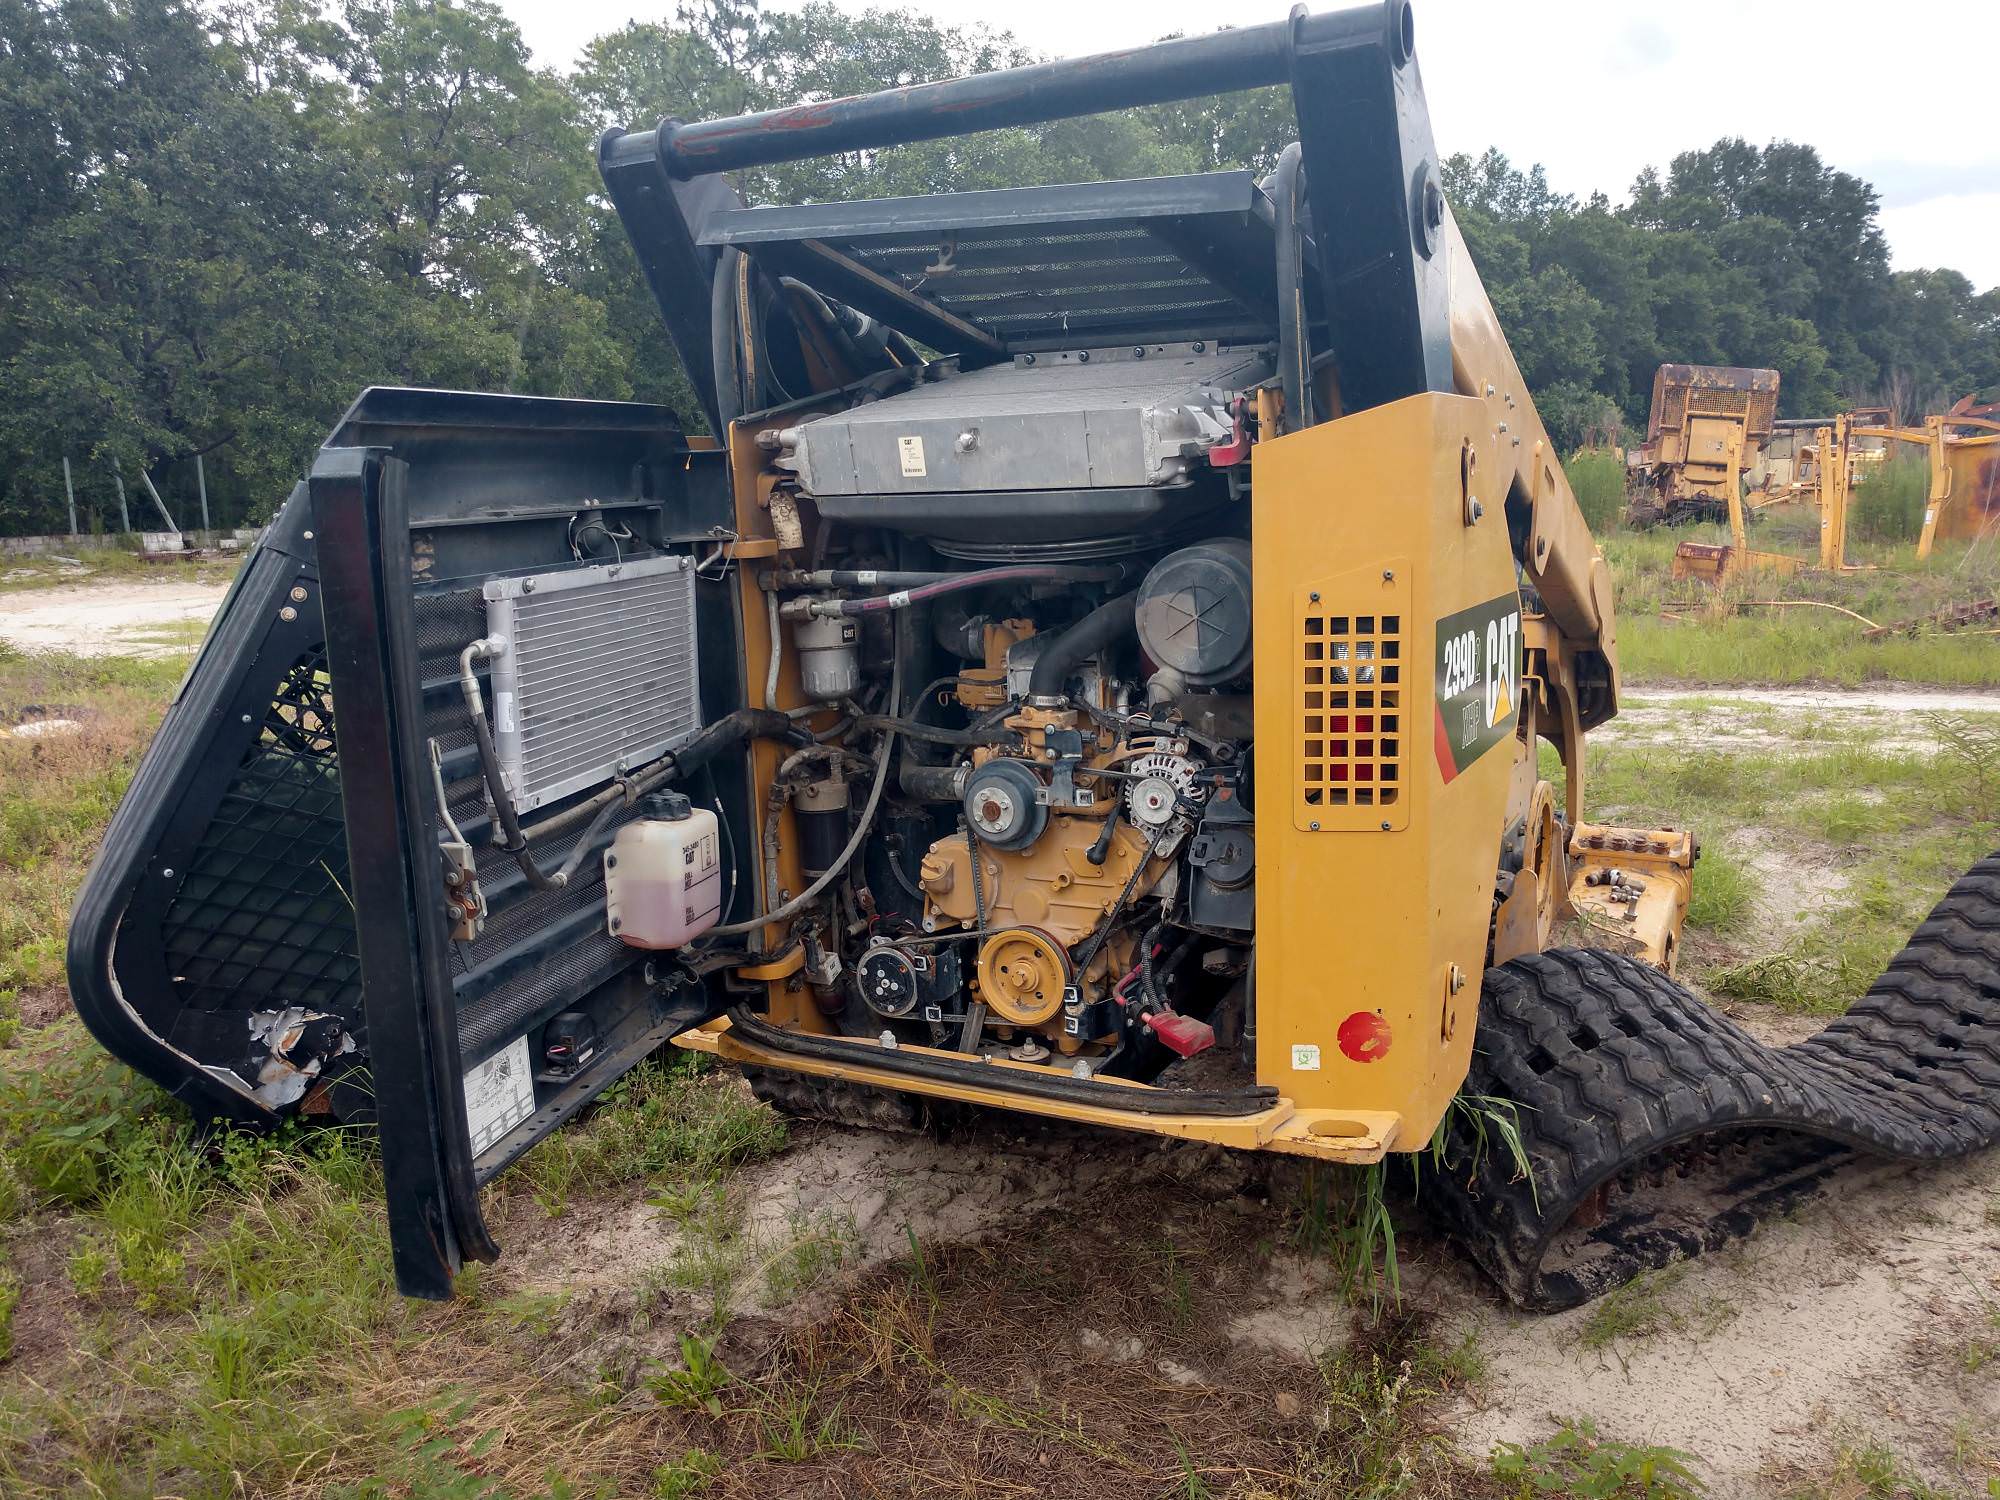
Front and center you see the hydraulic pump, which is connected directly to the engine. It's actually three pumps, all on the engine spline shaft. The front pump is "Charge". When I removed that large hose from the hydraulic oil tank it gushed out gallons of water from the pump... that can't be good for the internal pump parts. Since the hydraulic tank's top had melted, rainwater has collected over the time it sat in the junkyard.
The Charge pump is a gear pump that keeps all the lines charged with pressure (so no delay in activation), and provides pressure for the controls and (hydraulic) radiator fan. A gear pump simply uses two gears to roll oil out, and is what almost all cars use to move oil.
The middle pump is for Implements (lift arms, implement tilt, implement power), and given that this is an XHP machine, it is a 'swash plate' type of piston pump. Now, this is a truly weird pump design which I've only recently come to understand. There are only a few ways of converting rotation, to reciprocating action, and the car engine crankshaft is one way. Swash-plate is another.
As the loader's engine turns it rotates the center pump shaft. The right swash plate does not rotate (in the case of a pump) and the left one does. The left one has the pump pistons attached to it, so as the center shaft rotates so does the left swash plate and pistons, and that plate in turn pumps the pistons to move oil. But the right swash plate's angle is
controlled -- the more angle, the further the pistons move and the more oil it moves. The less angle the less oil is pumped, so this is a true 'variable displacement pump'; unusual to have a native VDP. This loader is designed to pump far less when not being used (only Control is run when idle), to save fuel.
Cat's pumps have nine pistons, and they are much beefier than this illustration. The back pump (next to the engine) is the Motive pump. It's also a swash-plate pump, and when the swash plate is at the greatest angle you get the most power to the two final drive motors on the tracks. Also Cat synthesizes 'two speed' by reducing the swash plate angle, and cutting off oil to half of the pistons (so they free-wheel) and the remaining pistons fill with oil faster -- less torque, high speed.
Something else weird: The two final drive motors on the tracks are also swash-plate design, not a turbine as I'd thought. The high-pressure oil comes in from the pump and drives the pistons, which drive the swash-plate and the motor's rotation! Cool. I can't believe it actually works, but it does.
Swash-plates are used on all helicopters to link the controls to the rotor, for setting blade angle and rotor attitude and pitch, although I've never understood them. (Still don't)
It is recommended to use SAE 10 oil in the hydraulic system but I was planning to use SAE 20 because of better lubricating qualities. (Cars usually get 10W-40) But now I see the value of using the thinner SAE 10 oil -- faster response, even in cold weather.
Three types of hydraulic oil: mineral (traditional dino-oil), synthetic, and bio-oil (from soybeans). I wanted to use bio-oil but was doubtful of its ability to hold up under the stress and heat in this case. But Cat's own docs say that bio-oils can last 6,000 hours like synthetic, instead of 2,000 hours like mineral. (Thanks to guys here for helping me out with this) Synthetic and bio-oil cost about three times mineral. So my plan is to first use mineral oil to run the system, which will flush out all the burn crap, then replace it with bio after changing the filter.
As I remove hoses I cover the ends with duct tape and mark the two connectors with A... B... C... etc, so I have some hope of putting this thing back together right. I'm also putting all fasteners back in the holes they came out of. But my duct tape and sharpie plan is falling apart. Sharpie writing wipes off, even before any power washing, much less sandblasting.
It's amazing that there is no rust on the frame whatsoever. This machine spent its whole life working on the Atlantic coast and had damp stinking mud in every crevice, yet
absolutely no rust. Either the paint (and their process) is very good, or the whole frame is galvanized after welding.
I had to run around this week trying to find open-end wrenches that are big enough for these hose connections. I have a good collection of tools but nothing this large. I finally found all wrench sizes except the biggest -- 42mm (1 11/16"), so I'm just using my big pipe wrench for those. The connections are very tight, but when I overcome its breaking strength, *SNAP* it then unscrews easily.
Well cleaning this up is a filthy nasty job, and I'm not sure if I can get this thing running again. I dreaded going back out there today, but it must be done or else it will annoy me to no end, not to mention I'll have a very expensive liability out there that there's no other way to resolve.
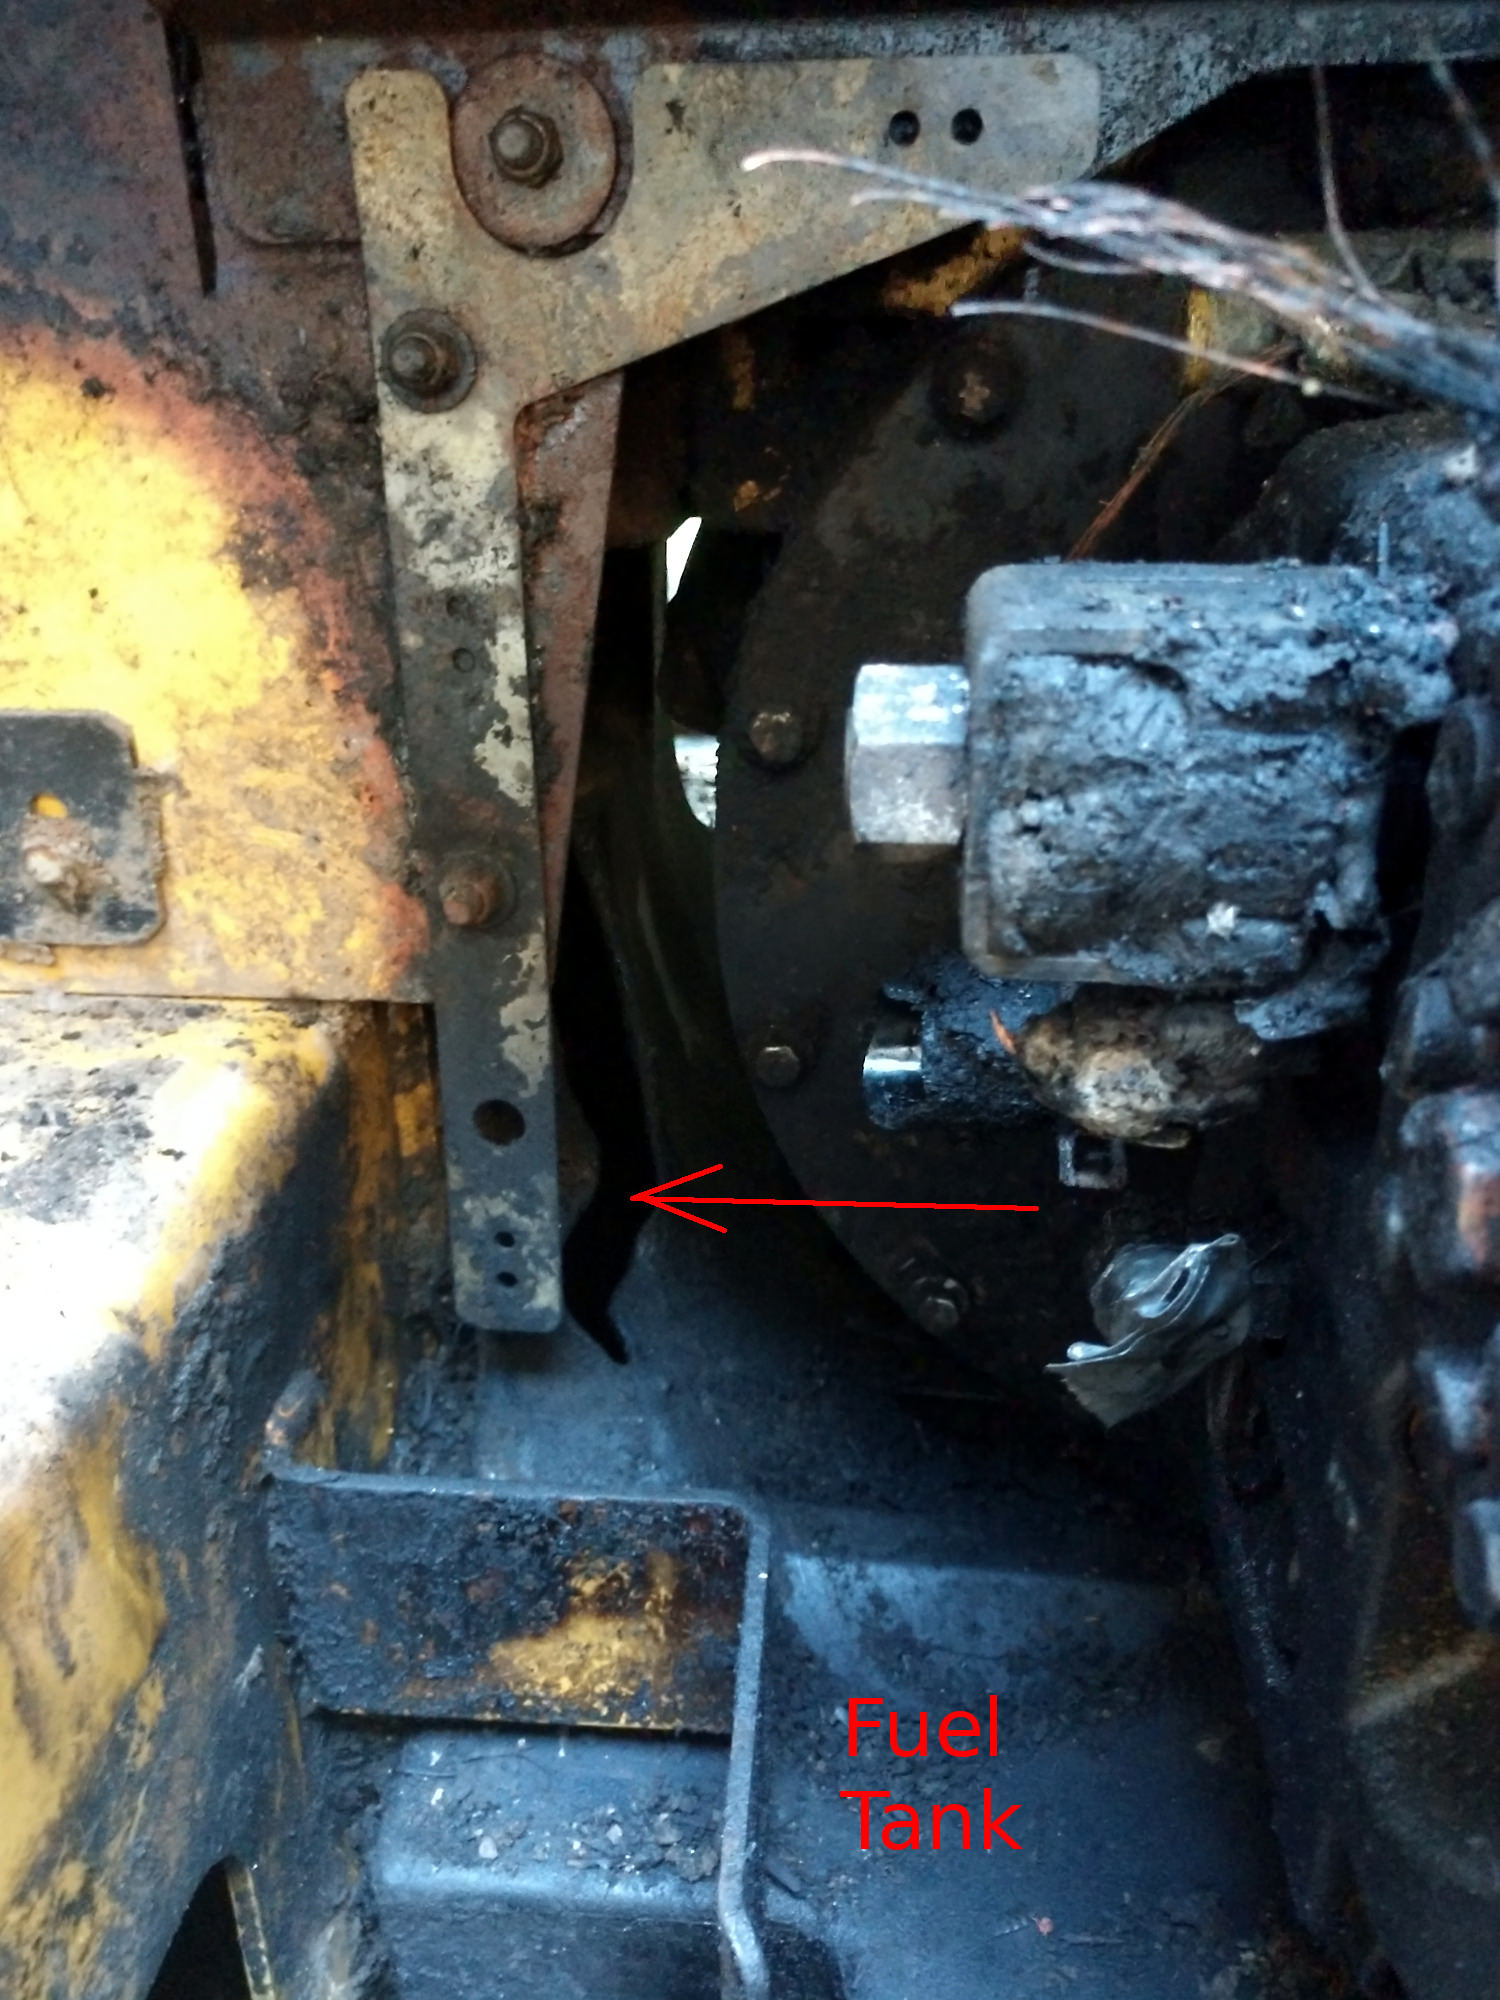
Yesterday as I was digging crap out of the machine near the engine, I got some bad news:
That is a hole in the 32 gallon polyethylene fuel tank. And the fuel tank is under the engine. No way to replace it without pulling the engine. It's a setback, but I assume that I would have had to pull the engine anyway, given the fried wiring harnesses passing through the bulkhead. Probably couldn't replace those without pulling the engine. I'm starting to think that pure engine fires are preferable to cab/bulkhead fires.
I have successfully pulled the implement hoses out of the right arm of the lifting frame. (burned at the bulkhead controller) And I have disconnected the giant auxiliary hoses in the left arm of the lifting frame, although I can't budge them because of one clamp where they exit the lifter arm at the top. It has two bolts inside that are simply impossible to get off. How in the world did they do this at the factory? I had to use a sawzall to saw the clamp in half.
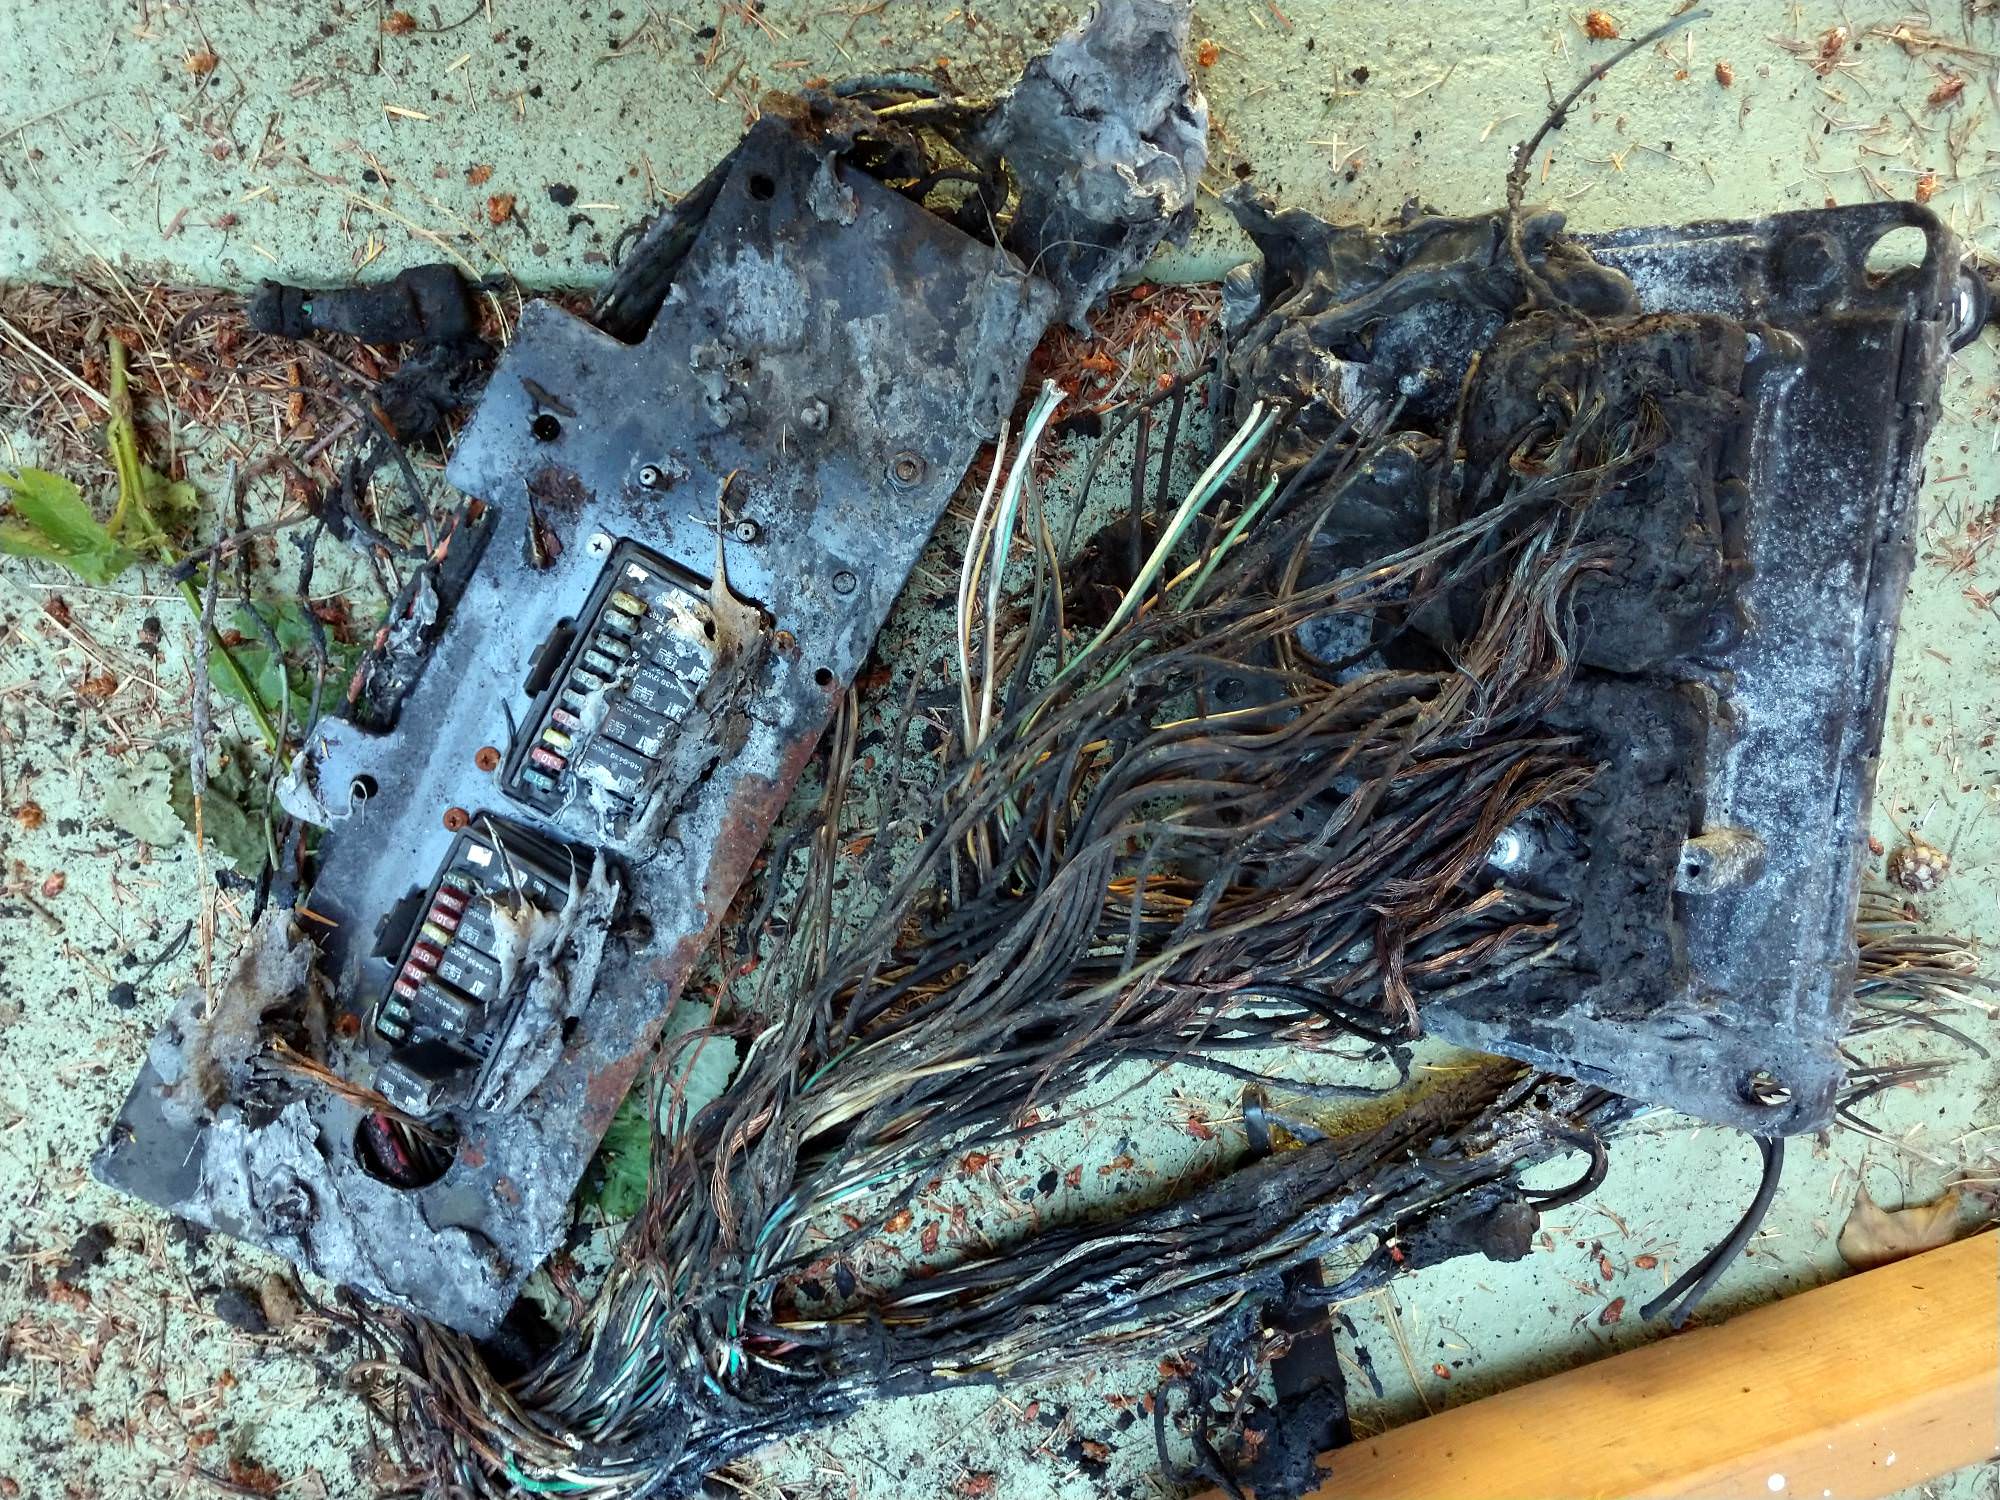
The back of the operator's cab has the fuse panel and Engine Control Module.
Both are on order, with all wiring harnesses. I called the Cat dealer (NC Machinery) to ask how they program the ECM. He said I'd bring the machine in and they'll connect their Cat Electronic Technician software to program. Well it'd cost me $1,200 just to get it in there since it doesn't run. So I thought about it and realized that they must fix machines in the field all the time. And all they need is some hand-held electronics to program my ECM.
So I later asked them again, just assuming a service call, and yes they do service calls. But because my ECM is fried and this is a top-of-the-line machine, they said it could take 4-5 hours to program, at who-knows-what hourly rate. So thought about it some more and asked them if they can just take a dump from a like machine in their rental stock and flash it to mine? Ohh they were reluctant, but it is clearly a solution. Main things needing changed from that are the VIN and hours, and any small differences in options. So maybe that's the path forward with that.
Today I continue teardown and hopefully get to the point of pulling the engine. Hating this pretty badly, but I have asked for it. I wanted the coolest Big Boy Toy and now I'm paying the price. I will pay it.


")