Thank you for sharing that! I ended up getting the mounts replaced. For anyone else wondering if you can do it, here are the steps I took. We have an open canopy 2000 CAT 302.5 with S/N 4AZ01260.
*To start this job, I positioned the boom of the machine over the dozer blade just straight on as if you were trailering the machine.*
1. Remove all outside body panels including the hood.
2. Remove the floot mat, hydraulic foot pedals, and all steel cover plates situated over hydraulic control valve. Also remove entire cover and door that stand vertically below the seat. The cover is u-shaped and fits over the front of this empty space (where your individual fuses are) and around the sides of the seat area a few inches.
3. Remove the bolts holding down the 'operators station'. I did not remove the seat from the lower portion, I just went straight for the bolts that hold that whole console (seat, joystick consoles, etc.) When operators station is free to move, *with help from another person* slide the entire station towards the front/boom side of the machine to give you access to access panel behind the seat. Slide seat forward as much as possible as well.
4. Remove access panel behind seat area.
5. Loosen exhaust clamp connecting downpipe to muffler. I did not remove the downpipe from the manifold because the area was very rusty and with the heat its exposed to I didn't think those bolts would come out.
6. Remove main skid plate underneath the tail end of the machine.
7. Remove exhaust clamp connecting tailpipe assembly to muffler.
8. Remove single bolt mounting tailpipe assembly to engine block.
9. Lay under machine and wiggle tailpipe assembly out and remove it.
10. From inside access panel, remove two large bolts that connect muffler bracket (part of the muffler) to the engine block. These bolts are quite large and with the shape of the muffler being the way it is, they're not easy to get out. I had to use multiple extensions and a swivel to remove them most of the way, and then an open end wrench to get them completely out once space became tighter.
11. Remove muffler from underneath machine.
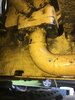
12. Loosen hose clamps and remove 2" (or so) rubber hose running across the engine bay from side to side that connects the air filter can to the air inlet hole on the right side of the engine compartment.
13. Remove the wire fan guard/grille from right side of engine compartment. It's bolted to metal fan shroud and protects from debris/other entering into the fan blades.
14. Remove bolts that secure the 2-3" wide metal fan shroud. The shroud does not need to be removed, this just allows the shroud to move with the motor when it's jacked up to change the mounts.
*The next step will result in nearly all of the hydraulic fluid being drained from the hydraulic tank. This will likely be over 5 gallons, probably 7-9 gallons. Since it's difficult to get a bucket under the location of the steel hydraulic line in the next step, I took two heavy duty 3 mil contractor garbage bags and placed one inside of the other (double bagged them) and then held the mouth of the bag open under the hydraulic line to catch the fluid.*
15. Loosen and remove the four allen head bolts that bolt the low pressure steel hydraulic line to the bottom side of the hydraulic pump. This is just a small section of steel line that turns 90 degrees upward to the hydraulic pump. The horizontal part of this line goes into a short section of rubber hose that's tightened down to the steel with hose clamps. Just loosening the bolts will break the seal of the line and fluid will start to drain out. Allow all of the fluid to drain into the garbage bags.
16. Transfer fluid from garbage bag to 5 gallon buckets or whatever other collection device you wish. I reused the fluid so I just transferred the fluid to clean buckets and allowed the fluid to settle overnight before transferring it back to the tank.
*Note, you probably could just drain the fluid out of the tank as well and avoid having as much fluid come out of the steel line as described in step 15, but it's up to you and that's just not how I did it.*
17. Remove large bolts from the top/center of each engine mount.
18. Remove two bolts on top/sides of each engine mount.
19. At this point, your engine should be free to move in all directions (as I recall - might have missed something). Look all around engine back, underneath, on top, etc. and verify that there's nothing holding the engine in place at this point. If there is, loosen it/remove the interference.
20. Using normal floor jack, position jack underneath engine bay and using a 2x4, wood block, steel, pipe, etc. on top of the jack plate (as an extension) line the extension up with the bottom of the thick steel engine mount brackets and jack up the engine. I jacked up the rear of the engine first (just jacking at one of the mount brackets will lift up the entire rear side of the engine.
21. Remove old engine mounts and replace with new engine mounts. Ensure the mounts are lined up correctly in the center of the mount holes.
22. Lower jack, and move the jack and extension device to the front of the motor (boom side).
23. Jack up the front of the motor and replace old mounts with new ones.
24. Lower engine back down.
25. Insert bolts (3 each, two small bolts on sides of mounts and one large bolt in center) into each engine mount and verify no adjustments need to be made before removing jack from area.
26. Tighten down all engine mount bolts.
27. Perform steps 1-15 in opposite manner to reassembly everything.
28. Once everything is reassembled, refill hydraulic tank with suitable oil. Like I said, I reused the old oil but it wasn't that old and we kept it clean when removing it from machine and transferring it to buckets.
Hope this helps somebody and hopefully I didn't miss anything. This seemed like the least intrusive way to get these mounts replaced short of pulling the entire engine. Worked great for machine, hardly any engine vibration now, the machine runs a lot smoother and the old mounts were clearly shot upon inspection.

")