• Thank you for visiting HeavyEquipmentForums.com! Our objective is to provide industry professionals a place to gather to exchange questions, answers and ideas. We welcome you to register using the "Register" icon at the top of the page. We'd appreciate any help you can offer in spreading the word of our new site. The more members that join, the bigger resource for all to enjoy. Thank you!

Replacing Bobcat loader control valve seals

Xxmike248xx

New Member
Joined
Jan 10, 2018
Messages
1
Location
Skippack
Occasionally a member finds their Bobcat loader control valve making an oily mess of the bottom of their machine because it needs new seals for the control valve spools. Some simply take the machine to their local Bobcat dealer for repair, but others consider doing the repair themselves and save a little money, to which they ask if this is a job that they can do. If one has a bit of mechanical skills, it certainly is a project that can be done. Here are the basic steps to accomplish the repair. This was done on a 773 G Series loader. There may be differences on older models, such as a 743, but the differences have little affect on the procedures for doing this repair. On the wheel loaders, it's a little easier because you can remove a side plate to access the front of the control valve easy. On the track machines, such as T190, the track frame gets in the way of working through side panel so all parts of the repair are done on the topside with cab raised. Worst part about doing this repair is the stuff in the way of accessing the control valve components, but that just comes with working on a Bobcat, pretty much everything you need to work on with these machines has something in your way. Sorry about a few fuzzy pics, I had to get in a few awkward positions to take pics and it was hard to hold camera still while flash working. So, lets re-seal a control valve. If your working on a wheel machine, take the time to clean out the debris and gunk from underneath the drive motor on the control valve side by reaching through the removed side plate hole between wheels. At the rear of that compartment is a hole in the belly of the machine. Place an oil drain pan under the hole to contain the oil that will drain from control valve while making repairs. Track machines have the hole in a different location.

View attachment 64728

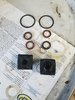
Hi do you know if i can buy a seal kit online with the four seals and two o rings. Thats mike
 

BC873G

Well-Known Member
Joined
Apr 14, 2017
Messages
49
Location
Kansas
Mike, you can find them online but haven't seen a kit. Search for "Bobcat Main Valve Spool Rod Seal" and you should be able to find some. One thing to note, at least on my machine, my spool rods were stamped on the ends with a number. At least originally, there were different seals for different numbers stamped on the rods. I have an 873. You could also determine which seal according to the color of the end cap on my machine. My end caps were green. YMMV I got mine from the dealer. As I recall there wasn't much of a difference in price for those versus online and you will get help picking out the right ones.
 

Bobcat Crazy

Senior Member
Joined
Dec 28, 2017
Messages
372
Location
Raleigh, NC
Occupation
Environmental Services Director
Willie59, Thanks for the help that is a great tutorial! And hopefully I can find the extra parts in the belly of the beast in the morning, it was after dark when they flew loose so I gave up soon after. And when I find them they will be well oiled, because the belly was very wet before I realized that I had a leak. But the good part is that the engine now runs great and I ran it enough to know the all of the hydraulics work great as well. That was a load off of my mind. :rolleyes:

As you may know when you purchase a machine with a locked engine you don't know if the other things that they tell you are correct or not. But once I get these little issues workout it looks as if it will be a great all around machine.

Thanks Again for your help! :)
B-Crazy
 

jbobcat99

New Member
Joined
Apr 22, 2018
Messages
2
Location
clinton, ms
hello to all. discovered this site a couple years ago. finally decided to respond to a great site and a great post. i just this repair on a 773 F. because of the great information shared here the repair went really well. after taking off the side panels and 3 days of pressure washing the insides made working on the machine joy. the only hiccup i ran into is when i took off the hose from the life bypass valve to gain a little room to the front retainer bolts, i must have kinked it the wrong way and now it leaks. heading to the hydraulic shop to have one made as Bobcat says 4-7 days if they order it. cant wait that long, got yardwork piling up. thanks again for a great post. i look forward to more enjoyable reading. will try to attach a photo, guess which one was the guilty culprit?
Jbobcat99
 

Attachments

  • seal pics.jpg
    seal pics.jpg
    1.8 MB · Views: 25

crewchief888

Senior Member
Joined
Feb 1, 2012
Messages
1,788
Location
NWI
it's only the 1st 1000 or so spool seal you replace that are the hard ones.... it gets easier after that


:eek:
 

willie59

Administrator
Joined
Dec 21, 2008
Messages
13,396
Location
Knoxville TN
Occupation
Service Manager
I recall the first one I did many years ago was a 743, didn't have a clue what I was getting into and pulled the detent section apart, learned a lesson to never forget that day
 

jbobcat99

New Member
Joined
Apr 22, 2018
Messages
2
Location
clinton, ms
i hear you. i must have read and reread this thread like a hundred times to make sure i got every step right. i know i fell asleep in the manual one night trying to get everything straight in my head. thanks again guys for all the helpful information.
keep up the good work.
 

crewchief888

Senior Member
Joined
Feb 1, 2012
Messages
1,788
Location
NWI
I recall the first one I did many years ago was a 743, didn't have a clue what I was getting into and pulled the detent section apart, learned a lesson to never forget that day

i remember the 1st time i did that....
man that was a L O N G time ago...
never made that mistake again. it was kinda embarrasssing to have to go back to the shop and tell the service manager what happened... funny thing is he was standing at the parts counter with the balls and springs in his hand.... he said he knew by the look on my face what i'd done :D


:eek:
 

willie59

Administrator
Joined
Dec 21, 2008
Messages
13,396
Location
Knoxville TN
Occupation
Service Manager
i remember the 1st time i did that....
man that was a L O N G time ago...
never made that mistake again. it was kinda embarrasssing to have to go back to the shop and tell the service manager what happened... funny thing is he was standing at the parts counter with the balls and springs in his hand.... he said he knew by the look on my face what i'd done :D


:eek:

I wager pretty much any wrench bender that has worked on a Bobcat has done it, it's like a built in mouse trap and we all trip it at least once. :D
 

gtluke

New Member
Joined
Nov 21, 2018
Messages
2
Location
Montville, NJ
wow is this thread a life saver.
got my seals out last night after a complete rupture, man I hope the seals fix it. not sure what else it would be, looked like oil just POURING out of the rear caps.

A few notes from my 763

Don't bother with the side covers, they do nothing. But they do drain out a few gallons of fluid if your leak was as bad as mine.

Remove the "firewall" or whatever you call the sheetmetal under the seat that the hand controls go through. It comes out way easier than you would think. 6 bolts, easy as pie. The linkage for the controls is just bolted together, just remove the 4 nuts/bolts and unplug 2 connectors and the entire panel lifts out with all the mechanisms still attached.

Remove the bracket that holds whatever that hydraulic thing is in front of what we're working on. 2 vertical bolts, 2 horizontal ones from the side.
Now you can access the front dust cap bolts with a hex drive on a regular ratchet set with a 6" extension. Hell you can get a air ratchet in there if you want.

The rear cap bolts come out pretty easy. One thing I noticed that could totally be avoided is why are we taking off the dust cap from the rod at all on the lower one with the detent disaster? Can't we just leave the cap and C-clip in place and pull it out like that ensuring that the detent mechanism stays put? I took mine apart as the instructions show, but looking at it it seems safer and easier just to leave the cap on and pull the cap with the rod.

I think there's still 5 gallons of oil in my belly pan. Going to have to figure out how to drain that but I'm at 30lbs of cat litter on the floor in my garage already. What a F'ng mess. Thankfully I was able to get the bobcat out of the mud where it happened and inside, nice stream of hydraulic fluid all over my driveway though.
 

gtluke

New Member
Joined
Nov 21, 2018
Messages
2
Location
Montville, NJ
Update, this did end up working. Got my bobcat going again leak free on Monday. I can't thank you guys enough for this writeup.
now... does someone have a template for making a new seat pan? Mine is basically a wet paper towel. Who's idea was it to insulate the back of it so it holds water forever?
 

Deertay

New Member
Joined
Sep 24, 2018
Messages
3
Location
Central VA
I think there's still 5 gallons of oil in my belly pan. Going to have to figure out how to drain that but I'm at 30lbs of cat litter on the floor in my garage already. What a F'ng mess. Thankfully I was able to get the bobcat out of the mud where it happened and inside, nice stream of hydraulic fluid all over my driveway though.

gtluke, check out Willie's suck bucket thread. Hmmm, won't let me link it... search heavy equipment suck bucket. Mine was as simple as buying a 1/2 acrylic tube, pulling the main cap off an old hydraulic fluid lid, drilling a 1/2" hole to put the tubing through, and attaching the shop vac where the main cap was to provide suction. Bonus points if your bucket has a clear strip to see the level, because the whole point is to keep your shopvac from getting slimed. That and a drip pan under the hole in the back and no kitty litter needed.
 
Joined
Aug 17, 2019
Messages
12
Location
waverly hall ga
Willy, a lil history here. Bought a machine from water works atlanta that had very few hours but sat for 12 yrs because of a dead battery and flat tire. Alot of seals dry rotted so ive done wheel bearings and seals and all the cylinder seals. I tried doing control valve seals but kept getting leaks so i took the machine to a place locally called united rental equipment. I told them besides the control valve leaking that one side of the aux hydraulics had stopped working.

500 bucks and a week they said machine was ready and replaced all 4 spool seals again, so i picked it up so i took it to a time sensitive job and found it still leaking. 5 five gallon buckets in 2 weeks. I called united back when i lifted the cab and discovered the leak and all the aux solenoids werent connected at all PLUS THE ENTIRE AUX VALVE WAS LAYING IN BOTTOM OF MACHINE. I asked the mechanic what it was, he said aux valve but denied removing it. Had no idea how it got into belly of tractor. anyway, after that mess i tinkered with orings till i got it sealed and no leaks until last week when fluid started pouring from lower front corner of the control valve. Its the lower valve with detent in rear. When i pulled the lower valve out the rear, there were no seals in front of the control block, none period.
I slid in the valve from the rear and when in the control body i slid a green seal in front of body over the valve. Not sure if it went in backwards but after putting everything back together the machine still leaks profusely. The stream of oil is a dime size stream not just a drip. Any ideas what im doing wrong here. The green seal fits exactly inside the black rubber boot. machine is 753g with 700 hrs.
 
Joined
Aug 17, 2019
Messages
12
Location
waverly hall ga
Anyone can answer not just willy, i just mentioned him as this was his thread. Id love to get this machine up and running because im broke and need to get back to earning. Im in the middle of filling a swimming pool job now. Btw, full sun, no shade, 100° sun baked days in Georgia so only have evenings or early mornings to make this machine go again. Please help me, im frustrated and desperate and NOT going back to united rentals. Also if anyone can help real time i can send my cell number if youde call me when im at the machine?
 

willie59

Administrator
Joined
Dec 21, 2008
Messages
13,396
Location
Knoxville TN
Occupation
Service Manager
Well, with the troubles you're having, not certain I can address then for sure as it could be other problems giving you grief, such as a crack in the casting. As for the spool seals, they're typically a U cup seal, Bobcat hasn't used Quad seals for some years, but there were some out there with Quad seals. And even with the U cup seals Bobcat was bad about using different sizes depending on the valve they used for a particular machine and not even the machine serial number will tell them which one is the correct one. But assuming it uses U cup seals, and assuming you have the correct ones, with U cup seals the lip of the seals always turn inward to the valve on both ends of the spools. The flat surface of the seal should be outward, U portion of the seal should be inward.
 
Top