• Thank you for visiting HeavyEquipmentForums.com! Our objective is to provide industry professionals a place to gather to exchange questions, answers and ideas. We welcome you to register using the "Register" icon at the top of the page. We'd appreciate any help you can offer in spreading the word of our new site. The more members that join, the bigger resource for all to enjoy. Thank you!

New-to-Me 1845C -- questions, etc

kshansen

Senior Member
Joined
Mar 11, 2012
Messages
11,165
Location
Central New York, USA
Occupation
Retired Mechanic in Stone Quarry
Good news is that the PO did leave the Operator and Safety manuals in the little plastic tote. I didn't even realize it was there to be honest, ha.

Right where I said it "should" be! Even has the mandatory "Safety Manual"! You could be the first person to see those since it left the factory!

Now start reading that owners manual cover to cover, there will be a test on Friday!:D
 

Dmoneyallstar

Well-Known Member
Joined
Jul 13, 2018
Messages
47
Location
Toledo, Ohio
Next on the list is to get the 2 left-side tires replaced. Both have very little tread left and front won't hold air for more than 30min and both on what looks to be original wheels. Right-side has new wheels and 85-90% tread tires.

Also got a pin-hole leak in the neck of the radiator. It will push out a few cc's of fluid when running for about 1hr. I'll braze the pin-hole in the coming days.

Got forks delivered today from Express Steel Inc. Bought them online 9am yesterday morning and they arrived at my place 20min east of Toledo exactly 25-hr later. And that's 'free shipping" even. Plucked the skid off the Estes trailer using the clamp-on forks (for the last time). Tough enough for my needs and priced as low as a lot of used forks with same load rating. Had to un-stick one of the quick-connect pins, but just took some grease and 10sec of torch heat.

The huge material bucket is now on a skid on my trailer. Later this fall the ol' bucket will get turned into a snow-pusher. Picking up a new low profile bucket later this week.


20180724_122323.jpg
 

Dmoneyallstar

Well-Known Member
Joined
Jul 13, 2018
Messages
47
Location
Toledo, Ohio
New left-side wheels and tires are on. It took a 5' breaker bar to loosen some of the lug nuts, but they all came off just fine. While wheels were off I cleaned up and painted the hubs, replaced a grease zerk (it miraculously came out without a fight), and greased both hub zerks. The "Case Yellow" paint from TSC sorta-kinda matches, FYI.
 

sims

Well-Known Member
Joined
Jun 1, 2008
Messages
112
Location
Rutledge, GA
I had some "custom" paint made up at the local big box store. I took in an existing panel they color matched it. The beauty of using a existing panel is that the new paint is already "faded" and you can do touch ups without having it look patchy. Good Luck
SimS
 

Dmoneyallstar

Well-Known Member
Joined
Jul 13, 2018
Messages
47
Location
Toledo, Ohio
Good idea! This was all hub painting, so no one will ever really see it either.

The tops of the hubs were pretty ugly, likely from moisture accumulating & sitting. Prob peeled off a good 1/16" of metal in a couple spots!

Question: on the primary fuel filter there is a black and red wire. Red wire has a connector that goes to nothing. What's it for? TYIA.
 

sims

Well-Known Member
Joined
Jun 1, 2008
Messages
112
Location
Rutledge, GA
The PO probably used a filter with a builtin water sensor. Mine just has a thumb screw drain. No alarm light for water either.

SimS
 

Dmoneyallstar

Well-Known Member
Joined
Jul 13, 2018
Messages
47
Location
Toledo, Ohio
Actually, I was wrong. The filter the wires appear to lead to is the hydraulic filter. Looking at engine bay from rear, filter at upper right with a 1" hydraulic line. Ideas?

Besides the manual, are there any better (clearer) instructions for changing the fuel filters out, bleeding air out, etc?
 

jacobd

Well-Known Member
Joined
Apr 2, 2017
Messages
147
Location
North carolina
IIRC one of the wires goes to the hydraulic filter restriction sensor (should have a small ring terminal on it), and the other one goes to the backup alarm (which is probably long gone by now).
Assuming you have a CAV injection pump just unscrew the filters, screw the new ones on (pre-fill them if you want), crack the bleed screws loose on the pump and manually operate the lift pump until you have a solid stream from both bleeders. Those CAV pumps won't hit a lick if they have any air in them so you do have to be thorough.
 

phil314

Senior Member
Joined
Dec 28, 2014
Messages
358
Location
Otsego, Mn
Occupation
Instigator of Choas
If you try the manual lever on the lift pump and it doesn't seem like it's doing anything. Bump the engine 1/2 a rotation or with the key and starter. Sometimes they stop at the top of the lobe that operates the lift pump.

Ask me how long it took me to figure this out the first time.
 

Dmoneyallstar

Well-Known Member
Joined
Jul 13, 2018
Messages
47
Location
Toledo, Ohio
Been a while, but that's a good thing!

Wondering if anyone has replaced or upgraded the foot pedal on their 1845c's aux hydraulics?

First off, I'm just glad the control valve works and moves! But the pedal motion is pretty clunky and clumsy. The pedal is in single-shear with a bushing and I imagine the rigid mount's hole is worn. I had to put some washers for space so the pedal would clear the ledge right below it. This just kinda' multiplies the clumsiness of the pedal. I've replaced the rod and clevis since it appeared the original had been hillbilly-welded back together. I've also replaced the aux hyd quick-connect fittings (so they'll actually fit my attachments).

Has anyone...
- Replaced the foot pedal with different type/design?
- Swapped valve for an electric solenoid type?
- Anything off-the-shelf?

Thanks!

-Dan
 

Jeepwalker

Senior Member
Joined
Aug 12, 2011
Messages
284
Location
WI
Dan,
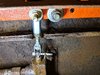
I agree about the foot pedal action. Terrible design. I plan on upgrading mine too. At the very least either drill out the holes and install a larger (shouldered) bolt, or weld/redrill ...to tighten up.

As a side note, have you checked and drained/re-filled your planetary drive motors under the seat? If not, I would recommend that. If they should happen to seize up, that would be the definition of a bad day. Also good to go around with an oil can and lube up every point on the hand control linkages. Don't forget to grease the zerks behind the wheels (which you've probably done), and the hidden zerk at the u-joint.

The HTO is an anti-foam additive. Foam is compressible so the additive helps avoid it. Probably not a big issue with the way a hobby farm guy uses their loader. Glad it's working out well for you.
 

Dmoneyallstar

Well-Known Member
Joined
Jul 13, 2018
Messages
47
Location
Toledo, Ohio
EDITED:
My machine is later-model and doesn't have the planetary drives. "Next" on my list is the chain case oil change and chain-play check/adjust/replace.

I'll post some pics of my pedal once it's done and working. Big snow coming this weekend (so they say) and I'd like to be able to run my power-angle plow.
 
Last edited:

Dmoneyallstar

Well-Known Member
Joined
Jul 13, 2018
Messages
47
Location
Toledo, Ohio
This is the pedal type I've got (attached).

Components #5 & #6 are what I need, and no way I'd spend $110 on them thru Coleman. I got them for $21 shipped from summit racing (part #s attached). Will be 3/8 clevis, 3/8 RH rod end, and 12" piece of 3/8-24 rod plus a couple of jam nuts.

The #12 bushing is also worn out and I may just order one unless I find an alternative. $16.25 on Coleman's site, but cheaper elsewhere. Found something very similar on Amazon and cheap enough to gamble & try (Bunting Bearings EF060812 Flanged Bearings, 3pk for $4.64).

I mean really...isn't the aux hyd valve no different than a 4-way 3-position open sprung center log splitter valve? You can find these for like ~$100 and then just remove the knob/lever, plus maybe make a mount plate for it. Hmmmm....
 

Attachments

  • pedal_assy_1845c.JPG
    pedal_assy_1845c.JPG
    35.7 KB · Views: 16
  • pedal_parts_list_price.JPG
    pedal_parts_list_price.JPG
    57.4 KB · Views: 14
  • summit_part_nos.JPG
    summit_part_nos.JPG
    39.5 KB · Views: 14
Last edited:

phil314

Senior Member
Joined
Dec 28, 2014
Messages
358
Location
Otsego, Mn
Occupation
Instigator of Choas
I'll post some pics of my pedal once it's done and working. Big snow coming this weekend (so they say) and I'd like to be able to run my power-angle plow.

I find this interesting. I've used mine for a lot of snow plowing and never had an issue with the aux pedals. I've always thought they worked well for angling the plow. No problems feathering the angle just a little when needed.

Slop in the linkage could be a problem. Hopefully with the new parts it will work better.
 

Dmoneyallstar

Well-Known Member
Joined
Jul 13, 2018
Messages
47
Location
Toledo, Ohio
Slop in the linkage could be a problem. Hopefully with the new parts it will work better.

I guarantee it's the slop. Like I said, I couldn't even get the left-side to actuate the valve (valve pin down or in) before the pedal would hit the frame under it. Your rig might be in better shape than this one, too. ;)
 

Dmoneyallstar

Well-Known Member
Joined
Jul 13, 2018
Messages
47
Location
Toledo, Ohio
FYI -- that Summit Racing clevis is not right. It's huuuuuuge. Going to just make a clevis with some steel and a 3/8-24 bolt. =)
 

sims

Well-Known Member
Joined
Jun 1, 2008
Messages
112
Location
Rutledge, GA
Have you tried McMaster Carr? I went there for all my linkage rehab parts. Rod ball ends, pins,etc
SimS
 

Dmoneyallstar

Well-Known Member
Joined
Jul 13, 2018
Messages
47
Location
Toledo, Ohio
Didn't find a clevis fast enough& pin, so I made a new.one on my cncp plasma and bent it. With new hardware as well, I got rid of about 90% of the pedal's free play. The last 10% is due to the holes in the stay being a little large from wear. Operates smooth and it actually operates. This ol' rig is ready for snow plowing. =)
 

Attachments

  • IMG_20190116_235933.jpg
    IMG_20190116_235933.jpg
    4.5 MB · Views: 38
  • IMG_20190117_000022.jpg
    IMG_20190117_000022.jpg
    4.6 MB · Views: 37
Top