• Thank you for visiting HeavyEquipmentForums.com! Our objective is to provide industry professionals a place to gather to exchange questions, answers and ideas. We welcome you to register using the "Register" icon at the top of the page. We'd appreciate any help you can offer in spreading the word of our new site. The more members that join, the bigger resource for all to enjoy. Thank you!

My old Case 530 Roosa Master pump

kshansen

Senior Member
Joined
Mar 11, 2012
Messages
11,165
Location
Central New York, USA
Occupation
Retired Mechanic in Stone Quarry
Stanadyne, {roosa master} went from a Bristol bit to a T45 w/ a support bushing..P#>21178
I highly rec. getting the bushing.
Dam! You guys are making me learn new stuff all the time!
I had to do a Google search on this "Bristol Bit" and 99% of the images that came up were for something you stick in a horses mouth! At least it didn't show some thing for the other end!

Then I finally found a picture that made a bit(pun not intended) more sense!

bristol bit.png

I would have thought that was a spline drive but guess some guy over in Bristol England dessigned it and thought that was a better name!
 

harleyboy1

Member
Joined
Mar 1, 2018
Messages
21
Location
Lake City, Fl.
Dam! You guys are making me learn new stuff all the time!
I had to do a Google search on this "Bristol Bit" and 99% of the images that came up were for something you stick in a horses mouth! At least it didn't show some thing for the other end!

Then I finally found a picture that made a bit(pun not intended) more sense!

View attachment 178445

I would have thought that was a spline drive but guess some guy over in Bristol England dessigned it and thought that was a better name!
It might be the same Guy that wrote the song Bristol Stomp!!!
 

doublewide

Senior Member
Joined
May 31, 2015
Messages
844
Location
MA

rodcap

Active Member
Joined
Dec 10, 2013
Messages
32
Location
Louisiana
Occupation
Retired Ag. & Heavy Eqip. Tech.
Ordered a DB service and repair manual off e-bay to study. Not sure what direction I'm going in yet. My or may not take the plunge. Was reading about a Bristol screwdriver, have a shop full of tools and never heard of that one. I guess, never to old to keep learning.

I'd suggest you take the pump to a InjectionShop for rebuild. If the cam screw splits/breaks while trying to remove it(it can be a tough bugger to remove), you'll have bought yourself more problems. It's not as easy as using the Cam Screw Tool(bristle tool), it's knowing HOW to use the tool. Once the cam screw breaks, you have to saw the pump housing to disassemble it. MO-Money!!!

dGy8L0Hm.jpg
 

thepumpguysc

Senior Member
Joined
Mar 18, 2010
Messages
7,537
Location
Sunny South Carolina
Occupation
Master Inj.Pump rebuilder
Man, you aint kiddin.!!! I've broken my share & it aint fun.. your heart sinks & you say some BAD words when THAT happens..
I've received pumps where the customer "tried" to o/h the pump & broken the screw.. & they "forgot" to tell me.. THATS WHY I tell people> it costs MORE if you disassemble the pump before sending it to me..
What a PITA THAT IS..
I've actually written/warned about it..
1 guy that I was helping {warned him} actually came back to the site & told about breaking his & he had to take it to a machine shop to get it removed.. $$$$
 

thepumpguysc

Senior Member
Joined
Mar 18, 2010
Messages
7,537
Location
Sunny South Carolina
Occupation
Master Inj.Pump rebuilder
Even the top cover screws will break off if your not careful.. & just TRY to drill, tap & helicoil THAT tiny friggin screw..in an aluminum housing..NOT FUN..
I had 1 customer "try" & broke the tap off in the hole.!! & THEN I got the job.. fun, fun, fun..
 

rodcap

Active Member
Joined
Dec 10, 2013
Messages
32
Location
Louisiana
Occupation
Retired Ag. & Heavy Eqip. Tech.
A person 
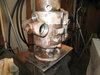
MIGHT get lucky and do the overhaul without a hitch, but I wouldn't suggest it. I've broke my share of cam screws and cover screws, but after a few time, you learn the tricks when disassembling.
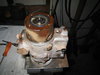
There's more to just rebuilding these pumps. There is the calibration and all that goes along with it.

I had one customer how rebuilt his pump himself(JD 5020 tractor) . He was so proud of himself.
animated-smileys-hands-fingers-31.gif

Once he bled the system and cranked the engine, 
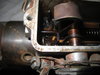
something jammed in the pump
darn.gif
(metering valve - you know what I'm talking about) the engine began to run-away. He put the tractor in-gear, held the brakes and released the clutch, to try to kill the engine. By that time, the engine's tach had pegged and it wasn't a happy ending.
animated-smileys-surprised-027.gif

He had parked his pickup truck in front of the tractor. Guess what happened.
animated-smileys-disgust-045.gif

Yep, besides the hole in the engine block(connecting rod failure) of his tractor, he also had a damaged truck bed.
kicking-dirt.gif


It's a darn good thing no one was standing nearby.

Man, you aint kiddin.!!! I've broken my share & it aint fun.. your heart sinks & you say some BAD words when THAT happens..
I've received pumps where the customer "tried" to o/h the pump & broken the screw.. & they "forgot" to tell me.. THATS WHY I tell people> it costs MORE if you disassemble the pump before sending it to me..
What a PITA THAT IS..
I've actually written/warned about it..
1 guy that I was helping {warned him} actually came back to the site & told about breaking his & he had to take it to a machine shop to get it removed.. $$$$

Even the top cover screws will break off if your not careful.. & just TRY to drill, tap & helicoil THAT tiny friggin screw..in an aluminum housing..NOT FUN..
I had 1 customer "try" & broke the tap off in the hole.!! & THEN I got the job.. fun, fun, fun..
 

thepumpguysc

Senior Member
Joined
Mar 18, 2010
Messages
7,537
Location
Sunny South Carolina
Occupation
Master Inj.Pump rebuilder
..& lets not forget about the folks that "just want the pilot tube replaced".. "it was running great.. just getting fuel in the oil.."
I gotta take it off anyway.. just let me go thru it..
NOPE.. it's runnin great..
OOOOKAY..its your call..
I put it back on..got my money.. & never made it from his driveway to the road.. & the phone is ringin..
This thing is runnin away!!! I cant control the rpm's..!!!
I told ya..
WELL HOW MUCH IS THIS GONNA COST ME??!!
twice as much as the 1st time.. {dumb-azz}
 

harleyboy1

Member
Joined
Mar 1, 2018
Messages
21
Location
Lake City, Fl.
..& lets not forget about the folks that "just want the pilot tube replaced".. "it was running great.. just getting fuel in the oil.."
I gotta take it off anyway.. just let me go thru it..
NOPE.. it's runnin great..
OOOOKAY..its your call..
I put it back on..got my money.. & never made it from his driveway to the road.. & the phone is ringin..
This thing is runnin away!!! I cant control the rpm's..!!!
I told ya..
WELL HOW MUCH IS THIS GONNA COST ME??!!
twice as much as the 1st time.. {dumb-azz}
Good morning,
Do you have any suggestions on where to purchase the support bushing #21178 ? I'm having no luck.
 

thepumpguysc

Senior Member
Joined
Mar 18, 2010
Messages
7,537
Location
Sunny South Carolina
Occupation
Master Inj.Pump rebuilder
I have an extra set that I keep for "accidents".. brand new in the package..
Bit & bushing..
Click on my name & hit> "start a conversation" to discuss it..
 

harleyboy1

Member
Joined
Mar 1, 2018
Messages
21
Location
Lake City, Fl.
Update. Went out to the tractor yesterday afternoon to put some thought into it. Took the top back off the pump as before. Un bolted the throttle rod at the pump leaver. Moved the throttle back and forth, looking closely into the body saw that the metering valve was not moving at all. Just could touch the top of the valve with my finger. It was very slow to move. Sprayed some pb blaster on to it and started moving freely. There is a fine glaze of dried diesel fuel in the top of the body. Looks seemlier to the yellow glaze left from old gas in carburetor boils I've rebuilt in the past. Anyway, reinstalled the top of the bump, turned fuel on, bled top of injectors and she started, runs like it always has. Yes, I'm sure this is just a temporary fix .But I have piece of mind that no metal parts are broken and the pump rebuild cost will be on the lower end.
 

thepumpguysc

Senior Member
Joined
Mar 18, 2010
Messages
7,537
Location
Sunny South Carolina
Occupation
Master Inj.Pump rebuilder
See post #3...
Altho you got it running..Unfortunatly THERE WILL BE metal parts broken..
The black specks that were in the pump aka: flex ring: "WERE" keeping metal parts from banging into each other.. The flex ring is OBVIOUSLY broken & flaking off.. guess what comes next??
First will be FLAKES of metal thru out the fuel system, back to the fuel tank & in the filters..
THEN>> CHUNKS of metal thru the engine block, when the engine speed is no longer controllable from the injection pump being neglected..
Unfortunatly the cost WILL BE ON THE HIGHER SIDE if you continue to run this machine..
BUT HEY> congratulations for getting it running..
I've seen them run like that for months.. AND.. I've seen them run like that for minutes.. until the speed becomes uncontrollable..
& just a "side note".. You only get a couple of chances to shut it down, when the speed starts to increase on its own..
SO DONT keep starting & stopping it, thinking, "it'll get better"..
Good luck.
 

DIYDAVE

Senior Member
Joined
Feb 18, 2007
Messages
2,419
Location
MD
Along with Pumpguy's comments, keep a piece of flat metal, or a big towel rag, that you can stop the air intake with, on the tractor. You will only have seconds, to shut it off, if it runs away...;)
 

harleyboy1

Member
Joined
Mar 1, 2018
Messages
21
Location
Lake City, Fl.
Got motivated Monday morning and said it's time to reseal the DB Roosa Master pump. Took the small timing window plate off and turned the engine till the two lines were lined up. Then checked the flywheel to see where it was at 5 degree BTDC. Removed the injector lines and fuel filters, shut off cable and throttle rod. I did have to make a bend in a 9/16 box in wrench and grind down the end some to reach the pump nuts. Then carefully removed the pump.
Next was to clean the out side of the pump. I've been looking for some small plugs to seal up the ports on the pump to no avail (I call them shipping caps or plugs). I used tape then to seal off the ports. Sprayed it down with carburetor cleaner and small wire brushing. Got her clean and blown off, now ready for disassembly.
I then made a fixture to hold the pump. After making two designs I said the second one will do (as pictured).
I set up a clean table to lay out my parts in order during disassembly. Had enough for today and called it quits.
On Tuesday Started the disassembly and thorough cleaning of each part. Carburetor cleaner cleaned off the 50 year old diesel film. Then blew off with compressed air. This process took a lot of time. Yes, the cam screw was tight but came out with no problem. I used the Syanadyne support bushing and the t-45 bit for the removal and assembly. All the parts was cleaned and laid out on clean table.
Now to get going on assembly. Started changing out all O-rings one by one on small parts. I but a light smear of Vaseline to help with installation. Next started on the pump assembly. I had to really pay full attention how parts go. I wrote down on table the placement of parts. Referred to a manual with pictures during the process. If you put a part in up side down, you are screwed. The only mistake I made was installing the pump assembly into the pump housing. I pushed the pump in to far. The o-ring came out the three set bolt holes "damn". I cut the o-ring and pulled it out the hole the 12 point bolt goes into. The o-ring is a 038 if anyone does this goof. The rest went really smooth. The last thing I did was a coat of paint. Long and stressful day.
Day three went well. Cleaned and put the two cup seals on the pump shaft. lubed them up with Vaseline. Taking care to not flip the cup seal with some finesse. It went on without a problem. Got the rest hooked up and she runs like a top. Thanks to all....
 

Attachments

  • Roosa Master DB 001.JPG
    Roosa Master DB 001.JPG
    1.6 MB · Views: 41
  • Roosa Master DB 002.JPG
    Roosa Master DB 002.JPG
    1.6 MB · Views: 40
  • Roosa Master DB 003.JPG
    Roosa Master DB 003.JPG
    1.5 MB · Views: 40
  • Roosa Master DB 004.JPG
    Roosa Master DB 004.JPG
    1.7 MB · Views: 39
Top