• Thank you for visiting HeavyEquipmentForums.com! Our objective is to provide industry professionals a place to gather to exchange questions, answers and ideas. We welcome you to register using the "Register" icon at the top of the page. We'd appreciate any help you can offer in spreading the word of our new site. The more members that join, the bigger resource for all to enjoy. Thank you!

My CAT 426 Project

edgephoto

Senior Member
Joined
Aug 13, 2019
Messages
733
Location
Stafford, CT
Last fall my wife and I closed on 15+ acres of heavily wooded land. We plan to build a house on this land. Instead of paying someone to remove the underbrush, stumps, rocks and basic site work we purchased a backhoe. Actually I ended up owning the backhoe a month before we closed on the land.

Anyway this backhoe was built 12/02/1987. I found this one about 2 hours from me. The guy was moving and had several pieces of equipment he needed gone. It is 4WD which I wanted. I was willing to spend money on parts and my labor to fix one up a bit. This one fit the bill. Less than half the price of similar machines I saw advertised. It ran, drove around and everything functioned. The boom did not stay up and fell down pretty quick and the brakes are more or less non-functional. There is some rust which seems to be par for the course on these CATs.

I had her moved to my brothers auto repair shop. I have been going once or twice a week and working on her. During the snowy and single digit temps I did not work on her.

So far I have done.

-Rebuilt one of the boom cylinders that was dented causing the boom to fall.
-Replaced the rod on on stabilizer cylinder because it was really chewed up.
-Repacked all the other cylinders.
-Replace nearly all the hydraulic hoses. I have 2 more to get made and installed.
-Replaced all the zerk fittings that I have found so far.
-Replaced negative cable. Old one had a 4 volt drop and she barely cranked.

I am in the process now of replacing a hard metal fuel line from the tank to the water separator. Old on had a pinhole.

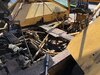
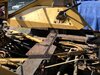
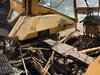
Next up will be to replace the floor, fix the cover and make a new step for the battery box. The current box is sound except for the floor which is really rusty. The step is missing and a new one from CAT is $400. I can weld one from some scrap steel I have hanging around. So some time, a few pieces of steel and some paint and the box will be good for another 30 years.
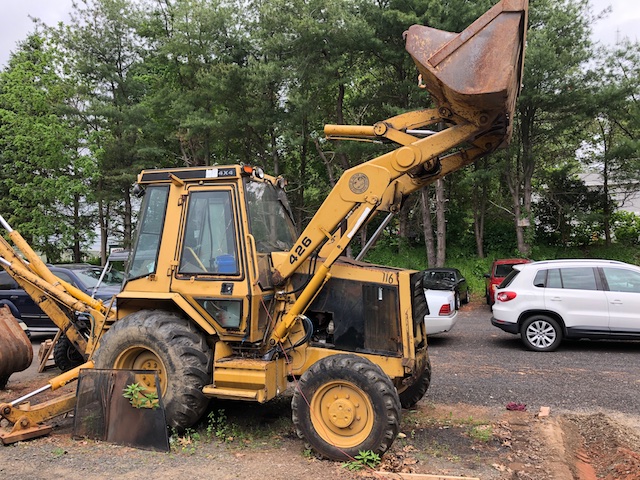
IMG-1126.jpg

IMG-1125.jpg
 

edgephoto

Senior Member
Joined
Aug 13, 2019
Messages
733
Location
Stafford, CT
Today I tackled the uel feed issue. When I bought it the guy selling the machine had a hose stuck in the filler neck acting as the fuel pickup. Machine ran fine this way. So today I decided to find out what he lean't by "a bad fuel line".

I removed the tank to diagnose what was wrong. The issue seems to be that the pickup tube in the tank was clogged. I am sure it was clogged with rust or debris. I poked it out with a wire and blew it clear. The fuel I siphoned out of the tank was clear but if you look in with a flashlight there is rust in the tank.

I am going to bring my borescope next time I go to work on her and look in the tank and see what the pick up looks like.

I will try to flush out whatever I can by draining the tank and filling it a few times.

I know it has a fuel filter but I am thinking maybe a screen to catch and rust particles. Do you guys think it would be wise to add a fuel filter screen inline to catch any possible debris?
 

edgephoto

Senior Member
Joined
Aug 13, 2019
Messages
733
Location
Stafford, CT
Well I did not get much work done during the summer. It was just too damn hot for me to work in the sun. I am under no pressure to get this finished and up to my land. I am hoping to have her ready to go by spring after the mud starts to dry.

I did remove the battery box and I brought it home to work on it. It was a bit worse than I thought. The bottom was smashed and of course rusty as are most battery boxes. The lower step was really bent where it mounts, the cover and top step were missing. New from Caterpillar this would have cost me $1200-1300. Not worth it when I could fabricate something. I cut the bottom half off and made a new bottom half. I straightened the lower step and I made a new top step and cover. It cme out great and I fitted it back on today. She came to life again and I was happy.

IMG-1440.jpg

IMG-1438.jpg


Next project is to remove the seat and seat mechanism. I will clean them up and get everything working nice and smooth. My wife will make a new cover. Seats are darn expensive. I have to fix the seat mounting. It is all wobbly and the previous owner rigged it up. I know the floor is rusty and I probably need to replace some of it. I assume the cross member where the seat frame bolts is also rotted. Soon I will know.
 

aighead

Senior Member
Joined
Apr 25, 2019
Messages
2,567
Location
Dayton, OH
Looks good @edgephoto I would have loved to save a bunch of money on mine and found one older but I don't have the time or knowledge to do what you are doing. Well done! I also wish I had 15 acres of land!
 

edgephoto

Senior Member
Joined
Aug 13, 2019
Messages
733
Location
Stafford, CT
@Nige Thanks!! My plan is to try and have a machine that can serve me well without breaking down every time I use it.

Wish I could find a couple of doors for it. If not, I might bring them home and see if I can patch them. Doesn't have to win a show just be functional.
 

edgephoto

Senior Member
Joined
Aug 13, 2019
Messages
733
Location
Stafford, CT
Finally started get back to work on my machine. I basically did not work on her from Thanksgiving until a couple weeks ago. Vacation weather below 35 degrees and then surgery on both hands kept my sidelined. I am now working on rust repairs. Removed the old floor panels and stripped the interior enough to be able to wire brush, grind and weld. I plan to start the repair process tomorrow. I hope to get the welding done so I can treat and paint the rust in the next week or two. Wish me luck.

IMG_1996.jpeg IMG_1999.jpeg IMG_1992.jpeg IMG_1996.jpeg IMG_1999.jpeg IMG_1992.jpeg
 

aighead

Senior Member
Joined
Apr 25, 2019
Messages
2,567
Location
Dayton, OH
Ah the ol' air welding! I'm kidding but it looks like you have to weld stuff to weld stuff to weld stuff! I haven't pulled up my floor board because I'm scared to see this...
 

edgephoto

Senior Member
Joined
Aug 13, 2019
Messages
733
Location
Stafford, CT
I will know more today but my initial inspection/diagnosis is that all the floor metal is scrap. Will cut out new pieces of 1/8" sheet for this purpose.

The large crossmember is solid and should be ok with some descaling and rust treatment. The small front crossmember is in need of a new top piece at least. The mounting points for the floor to screw down need to be figured out and welded.

The fixed portions of the floor and the bottom 1-2" of the fenders need to be replaced with new metal. Again not too hard to fabricate.

I bought this machine knowing I would find this. It is not a surprise. It is one of the reasons I got it for one third of market rate. I don't mind work. Prefer to have a machine I know and has all the maintenance, preventive maintenance and repairs done. I am one of those people that likes everything to work and be in decent shape. I figure when all is said and done I will have about 2/3 of the market rate into this one and it will have all new hoses, repacked/repaired cylinders and everything will work. It will serve me for many years.
 

boone

Senior Member
Joined
Aug 25, 2009
Messages
1,047
Location
AL
Glad you're back at and good to see her getting some TLC. Should be pretty straight forward, just work as you say...nothing wrong with that. I totally expected to see that under mine as it was an outdoor machine with 10lbs of mud underneath the mat. Given another 10 years it probably would have. I took all the pans out and repainted the floor. You'll have a good machine.

Your shifter boot is in the same shape as mine. I need to replace that as well.
 

aighead

Senior Member
Joined
Apr 25, 2019
Messages
2,567
Location
Dayton, OH
I'm envious of you guys that can do that. I'm lazyish, a procrastinator, and fairly ignorant in the world of mechanicing and fab work, which often means I'll go look at something that needs work, get intimidated and go back and sit on the couch or work on something else. I know if I do things I learn and get better but it's still a very real struggle for me.
 

boone

Senior Member
Joined
Aug 25, 2009
Messages
1,047
Location
AL
aighead. nothing to it but to get to it! Half the battle for me is motivation and time. It helps to have a project in mind where you need the machine. Having a thread about it helps some too.
 

edgephoto

Senior Member
Joined
Aug 13, 2019
Messages
733
Location
Stafford, CT
Boone is right. This forum is a good motivator. I need my machine to start getting my land ready to build a house.

My biggest issue is my machine is about 45-50 minutes away at my brother's auto shop. I don't have room at this house to put it.

Did 4 or 5 hours of work today. Took measurements so I can fab some stuff at home. Got a bunch of rust scale removed and found out what needs to be cut out and replaced. I hope to get some time next week to work on it.
 

Coaldust

Senior Member
Joined
May 9, 2011
Messages
3,354
Location
North of the 60
Occupation
Cargo Tanks, ULSD, RUG, Methanol, LPG
That’s awesome, bringing that beast back to life. Thanks for the updates.
 

edgephoto

Senior Member
Joined
Aug 13, 2019
Messages
733
Location
Stafford, CT
I have been working on my machine. I removed most of the rusted floor and chipped away the heavy scale. I was able to get the rusted seat base bolts removed. I was shocked when I was able to spin them out with nothing more than pounding on a socket.

I have rebuilt the original suspension seat. I found new seat tracks that I was able to make work. My wife sewed new seat covers and I added a little padding to the original cushions. All in all I have under $400 into the seat. I cut off the rotted part of the seat base and fabricated new pieces.

The loader bracket mounting plate was rotted pretty bad. A new brakes from Cat is $300. An hour or so and about $3 in steel I fixed it and it will do the job.

Next I need to cut the steel plates to size and drill the holes for the floor panels. I am hoping to go next week and cut all the rotted stuff out and start welding in the replacement sections.

I will post some pictures shortly.
 

edgephoto

Senior Member
Joined
Aug 13, 2019
Messages
733
Location
Stafford, CT
Been working on and off all summer on my 426. It has been so hot and humid that I did not get much done but I am making progress.

Back in the spring I took the seat apart. My wife recovered it and sewed new covers from some heavy cloth she had in her stockpile. I cleaned everything and installed new tracks. The old ones were shot. I rebuilt the seat pedestal. The bottom half was rotted away.
 

Attachments

  • IMG_2071.JPG
    IMG_2071.JPG
    3.1 MB · Views: 47
  • IMG_2072.JPG
    IMG_2072.JPG
    3.1 MB · Views: 42

edgephoto

Senior Member
Joined
Aug 13, 2019
Messages
733
Location
Stafford, CT
I have gutted the cabin and removed all the rotted floor panels, cut out a rotted crossmember, cut back the rotted inner fenders and some sections of the cab frame. Today I started welding in new metal in the frame. I hope to over the next couple weeks get the welding done, rust cleaned up and painted. I will inject cavity wax into the frame sections to slow/stop rust. Then I can repair the floor and inner fenders.

I had a buddy help me today and he asked why I was "restoring" it and not making it "good enough". He is one of those guys that rigs things together and makes stuff good enough. I am one who like stuff to work, and be in proper order. I told him I am not restoring it, I am repairing it. I want to stop the rust or at least slow it down so I can get years of service out of her.

Here are some pictures once I stripped the interior and cut out the rot.
 

Attachments

  • IMG_2097.JPG
    IMG_2097.JPG
    2.9 MB · Views: 82
  • IMG_2100.JPG
    IMG_2100.JPG
    3.5 MB · Views: 77
  • IMG_2107.JPG
    IMG_2107.JPG
    3.1 MB · Views: 76
Top